Blog

  • valval

    Valval

    Valval is the fastest web framework in V language.

    This means you can develop a website quickly and run it even faster!

    A simple demo:

    import valval
    
    fn hello(req valval.Request) valval.Response {
    	return valval.response_ok('hello world')
    }
    
    fn main() {
    	mut app := valval.new_app(true)
    	app.route("https://github.com/", hello)
    	valval.runserver(app, 8012)
    }

    Installation

    Using Git

    $ git clone https://github.com/taojy123/valval
    $ mkdir -p ~/.vmodules
    $ ln -s $(pwd)/valval ~/.vmodules/valval 
    

    Using VPM

    Watchmen123456 has registered the module with vpm.
    Simply use the following if you have v on your PATH variable:

    $ v install watchmen123456.valval

    Note: If you use vpm; you’ll have to change the import to:

    import watchmen123456.valval
    

    Quickstart

    A Minimal Application

    A minimal Valval application looks something like this:

    // demo.v
    
    module main
    
    import valval
    
    fn hello(req valval.Request) valval.Response {
    	return valval.response_ok('hello world')
    }
    
    fn main() {
    	mut app := valval.new_app(true)
    	app.route("https://github.com/", hello)
    	valval.runserver(app, 8012)
    }

    Run server

    $ v run demo.v
    

    Then you can visit http://127.0.0.1:8012/ to see the website

    $ curl http://127.0.0.1:8012/
    hello world
    

    Debug Mode

    You can decide whether to use debug mode when calling valval.new_app()

    mut app := valval.new_app(true)  // debug mode
    mut app := valval.new_app(false) // production mode

    debug mode will print out more infomation while app running

    Service Port

    You can decide the service port number when calling the valval.runserver()

    valval.runserver(app, 8012)  // listening 8012 port
    valval.runserver(app, 80)    // listening 80 port

    The valval server will bind 0.0.0.0 address, so you can visit the website by 127.0.0.1:Port or ServerIp:Port

    Routing

    Use the App.route() function to band a handler function to request path

    The handler function should have a parameter of type Request and return a Response

    mut app := valval.new_app(true)
    
    app.route("https://github.com/", hello)   		         // http://127.0.0.1
    
    app.route('/users', function1)        // http://127.0.0.1/users
    app.route('/user/info', function2)    // http://127.0.0.1/user/info
    
    app.route('POST:/book', function3)  // http://127.0.0.1/book by POST
    app.route('DELETE:/book', function4)    // http://127.0.0.1/book by DELETE
    app.route('/book', function5)         // http://127.0.0.1/book by other methods
    
    app.route('*', function6)   		     // all remain
    
    valval.runserver(app, 80)

    Accessing Request Data

    Currently, only the following data can be parsed:

    • query parameters by GET request; by valval.Request.query[xxx]
    • x-www-form-urlencoded parameters by POST / PUT / PATCH request; by valval.Request.form[xxx]

    fn hello(req valval.Request) valval.Response {
    	mut name = request.query['name']
    	if name == '' {
    		name = 'world'
    	}
    	return valval.response_ok('hello $name')
    }
    
    fn post_hello(req valval.Request) valval.Response {
    	mut name = request.form['name']
    	if name == '' {
    		name = 'world'
    	}
    	return valval.response_ok('hello $name')
    }
    
    app.route('GET:/hello', hello)
    app.route('POST:/hello', post_hello)

    valval.Request.get() provides a quick way to get data whether it is from query or form.

    fn hello(req valval.Request) valval.Response {
    	name = request.get('name', 'world')  // default: 'world'
    	return valval.response_ok('hello $name')
    }
    
    app.route('/hello', hello)

    More types of request data will be supported in the future:

    • parameters in url
    • multipart/form-data by POST request
    • application/json by POST request
    • uploaded files

    Static Files

    Use valval.App.serve_static to serve local files

    mut app := valval.new_app(true)
    
    app.serve_static('/static/', './relative/path/to/static/')  
    // visit http://127.0.0.1/static/xxx.js ...
    
    app.serve_static('/static2/', '/absolute/path/to/static2/') 
    // visit http://127.0.0.1/static2/yyy.css ...
    
    valval.runserver(app, 80)

    Rendering Templates

    Valval used a whole new idea to implement the template function; inspired by Vue’s system.

    Has the following advantages:

    • You don’t need to spend time learning how to use templates, if you have used Vue before.
    • If you haven’t used Vue, you also can learn it fast, because it’s so easy.
    • It can integrate some commonly used UI frameworks, such as: element, mint, vant, antd, bootstrap
    • I don’t need to spend time developing built-in templates 😁.

    An example for template:

    server.v:

    import valval
    import json
    
    struct User {
    	name string
    	age int
    	sex bool
    }
    
    fn users(req valval.Request) valval.Response {
    
    	// create a view by template file (`test6.html` can be a relative or absolute path)
    	// use `element` (https://github.com/ElemeFE/element) as ui framework
    	mut view := valval.new_view(req, 'users.html', 'element') or {
    		return valval.response_bad(err)
    	}
    
    	users := [
    		User{'Lucy', 13, false},
    		User{'Lily', 13, false},
    		User{'Jim', 12, true},
    	]
    	msg := 'This is a page of three user'
    
    	// use view.set to bind data for rendering template
    	// the second parameter must be a json string
    	view.set('users', json.encode(users))
    	view.set('msg', json.encode(msg))
    
    	return valval.response_view(view)
    }

    users.html:

    fn test1(req valval.Request) valval.Response {
    	name = req.get('name', '')
    	if name == '' {
    		return valval.response_redirect('/not_found')
    	}
    	return valval.response_ok('hello $name')
    }

    Responses

    In addition to the responses mentioned above (response_ok, response_view, response_redirect)

    Valval also provides other response types, as follows:

    struct User {
    	name string
    	age int
    	sex bool
    }
    
    fn text(req valval.Request) valval.Response {
    	return valval.response_text('this is plain text response')
    }
    
    fn json(req valval.Request) valval.Response {
    	user = User{'Tom', 12, true}
    	return valval.response_json(user)
    	// -> {"name": "Tom", "age": 12, "sex": true}
    }
    
    fn json_str(req valval.Request) valval.Response {
    	user = User{'Tom', 12, true}
    	user_str = json.encode(user)
    	return valval.response_json_str(user_str)
    	// -> {"name": "Tom", "age": 12, "sex": true}
    }
    
    fn file(req valval.Request) valval.Response {
    	return valval.response_file('path/to/local/file')
    }
    
    fn bad(req valval.Request) valval.Response {
    	return valval.response_bad('Parameter error!')
    	// response with statu code 400
    }
    

    Complete Example

    Install V Language

    Valval framework currently supports the V language version is 0.1.24

    Here are some ways to install V:

    1. Download a prebuilt V package

    Visit official home page https://vlang.io/ to download

    2. Run V in docker [recommand]

    docker run -it -p 8012:8012 --name vlang taojy123/vlang bash
    

    It includes OpenSSL

    3. Install V from source

    $ git clone https://github.com/vlang/v
    $ cd v
    $ make
    

    Install OpenSSL

    macOS:
    $ brew install openssl
    
    Debian/Ubuntu:
    $ sudo apt install libssl-dev openssl ca-certificates
    

    Windows (Win10 Verified):
    Source can be downloaded from:

    You can find a Graphic installer if that’s more to you’re liking.

    Visit original content creator repository
    https://github.com/valvalio/valval

  • database_CRUD_operations_console

    Database CRUD Operations Console

    Table of Contents

    Installation

    To get started with the Examples and code examples, follow these steps:

    1. Clone the repository:
      git clone

    2. Install Poetry:
      curl -sSL https://install.python-poetry.org | python3 –

    3. Install the project dependencies:
      poetry install

    4. Set up the database configuration:

    • Modify the config.ini file with your database credentials.
    • Ensure that the required database is set up and accessible.
    1. Run the code examples and Examples using Poetry:
      poetry run python script_name.py

    Example

    Example 1: Database Migrations with Alembic

    Learn how to manage database migrations using Alembic, a powerful database migration tool for SQLAlchemy. Understand the process of synchronizing the database schema with your application code as it evolves over time.

    Example Highlights:

    • Setting up Alembic configuration
    • Creating and running migrations
    • Handling offline and online migrations

    Example 2: CRUD Operations

    Master the basic CRUD operations (Create, Read, Update, Delete) in SQLAlchemy. Explore different techniques for creating, reading, updating, and deleting records from a database using SQLAlchemy’s powerful ORM capabilities.

    Example Highlights:

    • Creating records
    • Retrieving records
    • Updating records
    • Deleting records

    Example 3: Seeding Sample Data

    Learn how to seed your database with sample data using Faker, a Python library for generating fake data. Discover techniques for populating your database with realistic test data to facilitate development and testing.

    Example Highlights:

    • Generating fake data with Faker
    • Seeding records for teachers, students, subjects, grades, and groups

    Example 4: CLI for Database Operations

    Build a command-line interface (CLI) tool to perform database operations. Create a user-friendly interface that allows users to execute CRUD operations on the database using command-line arguments.

    Example Highlights:

    • Parsing command-line arguments with argparse
    • Implementing create, read, update, and delete functionality
    • Handling exceptions and error messages

    Example 5: Advanced Database Queries

    Explore advanced database query techniques using SQLAlchemy. Learn how to perform complex queries to retrieve specific information from the database, such as aggregations, filtering, sorting, and joining multiple tables.

    Example Highlights:

    • Aggregating data and calculating averages
    • Filtering and sorting results
    • Joining tables and retrieving related data
    • Executing complex queries

    Contributing

    Contributions to this repository are welcome! If you have any improvements, bug fixes, or additional Examples/code examples to share, feel free to submit a pull request or open an issue. Let’s learn and grow together!

    License

    This project is licensed under the MIT License.

    Visit original content creator repository
    https://github.com/remmover/database_CRUD_operations_console

  • Synology-Homebrew

    Synology-Homebrew

    License: MIT PRs Welcome Last Commit Platform: DSM 7.2+ macOS Supported Arch: ARM64 & x86_64


    🚀 Overview

    Welcome to Synology-Homebrew – the easiest and safest way to get Homebrew running on your Synology NAS or macOS device.

    This installer:

    • Ensures Homebrew is correctly mounted on DSM 7.2+
    • Avoids overwriting or deleting existing Synology packages
    • Comes with a full uninstall option
    • Mirrors your terminal setup on macOS (Intel & Apple Silicon)

    📦 Whether you’re setting up Neovim, configuring plugins with config.yaml, or building a powerful shell with zsh and oh-my-zsh, this repo helps you do it cleanly and consistently.


    💡 Why Homebrew on Synology or macOS?

    Homebrew, the package manager for macOS and Linux, unlocks a vast ecosystem of open-source tools. On Synology NAS, this means:

    • Installing modern CLI tools without waiting for package updates
    • Using advanced dev environments on low-power NAS devices
    • Sharing dotfiles/config across macOS & NAS seamlessly

    🔧 Key Features

    • Installation Modes: Minimal or Advanced setups based on your needs.
    • Synology Integration: Coexists with Synology packages without removing or breaking system services.
    • Cross-Platform: Use the same config on Synology NAS, Intel Macs, and Apple Silicon.
    • Safe Uninstall: Revert your system to its original state using the provided script.
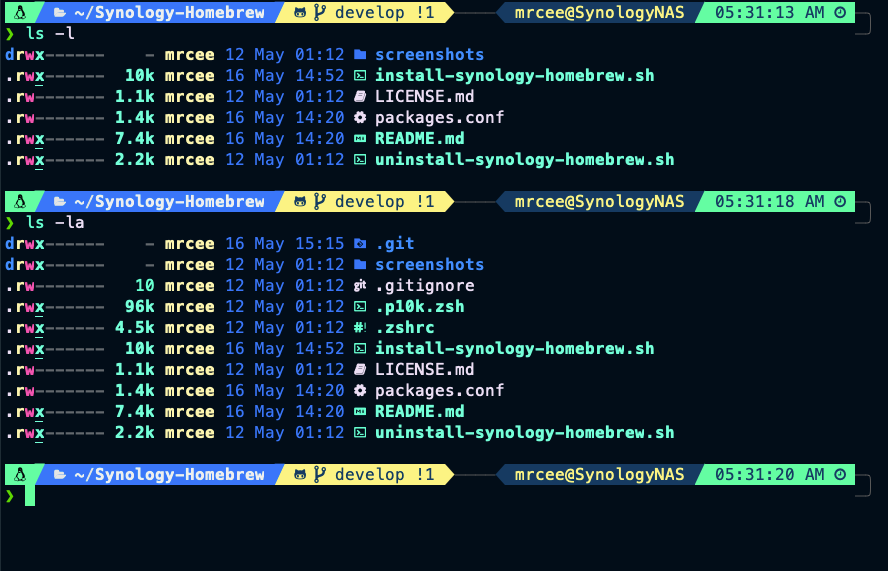
    • Zsh & Theme Setup: Comes with oh-my-zsh, powerlevel10k, and aliases for a powerful terminal experience.
    • Neovim Ready: Optional full Neovim configuration via kickstart.nvim or your custom dotfiles.

    🛡️ Security & Trust

    This script is designed with safety in mind:

    • No hidden network calls to unknown sources.
    • Does not capture credentials or sudo passwords.
    • Respects your Synology environment – does not remove or conflict with built-in packages.
    • Full uninstall script included for rollback.
    • All code is open-source and auditable. Submit issues or PRs to improve security.

    ⚙️ Installation Guide

    🚀 Quick Start (Synology NAS)

    1. SSH into your Synology NAS (DSM 7.2 or newer).
    2. Run the following command to clone the repo and launch the installer:
    git clone https://github.com/MrCee/Synology-Homebrew.git ~/Synology-Homebrew && \
    ~/Synology-Homebrew/install-synology-homebrew.sh
    1. Choose your install type when prompted:

    🧼 Option 1: Minimal Install (Clean & Lightweight)

    • Installs Homebrew and core dependencies only
    • Ignores all additional packages in config.yaml
    • Use this for a bare setup or as a base to build on later

    You can rerun the installer at any time to switch to Advanced mode or uninstall.


    ⚡ Option 2: Advanced Install (Fully Loaded)

    • Installs everything defined in config.yaml
    • Includes Neovim, CLI tools, shell enhancements, aliases, plugins, and themes
    • Recommended for a full developer-ready setup

    📦 Packages Always Installed

    Regardless of install type, the following essential packages are always included to support Homebrew functionality on Synology:

    • git, ruby, glibc, gcc, python3, yq, zsh, oh-my-zsh

    📋 Prerequisites & Preflight

    🧾 Synology NAS Requirements

    Make sure the following are configured:

    • ✅ Synology NAS with DSM 7.2 or later
    • SSH access enabled (Control Panel > Terminal & SNMP > Enable SSH service)
    • User home directories enabled (Control Panel > User > Advanced > Enable user home service)
    • ✅ Set up scheduled task (see below) to remount Homebrew after reboot

    📥 Install Git via CLI (if needed)

    If Git is not already installed, run this command to install a minimal version. This will later be replaced by Homebrew’s Git:

    curl -sSL https://raw.githubusercontent.com/MrCee/Synology-Git/refs/heads/main/install-synology-git.sh | bash

    💻 macOS Terminal Environment (Optional but Recommended)

    For macOS users planning to sync terminal config with Synology:

    • Use iTerm2 instead of the default Terminal.app
    • Install a Nerd Font (e.g., nerdfonts.com)
    • Configure a color profile (e.g. coolnight.itermcolors)

    Check the iTerm2 Configuration Guide for setup instructions.


    🔁 Persist Homebrew After Reboot (Synology)

    To automatically mount the Homebrew directory after a NAS reboot:

    1. Go to Control Panel > Task Scheduler
    2. Click Create > Triggered Task > User-defined Script
    3. Configure as follows:

    1st Tab (General)

    • Task Name: Homebrew Boot
    • User: root
    • Event: Boot-up
    • Enabled: ✅

    2nd Tab (Script)

    Paste this into the User-defined script box:

    #!/bin/bash
    
    # Ensure /home exists
    [[ ! -d /home ]] && sudo mkdir /home
    
    # Only mount if it's not already a mountpoint
    if ! grep -qs ' /home ' /proc/mounts; then
      sudo mount -o bind "$(readlink -f /var/services/homes)" /home
    fi
    
    # Permission fixes
    sudo chown root:root /home
    sudo chmod 775 /home
    
    if [[ -d /home/linuxbrew ]]; then
      sudo chown root:root /home/linuxbrew
      sudo chmod 775 /home/linuxbrew
    fi

    🛠️ Configure Packages with config.yaml

    If you chose Advanced Install, your setup is driven by a YAML configuration file.

    This file lets you define exactly what packages, plugins, themes, and aliases to install. It’s fully customizable — just edit the actions or add your own!


    📂 File Location

    After cloning this repo, you’ll find the config file at:

    ~/Synology-Homebrew/config.yaml

    Open it in your favorite editor:

    nvim ~/Synology-Homebrew/config.yaml
    # or
    nano ~/Synology-Homebrew/config.yaml

    ⚙️ Available Actions

    Each item (package, plugin, etc.) supports three actions:

    • install: install it
    • uninstall: remove it (if installed)
    • skip: ignore it (leave it as-is)

    📦 Example: Packages Section

    packages:
      neovim:
        action: install
        aliases:
          vim: "nvim"
        eval: []
      bat:
        action: install
        aliases:
          cat: "bat --paging=never"
        eval: []
      eza:
        action: install
        aliases:
          ls: "eza --color=always --group-directories-first --icons"
          ll: "eza -la --icons --octal-permissions --group-directories-first --icons"
          l: "eza -bGF --header --git --color=always --group-directories-first --icons"
          llm: "eza -lbGd --header --git --sort=modified --color=always --group-directories-first --icons"
          la: "eza --long --all --group --group-directories-first"
          lx: "eza -lbhHigUmuSa@ --time-style=long-iso --git --color-scale --color=always --group-directories-first --icons"
          lS: "eza -1 --color=always --group-directories-first --icons"
          lt: "eza --tree --level=2 --color=always --group-directories-first --icons"
          l.: "eza -a | grep -E '^\\.'"
        eval: []
      zoxide:
        action: install
        aliases:
          cd: "z"
        eval:
          - "zoxide init zsh"

    🎨 Example: Plugins Section

    plugins:
      powerlevel10k:
        action: install
        url: "https://github.com/romkatv/powerlevel10k"
        directory: "~/.oh-my-zsh/custom/themes/powerlevel10k"
        aliases: []
        eval: []
      kickstart.nvim:
        action: install
        url: "https://github.com/nvim-lua/kickstart.nvim"
        directory: "~/.config/nvim-kickstart"
        aliases:
          nvim: 'NVIM_APPNAME="nvim-kickstart" nvim'
        eval: []

    🧠 Pro Tips

    • Use aliases to override default commands (e.g. ls → eza)
    • Use eval to inject shell behavior after installing a package
    • Skip unused packages instead of deleting them — easier to toggle later
    • You can comment out any section using #

    🔄 Applying Changes

    You can re-run the installer any time:

    ~/Synology-Homebrew/install-synology-homebrew.sh

    It will re-read your updated config.yaml and apply the new actions.


    📦 Installed Packages (Advanced View)

    These are the packages installed when using the Advanced Install option in config.yaml.

    📦 Click to view full list of installed packages (Advanced Install)
    Package Description Dependency
    brew Homebrew – The Missing Package Manager now for macOS & Linux. Essential for: Synology-Homebrew
    git Latest version replaces Synology Package Centre version. Essential for: Synology-Homebrew
    ruby Latest version replaces Synology Package Centre version. Essential for: Synology-Homebrew
    zsh UNIX shell (command interpreter). Essential for: Synology-Homebrew
    python3 / pip3 Latest version installed. Essential for: Synology-Homebrew
    glibc The GNU C Library – Core libraries for the GNU system. Essential for: Synology-Homebrew
    gcc GNU compiler collection. Essential for: Synology-Homebrew
    oh-my-zsh Community-driven framework for managing Zsh configuration. Essential for: Synology-Homebrew, zsh
    jq Lightweight and flexible command-line JSON processor. Essential for: Synology-Homebrew
    make Utility for directing compilation. Essential for: neovim plugins
    node JavaScript runtime environment. Essential for: neovim
    neovim Hyperextensible Vim-based text editor. Recommended for: Synology
    powerlevel10k A theme for zsh. Recommended for: oh-my-zsh
    zsh-syntax-highlighting A plugin for zsh. Recommended for: oh-my-zsh
    zsh-autosuggestions A plugin for zsh. Recommended for: oh-my-zsh
    ripgrep Recursive regex directory search tool. Essential for: neovim, telescope, fzf
    fd User-friendly alternative to find. Essential for: neovim, telescope
    fzf A command-line fuzzy finder. Essential for: neovim, telescope
    fzf-git.sh Bash and zsh key bindings for Git objects. Recommended for: neovim, telescope, fzf
    bat A cat clone with syntax highlighting and Git integration. Recommended for: zsh, neovim
    git-delta Syntax highlighting for diffs using Levenshtein algorithm. Recommended for: neovim
    eza A modern replacement for ls. Recommended for: zsh, neovim
    tldr Simplified help pages for command-line tools. Recommended for: neovim
    thefuck Corrects previous console command errors. Recommended for: zsh
    kickstart.nvim A starting point for Neovim. Optional for: neovim
    perl Feature-rich programming language. Essential for: stow
    stow GNU Stow: Manage symlinks for dotfiles. Optional
    zoxide Smarter cd command, inspired by z and autojump. Recommended for: zsh
    lazygit Terminal UI for Git commands. Recommended for: zsh, neovim

    ✨ Neovim Setup

    Neovim (nvim) is fully supported and enhanced out of the box — ready for power users.

    You can choose to run a custom config or use the kickstart.nvim template for a smart default.


    📁 Neovim Config Script

    This repo includes a helper script:

    ~/Synology-Homebrew/nvim_config.sh

    Run it manually to:

    • Enable system clipboard over SSH via OSC52
    • Install Python support for linting and plugins
    • Setup Ruby gem support
    • Add helpful scripts like fzf-git.sh for Git integration
    bash ~/Synology-Homebrew/nvim_config.sh

    🚀 Using Kickstart.nvim (optional template)

    Want a clean, fast Neovim config with everything pre-wired?

    1. In config.yaml, find the plugins: section
    2. Set kickstart.nvim to action: install
    plugins:
      kickstart.nvim:
        action: install
        url: "https://github.com/nvim-lua/kickstart.nvim"
        directory: "~/.config/nvim-kickstart"
        aliases:
          nvim: 'NVIM_APPNAME="nvim-kickstart" nvim'

    🔄 Switching Between Configs

    In your ~/.zshrc, add an alias to switch Neovim configs easily:

    # Kickstart config
    alias nvim="NVIM_APPNAME='nvim-kickstart' nvim"
    
    # Your own config
    alias nvim="NVIM_APPNAME='nvim-mrcee' nvim"

    If no alias is set, Neovim defaults to:

    ~/.config/nvim

    ✅ Final Step: Health Check

    After installation, launch Neovim:

    nvim

    Then, inside Neovim, run:

    :checkhealth
    

    This will check your environment and highlight any missing dependencies, misconfigured plugins, or setup issues.

    💡 If you’ve configured aliases via .zshrc, be sure you’re launching the correct Neovim app profile:

    NVIM_APPNAME="nvim-kickstart" nvim


    🖌️ Customize Your Zsh

    Your shell environment comes preloaded with:

    • zsh + oh-my-zsh
    • The powerlevel10k theme
    • Helpful plugins (e.g. autosuggestions, syntax highlighting)
    • Useful command aliases (like ll, vim → nvim, cat → bat, cd → zoxide, ls → eza)

    Customize further with:

    p10k configure

    This interactive wizard lets you choose your preferred prompt style, icons, spacing, and color themes.

    For a full walkthrough and recommended iTerm2 settings, check the iTerm2 Configuration Guide →


    🧑‍💻 Usage & Contributions

    • Refer to official Homebrew documentation for basic usage
    • To re-run or update your setup:
      ~/Synology-Homebrew/install-synology-homebrew.sh
    • Need help or want to improve the project?
      Submit issues, pull requests, or questions on GitHub

    ⚖️ Disclaimer & License

    This script is provided as-is with no warranties.
    Please review and understand changes before applying them to your system.

    Licensed under the MIT License.


    🙏 Acknowledgements

    Big thanks to the open source projects and creators that made this possible, including:

    • Everyone contributing to brew
    • @ogerardin, @AppleBoiy, @josean-dev, @tjdevries
    • The GitHub & Synology dev communities
    • Everyone contributing ideas, scripts, and support 🎉

    ☕ Support the Project

    If this saved you hours or you just love clean terminal setups:

    Visit original content creator repository https://github.com/MrCee/Synology-Homebrew
  • far_api

    Federal Acquisition Regulation API

    1.0 – Overview

    This project will attempt to convert the FAR into separate database entries, each ontaining HTML text for each of its’ respective sections. This way, regulation information can be pulled whenever required, centrally stored in one secure location, and updated securely as a result.

    2.0 – Possibilities

    The main reason I wanted to create an API for the FAR was to implement a web app that will allow users to search for any number of regulations simultaneously. Acquisition professional must do this everyday anyway, and the way the regulations are currently established online, only one regulation can be viewed at a same time. People have been doing this for years, so I guess this isn’t too big of a problem, but there is room for at least some improvement.

    Having an API for the FAR will allow the web app to automatically detect when a selected reference from the FAR is available in another reference. Viewing regulations side-by-side can greatly help with the day-to-day searching and reading since all verbiage pertaining to the users’ desired subject can now be had quicker in one tab, instead of having to find it in multiple tabs.

    In theory, if the FAR were stored in a database and referenced at ease, the system will be able to tell if a supplemental regulation further implements the FAR. Even if it doesn’t apply, at least the API will allow the user to view the text (HTML) conveniently in front of them regardless. Utilizing proper hyperlinks will allow for faster and easier browsing (see problem below) as well as faster, easier, and more accurate analyzing of the regulations.

    3.0 – Problems With the Current System

    In addition to creating a web app, the current regulations posted on
    acquisition.gov have several problems.

    3.1 – Paragraphs and Lists

    The HTML structure of the FAR is not consistent among each regulation. Here is a table of how each regulation indents their paragraphs:

    REGULATION STYLE
    FAR <span class="ph autonumber">
    DFARS <p class= "p List1">
    <p class="p List3.>
    DFARS PGI <p class="p List1">
    <p class="p List3.>
    AFFARS <p align="left" style="margin-left: 0.3in"...>
    DARS <p style="margin-left: 0.57in">
    <p style="margin-left: 0.89in">
    DLAD <p style="margin-left: 0.3.in;">
    <p style="margin-left: 0.50in;">
    NMCARS <p class="p List1">
    <p class="p List3.>
    SOFARS Uses a combination of <li> and <p>
    TRANSFARS Just uses <p>, no indentations
    AGAR Just uses <p>, no indentations
    AIDAR Just uses <p>, no indentations
    CAR Just uses <p>, no indentations
    DEAR Just uses <p>, headings use <li>
    DIAR <p class="p List1">
    <p class="p List3.>
    DOLAR Just uses <p>, no indentations
    DOSAR Just uses <p>, no indentations
    DTAR Just uses <p>, no indentations
    EDAR Just uses <p>, no indentations
    EPAAR <p class="p List1">
    <p class="p List3.>
    FEHBAR Just uses <p>, no indentations
    GSAM/R <span class="ph autonumber">
    HHSAR Just uses <p>, no indentations
    HSAR <p class="p List1">
    <p class="p List3.>
    HUDAR <p class="p List1">
    <p class="p List3.>
    IAAR Just uses <p>, no indentations
    JAR Just uses <p>, no indentations
    LIFAR Just uses <p>, no indentations
    NFS Just uses <p>, no indentations
    NRCAR Just uses <p>, no indentations
    TAR Just uses <p>, no indentations
    VAAR <p class="indenta">
    <p class="indenti">
    <p class="indent1">

    As you can see, the vast majority of the regulations don’t even have indents. Those that do never have their text line up with the indent itself and end up trail well past the indentation, which defeats the purpose of showing a list.

    If all the regulation had the same formatting and structure, perusing their contents will easier and more efficient. The current version of the FAR isn’t unreadable, but it could use some improvements.

    3.3.- Hyperlinks with Arbitrary Names

    Scoring through the HTML code, you can find numerous examples of hyperlink ID’s that make no sense at all. Take HHSAR part 317: the contents of this has almost not a single id that makes logical sense. For example, what exactly is P8_300 supposed to mean in a section that direcetly preceeds P18_1718?

    Each section should have a hyperlink of course, but how about a more generalized format such as the actual reference of the text in the regulation? P8_300 is the hyperlink ID for HHSAR 317.105-1. What if it was called 0317_105_1 so that we can parse this ID and easily get the part, section, and subsection? Having links like this in a more standardized format will allow setting up the webpage so much easier and more convenient. A solid foundation eases future edits.

    3.3 – Separate HTML Files for Every Subsection

    I believe that each subsection for every regulation deserves to be it’s own object in some sort of database to be pulled or edited at will. However, each of these subsections absolutely does not need to be their own HTML file.

    Individuals in the acquisition field are not trained to read just the specific verbiage of text that relates to their requirement: they are taught to ‘zoom-out’ to the prescription of said text, then to ‘zoom-out’ even further to see if it still applies. This ‘zooming-out’ is crucial to ensuring any and all text applies to the issues at hand, and having one HTML file per subsection is inefficient, unnecessary, and wasteful of space.

    The good news is, much of the regulations are already strcutured this way. This problem isn’t too big among the supplements, but when it gets to the DFARS, all the text pertaining to each section and subsection brings users to individual links for not only each text, but the Table of Contents for each section. Above all, this is annoying since ‘zooming-out’ entitles you to hit the back button about four or five times before you actually get to where you need to reference.

    If every part of every regulation were just one HTML file, searching through contents will be so much easier. Once users find the paragraph they require, they simple just scroll up to read the prescription, scroll-up even more to read more prescriptions, and finally scroll to the top to insure everything complies. Again, this feature does exist but there are still separate HTML files lurking through the website waiting to catch users in a sticky web of inefficiency.

    In conclusion, having separate HTML files for each subsection:

    • makes it harder to manage code, since there would need to be a # in links to distinguish separate files
    • increases file bloat and system capacity
    • makes the users’ jobs harder by spending more energy trying to find prescriptions
    • is completely unnecessary

    Why mention this with the API? The database will store the HTML for each subsection and generating the one HTML file for the regulation’s part will just be a matter of combining all the appropriate objects together. This may even be how it is managed…

    3.4 – Mobile Versions an Unneeded Luxury

    The current system uses a DITA system to manage their content which seems perfect for this but in all honesty, a mobile version of the FAR is just not warranted. Users who routinely seach trough the FAR don’t use it on mobile devices, but on computers. This may seem counterintuitive to today’s society, but a mobile version is just not required for the vast majority of acquisitions professionals.

    But in either case, a FAR API will be able to send information to any device which will reduce the need to have multiple formats for the same publication.

    4.0 – Complications with an API

    This project will not be without its problems. There are of course many things that could go wrong with this approach, which will be explained below for transparency.

    4.1 – It won’t be Searchable

    Part of why having the FAR is valuable in HTML is that google can do its thing and search for exactly where a regulation is required. This puts acquisition.gov above the rest, as their layouts are very clean and obviously well taken care-of. Besides from both of the problems above, I don’t see any other website taking the reigns off of them to house the FAR.

    This supposed web app may be very useful and convenient, but it will lack the searching power of having these regs in HTML. This alone almost begs the question as to why even build this thing if you can’t search in it? Maybe there is a way to integrate searching in this, which would make this even greater, but that’s another project within this project.

    So with all this said, this web app will primarily be a nice tool to supplement the FAR – meant for people who already know where to look for a specific reference and needing to see whether this reference is referenced in any number of regulations. Limited capablities, but convenient.

    4.3.- Text Will Still Need to be Manually Updated

    Either way, the FAR will need to be updated to reflect the many changes that update on a normal basis. This means that there will probably be more work involved with managing an API along with the text itself. Perhaps the DITA packages currently in use are perfect for the job already.

    4.3 – Potentially Costly

    Having an API with constant data calls could potentially be more costly than just having HTML sitting on a website. The traditional website design that isn’t like a web app is tried and true and more than likely isn’t generating heavy costs. An AWS account that gets charged by the click could rack up many expenses.

    4.4 – Lack of Other Users

    This goes with 4.3 above, but if the sole purpose of this API is to provide a more dynamic FAR, then it may not be as useful as we can imagine. What would be great is if there were many sources of information pulling the API to get text. Perhaps the contracting systems can pull this information to apply clauses, but there is no guarantee that this will even be a possibility among them.

    Visit original content creator repository
    https://github.com/smatsushima1/far_api

  • Model-Viewer

    Visit original content creator repository
    https://github.com/DinPX/Model-Viewer

  • sveltejs-documentation-zh-CN

    Svelte简介

    前言

    前几天在刷github趋势榜,意外的发现了这个开源项目,通过阅读文档与相关资讯了解到Svelte的用法,好处以及缺陷,并对其思想深深的吸引,虽然框架存在诸多不足,生态圈也不算完善,但是我个人认为,这不失为一种web组件化方向的探索。在寻找资料的过程中,我发现Svelte几乎没有什么中文相关资料和中文文档,于是我决定先将其文档翻译成中文,这样能让更多的人了解到Svelte框架。大家也可以一起为它添砖加瓦。

    相关资料也会长期更新。

    以下是翻译的内容。如果你有什么好的想法,或者翻译中存在什么错误,欢迎提iusse指正,非常感谢。

    什么是Svelte

    如果您曾经构建过JavaScript应用程序,你或多或少使用过React,Angular,Vue和Ractive。与Svelte很像,这些工具都有一个目标,就是可以轻松的构建交互式用户界面。

    但Svelte有一个关键的区别:你的应用程序会在打包构建时(build)被转化成原生的可执行的javascript代码,且不需要一个运行时(runtime)来解释你的应用程序代码。这意味着你无需负担由于框架抽象或者在你的应用首次加载时产生的性能损耗。

    并且,由于没有额外的使用成本,你可以轻松地在现有的程序中逐渐采用Svelte,或者将小部件作为独立的组件使用到任何的地方。

    阅读介绍性博客文章,了解更多关于Svelte的目标和哲学。

    中文介绍

    认识与理解svelte组件

    在Svelte中,应用程序由一个或多个组件组成。组件是封装了标签的,样式,与行为的可复用的自包含代的码块。(很像.vue文件)。

    像Ractive和Vue一样,Svelte也崇尚单文件组件的概念:组件只是一个.html文件。下面是一个简单的例子:

    <!-- App.html --> <h1>Hello {{name}}!</h1>

    Svelte会把它转换为可以一个可直接被引入到你的应用程序中的JavaScript模块:

    // main.js
    import App from './App.html';
    
    const app = new App({
      target: document.querySelector( 'main' ),
      data: { name: 'world' }
    });
    
    // 更改与模板相关的数据
    app.set({ name: 'everybody' });
    
    // 卸载组件并做一些清理
    app.destroy();
    

    恭喜你,你刚刚已经了解了一半的SvelteAPI!

    入门

    通常来说,这里会说你需要使用<script>标签把框架引入到你的页面。但是由于Svelte在构建时就已经打包成了可运行的代码,所以它的工作方式会有所不同。

    Svelte的最好的使用方式是将其集成到你的构建系统中,这里有针对RollupBrowserifyGulp等的打包工具,更多资料,请参阅这里获取最新的列表。

    现在,为了演示的目的,我们将使用svelte-cli命令行工具。

    你需要安装node.js并熟悉一些简单的命令行操作

    首先,安装svelte-cli

    npm install -g svelte-cli
    

    然后为项目创建一个文件夹

    mkdir my-svelte-project
    cd my-svelte-project
    

    进入my-svelte-project文件夹,创建一个HelloWorld.html的文件,并且输入如下内容:

    <h1>Hello {{name}}</h1>

    编译它

    svelte compile --format iife HelloWorld.html > HelloWorld.js
    

    --format iife是指生成一个立即调用的函数表达式,这样做可以允许我们使用一个<script>标签来使用这个组件(默认情况下,Svelte被编译成一个JavaScript模块,建议在更高级的应用中使用,但需同时也需要额外的步骤)。

    创建一个index.html页面并且引入刚才生成的代码

    <!doctype html>
    <html>
    <head>
      <title>My first Svelte app</title>
    </head>
    <body>
      <main></main>
      <script src='HelloWorld.js'></script>
      <script>
        var app = new HelloWorld({
          target: document.querySelector( 'main' ),
          data: {
            name: 'world'
          }
        });
      </script>
    </body>
    </html>

    最后,在浏览器里面打开该页面,并在控制台中输入app可以查看更多API。

    组件API

    正如我们上面看到的,你通过new关键字创建了一个组件实例:

    import MyComponent from './MyComponent.html';
    
    const component = new MyComponent({
      // `target` 是唯一的必填字段 – 类似vue中的el配置
      // 用来描述组件将渲染在哪里
      target: document.querySelector( 'main' ),
    
      // `data` 是一个选填字段。一个组件也能有
      // 默认 data – 我们稍后会接触到
      data: {
        questions: [
          'life',
          'the universe',
          'everything'
        ],
        answer: 42
      }
    });

    除了你添加的自定义方法之外,每一个组件实例都提供少量的方法,你能控制这些方法操作组件。

    component.set(data)

    该方法会根据传入的新data值更新组件状态并引起DOM的改变。data必须是一个纯粹的javascript对象。任何没有包含在data之内的属性将会保持和原来一样。

    component.set({
      questions: [
        'why is the sky blue?',
        'how do planes fly?',
        'where do babies come from?'
      ],
      answer: 'ask your mother'
    });

    如果你之前使用过Ractive,这里会与ractive.set(...)非常类似,但是你必须始终使用ractive.set(...)而不能使用ractive.set('foo', 'bar')这种方式,并且你不是直接给对象设置关键字(比如,不能使用ES6中用{‘class’:1}这种)。它也非常类似于ReactsetState,除了svelte会导致同步更新,这意味着DOM总是处于可预测状态。

    component.get(key)

    返回当前key的值

    console.log( component.get( 'answer' ) ); // 'ask your mother'
    

    这也会取出计算属性的值

    component.observe(key, callback[, options])

    此方法允许你响应状态更改,结合生命周期钩子和双向绑定时这将会特别有用

    const observer = component.observe( 'answer', answer => {
      console.log( `the answer is ${answer}` );
    });
    // 会立即出发修改过后的answer
    // -> 'the answer is ask your mother'
    
    component.set({ answer: 'google it' });
    // -> 'the answer is google it'
    
    observer.cancel(); // further changes will be ignored
    

    回调函数有两个参数,当前值和上一个值。(如果是第一次调用第二个参数会是undefined):

    thermometer.observe( 'temperature', ( newValue, oldValue ) => {
      if ( oldValue === undefined ) return;
      console.log( `it's getting ${newValue > oldValue ? 'warmer' : 'colder'}` );
    });

    如果你不希望在首次添加observer时触发回调,你可以设置init:false

    thermometer.observe( 'temperature', ( newValue, oldValue ) => {
      console.log( `it's getting ${newValue > oldValue ? 'warmer' : 'colder'}` );
    }, { init: false });
    

    对于字符串和数值类型的值,只有当值更改的时候才会触发observer的回调。但是由于值可能是一个对象或者数组,而传入的值如果引用与之前是相同的时候Svelte会谨慎处理(因为引用相同没则需要判断内部是否每个值都相同)也就是说,如果你调用component.set({foo: component.get('foo')}),而foo是一个对象或者数组的时候,任何一个fooobserver都将会触发。

    默认情况下,observer会在DOM更新之前被调用,让你有机会执行任何其他更新,而不需要修改DOM。 在某些情况下,你需要在DOM变更之后再触发回调,例如,如果在DOM更新后需要计算元素可以使用defer:true

    function redraw () {
      canvas.width = drawingApp.get( 'width' );
      canvas.height = drawingApp.get( 'height' );
      updateCanvas();
    }
    
    drawingApp.observe( 'width', redraw, { defer: true });
    drawingApp.observe( 'height', redraw, { defer: true });

    如果需要监听嵌套的组件,可以使用refs:

    <Widget ref:widget/>
    <script>
      export default {
        oncreate () {
          this.refs.widget.observe( 'xxx', () => {...});
        }
      };
    </script>

    component.on(eventName, callback)

    允许你响应事件

    const listener = component.on( 'thingHappened', event => {
      console.log( `A thing happened: ${event.thing}` );
    });
    
    // some time later...
    listener.cancel();

    component.fire(eventName, event)

    component.on(...)有关:

    component.fire( 'thingHappened', {
      thing: 'this event was fired'
    });

    乍一看,component.on(...)component.fire(...)不是特别有用,但是当我们了解嵌套组件时,它会变得非常好用。(因为没有类似Vuex的东西组件间通信就靠它了)

    component.on(...)component.observe(...)看起来很相似,但是它们有不同的用途,Observers被用来响应应用的数据流的变化和任何时候持续的变化,然而事件在处理离散的时刻会更好用,比如用户做了一个选择,选择引发了很多变动。

    component.destroy()

    把组件从DOM中移除,同时也会移除所有创建的observers和事件监听,这也会触发一个destory事件。

    component.on( 'destroy', () => {
      alert( 'goodbye!' ); // please don't do this
    });
    
    component.destroy();

    模板语法

    Svelte不重复造轮子,学习Svelte模板只需要在HTMLCSSJavaScript基础上少量的学习一些新知识即可。

    标签

    标签允许你把数据绑定到模板上,无论何时修改数据(比如,在component.set(…)之后),DOM将自动更新。你可以在模板中使用任何JavaScript表达式,并且也会自动地更新:

    <p>{{a}} + {{b}} = {{a + b}}</p>

    你还可以使用标签属性

    <h1 style='color: {{color}};'>{{color}}</h1>

    虽然使用{{}}分隔标签,但Svelte不使用Mustache语法。 标签只是JavaScript表达式。

    Triples(直接输出html)

    普通的分隔标签将会生成存文本,如果你需要将表达式转化成HTML,你可以把他包含在三个{{{,}}}

    <p>This HTML: {{html}}</p>
    <p>Renders as: {{{html}}}</p>

    与普通标签一样,你也可以在其中使用Javascript表达式,并且当数据变化的时候也会自动更新内容

    使用三个花括号的形式将不会对HTML进行转义!如果你想显示用户输入,你有义务先对数据进行转义,否则你可能会遭受不同形式的攻击

    条件渲染

    通过将其包装在if块来控制模板的一部分是否被渲染。

    {{#if user.loggedIn}}
      <a href='/logout'>log out</a>
    {{/if}}
    
    {{#if !user.loggedIn}}
      <a href='/login'>log in</a>
    {{/if}}

    你也可以把上面两个block通过{{else}}合并:

    {{#if user.loggedIn}}
      <a href='/logout'>log out</a>
    {{else}}
      <a href='/login'>log in</a>
    {{/if}}

    你也可以使用{{elseif ...}}:

    {{#if x > 10}}
      <p>{{x}} is greater than 10</p>
    {{elseif 5 > x}}
      <p>{{x}} is less than 5</p>
    {{else}}
      <p>{{x}} is between 5 and 10</p>
    {{/if}}

    列表渲染

    循环数据列表

    <h1>Cats of YouTube</h1>
    
    <ul>
      {{#each cats as cat}}
        <li><a target='_blank' href='{{cat.video}}'>{{cat.name}}</a></li>
      {{/each}}
    </ul>

    你可以使用name,index的方式来访问当前元素的索引

    <div class='grid'>
      {{#each rows as row, y}}
        <div class='row'>
          {{#each columns as column, x}}
            <code class='cell'>
              {{x + 1}},{{y + 1}}:
              <strong>{{row[column]}}</strong>
            </code>
          {{/each}}
        </div>
      {{/each}}
    </div>

    指令

    最后,Svelte模板语法不同于传统HTML的地方在于:指令允许你添加添加事件处理程序,双向绑定,refs(引用)等特殊申明。我们在后面将会逐一介绍,你现在需要知道的是,可以通过:字符的方式来识别指令:

    <p>Count: {{count}}</p>
    <button on:click='set({ count: count + 1 })'>+1</button>

    从技术上来说,:用来表示HTML属性的命名空间,如果遇到的话,将不会被视为指令

    样式作用域

    Svelte的一个重要原则就是组件是独立的,可以在不同的上下文中复用,因此它有一个独特的CSS隔离机制,这样就不会意外的干扰到相同选择器的其他页面了

    添加样式

    你的组件可以有一个<style>标签,像这样:

    <div class='foo'>
      Big red Comic Sans
    </div>
    
    <style>
      .foo {
        color: red;
        font-size: 2em;
        font-family: 'Comic Sans MS';
      }
    </style>

    如何工作的

    打开示例,检查元素以查看发生了什么,你会发现,Svelte已经向元素添加了一个svelte-[uniqueid]属性。并相应地转换了CSS选择器。因为页面上没有其他元素可以共享该选择器,所以页面上class ='foo'的任何其他元素都不会受到我们的样式的影响。

    这比通过Shadow DOM实现相同的效果要简单得多,并且在没有polyfills的地方使用。

    Svelte将会向含有该组件的页面添加一个<style>标签。如果您的网站具有内容安全策略,则动态添加样式可能是不可能的。如果是这样,您可以使用服务器渲染CSS。并在编译时使用css:false选项,或使用CLI的--no-css操作。

    级联规则

    通常的级联机制仍然适用,任何全局的.foo样式仍然可以应用,如果我们的模板具有嵌套的组件与class='foo'元素,它们将继承我们的样式。

    样式隔离不是动态的,组件是一个已经编译好的实例,因此你不能在CSS中使用{{tag}}.

    行为

    除了样式与模板之外,组件还可以封装行为逻辑,为此,我们添加了一个<script>标签元素并导出了一个对象

    <div> <!-- template goes here --> </div> <script> export default { // behaviours go here }; </script>

    默认数据

    通常,组件具有默认数据是有意义的,它将会通过一个函数表达式来返回一个纯粹的JS对象

    <p>Count: {{count}}</p>
    <button on:click='set({ count: count + 1 })'>+1</button>
    
    <script>
      export default {
        data () {
          return {
            count: 0
          };
        }
      };
    </script>

    实例化new Component(...)传入的数据优先级高于默认值

    上面的代码中使用了ES6的语法,Svelte会生成ES5的代码运行在各种平台上,它本身不会将ES6转化成ES5,所以如果你想使用ES6的语法,你需要了你的构建项目中使用Babel

    计算属性

    通常你的程序使用的某个值依赖了其他的某个值,举个例子,您可能有一个过滤的列表,这取决于列表和过滤器。通常在JavaScript中,当任何依赖关系发生变化时,您必须添加逻辑来更新依赖属性。这样是常见的错误来源,随着应用的逐渐扩大,它会变得原来越糟糕。

    Svelte允许您在计算属性中表达这些依赖关系,每当这些依赖关系更改时,它们将重新计算:

    <p>
      The time is
      <strong>{{hours}}:{{minutes}}:{{seconds}}</strong>
    </p>
    
    <script>
      export default {
        data () {
          return {
            time: new Date()
          };
        },
    
        computed: {
          hours: time => time.getHours(),
          minutes: time => time.getMinutes(),
          seconds: time => time.getSeconds()
        }
      };
    </script>

    注意,我们需要告诉Svelte,hoursminutesseconds都依赖time,time会作为参数传入函数中,至于依赖关系追踪的过程会在编译的时候解决

    computed字段必须是一个可迭代的对象,同时属性必须都是函数或者箭头函数表达式

    生命周期钩子

    Svelte提供两个控制逻辑的生命周期钩子oncreateondestory

    <p>
      The time is
      <strong>{{hours}}:{{minutes}}:{{seconds}}</strong>
    </p>
    
    <script>
      export default {
        oncreate () {
          this.interval = setInterval( () => {
            this.set({ time: new Date() });
          }, 1000 );
        },
    
        ondestroy () {
          clearInterval( this.interval );
        },
    
        data () {
          return {
            time: new Date()
          };
        },
    
        computed: {
          hours: time => time.getHours(),
          minutes: time => time.getMinutes(),
          seconds: time => time.getSeconds()
        }
      };
    </script>

    Helpers

    Helpers是一个小巧的函数,可以用于模板,下面的例子中,我们需要确保分钟和秒时刻都是两位的,我们需要自动补0,因此,我们添加了一个名为leftPad的Helper

    <p>
      The time is
      <strong>{{hours}}:{{leftPad(minutes, 2, '0')}}:{{leftPad(seconds, 2, '0')}}</strong>
    </p>
    
    <script>
      import leftPad from 'left-pad';
    
      export default {
        helpers: {
          leftPad
        },
    
        oncreate () {
          this.interval = setInterval( () => {
            this.set({ time: new Date() });
          }, 1000 );
        },
    
        ondestroy () {
          clearInterval( this.interval );
        },
    
        data () {
          return {
            time: new Date()
          };
        },
    
        computed: {
          hours: time => time.getHours(),
          minutes: time => time.getMinutes(),
          seconds: time => time.getSeconds()
        }
      };
    </script>

    当然你也可以在计算属性中使用leftPad,而不是在模板中使用。什么时候你应该使用Helper还是计算属性,这点并没有硬性规定,也没有表示哪一个比较快的规则,你如何做,取决于你的组件怎样容易让下一个开发者更容易理解。

    helper 函数应该是一个纯函数,换句话说就是在使用过程中不应该产生副作用,而他的返回值也仅仅只和传入参数有关。

    自定义方法

    除了内置的方法之外,你还可以使用自定义的方法。

    <script>
      export default {
        methods: {
          say: function ( message ) {
            alert( message ); // again, please don't do this
          }
        }
      };
    </script>

    这些方法将会成为组件API的一部分。

    import MyComponent from './MyComponent.html';
    
    var component = new MyComponent({
      target: document.querySelector( 'main' )
    });
    
    component.say( '👋' );

    任何方法,都能被内部的事件处理函数调用。

    <button on:click='say("hello")'>say hello!</button>

    自定义事件处理

    我们过后会学习事件处理,如果你需要,可以先跳过这里,最后再回过头来看!

    大多数时候,你可以使用标准的DOM事件,但是有时候你可能需要自定义的时间去处理手势之类的操作。

    自定义事件只是将节点和回调作为参数的函数,并返回一个具有destroy方法的对象,当该元素从页面中删除时,该方法被调用:

    <button on:longpress='set({ done: true })'>click and hold</button>
    
    {{#if done}}
      <p>clicked and held</p>
    {{/if}}
    
    <script>
      export default {
        events: {
          longpress ( node, callback ) {
            function onmousedown ( event ) {
              const timeout = setTimeout( () => callback( event ), 1000 );
    
              function cancel () {
                clearTimeout( timeout );
                node.removeEventListener( 'mouseup', cancel, false );
              }
    
              node.addEventListener( 'mouseup', cancel, false );
            }
    
            node.addEventListener( 'mousedown', onmousedown, false );
    
            return {
              destroy () {
                node.removeEventListener( 'mousedown', onmousedown, false );
              }
            };
          }
        }
      };
    </script>

    命名空间

    假设组件在HTML命名空间中,如果你的组件是设计给<svg>元素使用的,则需要指定命名空间。

    App.html

    <svg viewBox='0 0 1000 1000' style='width: 100%; height: 100%;'>
      <SmileyFace x='70' y='280' size='100' fill='#f4d9c7'/>
      <SmileyFace x='800' y='250' size='150' fill='#40250f'/>
      <SmileyFace x='150' y='700' size='110' fill='#d2aa7a'/>
      <SmileyFace x='875' y='730' size='130' fill='#824e2e'/>
      <SmileyFace x='450' y='500' size='240' fill='#d2b198'/>
    </svg>
    
    <script>
      import SmileyFace from './SmileyFace.html';
    
      export default {
        components: { SmileyFace }
      };
    </script>

    SmileyFace.html

    <!-- CC-BY-SA — https://commons.wikimedia.org/wiki/File:718smiley.svg --> <g transform='translate({{x}},{{y}}) scale({{size / 366.5}})'> <circle r="366.5"/> <circle r="336.5" fill="{{fill}}"/> <path d="m-41.5 298.5c-121-21-194-115-212-233v-8l-25-1-1-18h481c6 13 10 27 13 41 13 94-38 146-114 193-45 23-93 29-142 26z"/> <path d="m5.5 280.5c52-6 98-28 138-62 28-25 46-56 51-87 4-20 1-57-5-70l-423-1c-2 56 39 118 74 157 31 34 72 54 116 63 11 2 38 2 49 0z" fill="#871945"/> <path d="m-290.5 -24.5c-13-26-13-57-9-85 6-27 18-52 35-68 21-20 50-23 77-18 15 4 28 12 39 23 18 17 30 40 36 67 4 20 4 41 0 60l-6 21z"/> <path d="m-132.5 -43.5c5-6 6-40 2-58-3-16-4-16-10-10-14 14-38 14-52 0-15-18-12-41 6-55 3-3 5-5 5-6-1-4-22-8-34-7-42 4-57.6 40-66.2 77-3 17-1 53 4 59h145.2z" fill="#fff"/> <path d="m11.5 -23.5c-2-3-6-20-7-29-5-28-1-57 11-83 15-30 41-52 72-60 29-7 57 0 82 15 26 17 45 49 50 82 2 12 2 33 0 45-1 10-5 26-8 30z"/> <path d="m198.5 -42.5c4-5 5-34 4-50-2-14-6-24-8-24-1 0-3 2-6 5-17 17-47 13-58-9-7-16-4-31 8-43 4-4 7-8 7-9 0 0-4-2-8-3-51-17-105 20-115 80-3 15 0 43 3 53z" fill="#fff"/> <path d="m137.5 223.5s-46 40-105 53c-66 15-114-7-114-7s14-76 93-95c76-18 126 49 126 49z" fill="#f9bedd"/> </g> <script> export default { // you can either use the shorthand 'svg', or the full // namespace: 'http://www.w3.org/2000/svg'. (I know // which one I prefer.) namespace: 'svg', data () { return { x: 100, y: 100, size: 100 }; } }; </script>

    嵌套组件

    除了嵌套元素(条件渲染,列表渲染),Svelte组件可以还包含其他Svelte组件。

    <div class='widget-container'>
      <Widget foo bar='static' baz='{{dynamic}}'/>
    </div>
    
    <script>
      import Widget from './Widget.html';
    
      export default {
        data () {
          return {
            dynamic: 'this can change'
          }
        },
    
        components: {
          Widget
        }
      };
    </script>

    上面的例子等同于下面的内容。

    import Widget from './Widget.html';
    
    const widget = new Widget({
      target: document.querySelector( '.widget-container' ),
      data: {
        foo: true,
        bar: 'static',
        baz: 'this can change'
      }
    });

    Svelte将确保在父组件bazdynamic的值会被同步,并且在父组件被销毁时先销毁子组件。

    组件名称应该按照javascript构造函数的形式约定首字母大写,这也是一种区分元素和模板的简单方法。

    Yield tags

    组件可以包含 {{yeild}} 标签,来支持父组件插住内容。

    APP.html

    {{#if showModal}}
      <Modal on:destroy='set({ showModal: false })'>
        <h2>Hello!</h2>
        <p>This is a modal dialog box. it can contain anything</p>
      </Modal>
    {{else}}
      <button on:click='set({ showModal: true })'>show modal</button>
    {{/if}}
    
    <script>
      import Modal from './Modal.html';
    
      export default {
        components: { Modal }
      };
    </script>

    modal.html

    <div class='modal-background' on:click='destroy()'></div> <div class='modal'> {{yield}} <!-- content is injected here --> <button on:click='destroy()'>close modal</button> </div> <style> .modal-background { position: fixed; top: 0; left: 0; width: 100%; height: 100%; background: rgba(0,0,0,0.3); } .modal { position: absolute; left: 50%; top: 50%; width: calc(100% - 4em); max-width: 32em; transform: translate(-50%,-50%); padding: 1em; border-radius: 0.2em; background: white; text-align: center; } </style>

    <:Self> tags

    有时候一个组件需要能够嵌套自身。例如,如果你有一个树状的数据结构。在Svelte,这是通过<:Self>标签完成的:

    {{#if countdown > 0}}
      <p>{{countdown}}</p>
      <:Self countdown='{{countdown - 1}}'/>
    {{else}}
      <p>liftoff!</p>
    {{/if}}

    <:Window> tags

    特殊的<:Window>标签为您提供了一种方便的方式来向窗口声明性地添加事件侦听器。当组件被销毁时,事件侦听器将被自动删除。

    <:Window on:keydown='set({ key: event.key, keyCode: event.keyCode })'/>
    
    {{#if key}}
      <p><kbd>{{key === ' ' ? 'Space' : key}}</kbd> (code {{keyCode}})</p>
    {{else}}
      <p>click in this window and press any key</p>
    {{/if}}
    
    <style>
      kbd {
        background-color: #eee;
        border: 2px solid #f4f4f4;
        border-right-color: #ddd;
        border-bottom-color: #ddd;
        font-size: 2em;
        margin: 0 0.5em 0 0;
        padding: 0.5em 0.8em;
        font-family: Inconsolata;
      }
    </style>

    目前为止,你可以绑定innerWidthouterWidthinnerHeightouterHeightscrollXscrollY

    <:Window bind:scrollY='y'/>
    
    <div class='background'></div>
    <p class='fixed'>user has scrolled {{y}} pixels</p>
    
    <style>
      .background {
        position: absolute;
        left: 0;
        top: 0;
        width: 100%;
        height: 9999px;
        background: linear-gradient(to bottom, #7db9e8 0%,#0a1d33 100%);
      }
    
      .fixed {
        position: fixed;
        top: 1em;
        left: 1em;
        color: white;
      }
    </style>

    元素指令

    Svelte的指令是指元素或组件级指令,它们看起来像属性,只是多了一个:字符。

    事件处理程序

    在大多数应用中,你需要响应用户的操作。在Svelte中,这是通过指令on:[event]来实现的。

    <p>Count: {{count}}</p>
    <button on:click='set({ count: count + 1 })'>+1</button>

    当用户点击按钮时,Svelte使用提供的参数来调用component.set(...)。你可以调用属于组件的任何一个方法(无论是内置的还是自定义的)以及范围内的任何数据属性(包括计算属性)。

    <p>Select a category:</p>
    
    {{#each categories as category}}
      <button on:click='select( category )'>select {{category}}</button>
    {{/each}}
    
    <script>
      export default {
        data () {
          return {
            categories: [
              'animal',
              'vegetable',
              'mineral'
            ]
          }
        },
    
        methods: {
          select ( name ) {
            alert( `selected ${name}` );
          }
        }
      };
    </script>

    你也可以在调用过程中访问event对象:

    <div on:mousemove='set({ x: event.clientX, y: event.clientY })'>
      coords: {{x}},{{y}}
    </div>
    
    <style>
      div {
        border: 1px solid purple;
        width: 100%;
        height: 100%;
      }
    </style>

    目标节点可以使用this来引用,这意味着你可以这样做。

    <input on:focus='this.select()'>

    自定义事件

    你可以定义你自己的自定义事件来处理复杂的用户交互,如拖拽和滑动。更多信息,可以参考有关自定义事件处理程序的部分。

    组件的事件

    对于嵌套组件子组件向父组件通信,使用事件是一个很好的方式。我们来看一个早期的例子,但是把它变成了一个<CategoryChooser>组件:

    <!-- CategoryChooser.html --> <p>Select a category:</p> {{#each categories as category}} <button on:click='fire( "select", { category } )'>select {{category}}</button> {{/each}} <script> export default { data () { return { categories: [ 'animal', 'vegetable', 'mineral' ] } } }; </script>

    当用户点击按钮时,组件将会触发select事件,事件对象具有category属性,任何嵌套了<CategoryChooser>的组件都能像如下的方式监听该事件:

    <CategoryChooser on:select='playTwentyQuestions( event.category )'/>
    
    <script>
      import CategoryChooser from './CategoryChooser.html';
    
      export default {
        components: {
          CategoryChooser
        },
    
        methods: {
          playTwentyQuestions ( category ) {
            // TODO implement
          }
        }
      };
    </script>

    Refs(引用)

    引用是存储对特定的DOM节点或组件的一种方便的途径,通过ref:[name]申明一个ref,并能在组件中通过this.ref.[name]来访问到他:

    <canvas ref:canvas width='200' height='200'></canvas>
    
    <script>
      export default {
        oncreate () {
          const canvas = this.refs.canvas;
          const ctx = canvas.getContext( '2d' );
    
          let destroyed = false;
          this.on( 'destroy', () => destroyed = true );
    
          function loop () {
            if ( destroyed ) return;
            requestAnimationFrame( loop );
    
            const imageData = ctx.getImageData( 0, 0, canvas.width, canvas.height );
    
            for ( let p = 0; p < imageData.data.length; p += 4 ) {
              const i = p / 4;
              const x = i % canvas.width;
              const y = i / canvas.height >>> 0;
    
              const t = window.performance.now();
    
              const r = 64 + ( 128 * x / canvas.width ) + ( 64 * Math.sin( t / 1000 ) );
              const g = 64 + ( 128 * y / canvas.height ) + ( 64 * Math.cos( t / 1000 ) );
              const b = 128;
    
              imageData.data[ p + 0 ] = r;
              imageData.data[ p + 1 ] = g;
              imageData.data[ p + 2 ] = b;
              imageData.data[ p + 3 ] = 255;
            }
    
            ctx.putImageData( imageData, 0, 0 );
          }
    
          loop();
        }
      }
    </script>

    由于只有一个元素或组件可以使用给定的引用,因此请勿在{{#each}}中使用它们,不过你依然可以在{{#if}}中使用。

    双向数据绑定

    目前流行的观点认为:应该避免在场景中使用双向绑定,因为它会引起各种难以调试的BUG,并降低程序运行效率,并且自上而下的单向数据流更容易让人理解。这其实是一个高级的废话。
    确实双向绑定做得很糟糕,有各种各样的问题,而且大型应用因为深度嵌套可能会导致状态变化时影响到了与应用不相关的部分。所以它们从禁止组件深度嵌套的约束中受益。
    但是当正确使用双向绑定时,它能极大的简化很多事情。

    使用bind:[attribute]来申明指令。

    <input bind:value='name' placeholder='enter your name'>
    <p>Hello {{name || 'stranger'}}!</p>

    双向绑定还未能完全的实现,后续会实现全套可用的绑定功能。

    除了DOM元素,你还可以给组件绑定数据属性。

    <CategoryChooser bind:category='category'/>
    

    如果绑定的属性和数据共用一个名字,你还可以使用简写:

    <CategoryChooser bind:category/>

    下面是一个完整的在表单中使用双向绑定的例子。

    <form on:submit='handleSubmit( event )'>
      <input bind:value='test' type='text'>
      <button type='submit'>Store</button>
    </form>
    
    <script>
    export default {
      methods: {
        handleSubmit: function ( event ) {
          // prevent the page from reloading
          event.preventDefault();
    
          var value = this.get( 'test' );
          console.log( 'value', value );
        }
      }
    };
    </script>

    插件

    todo…(作者写的todo)

    服务端渲染

    到目前为止,我们一直都在讨论在浏览器客户端上创建Svelte组件,但是你也可以在Node.js中渲染Svelte组件。这可以让你感到更好的性能上的提升,应用的页面在下载的时候就可以开始渲染了,这个动作比任何javascript代码执行都要早。在某些情况下,这也利于SEO,对于那些因各种原因不能运行javascript的浏览器来说也是有利的。

    渲染HTML

    要想使用服务端渲染,我们必须先注册它,这意味着当你require你的.html组件的时候,它已经被服务端渲染编译器拦截到了:

    require( 'svelte/ssr/register' );

    在这之后,你可以这样加载组件:

    const thing = require( './components/Thing.html' );

    组件在Node.js中具有不同的API,创建的实例没有set(...)get(...)方法。组件是一个拥有render(data)方法的对象,该方法会返回HTML,数据对象data与在浏览器中实例化组件时使用的一样的,是可选的:

    const data = { answer: 42 };
    const html = thing.render( data );

    任何默认数据计算属性助手嵌套组件都能按照预期工作。

    SSR编译器将为你的每个组件生成一个CommonJS模块,这意味着导入和导出语句将会转化为requiremodule.exports等选项。如果你的组件依赖了非组件,则他们必须在Node中作为CommonJS模块。如果使用了ES2015模块,建议你将其自动转化成CommonJS。

    渲染CSS

    你也可以渲染组件隔离的CSS包括任何嵌套组件:

    const { css, components } = thing.renderCss();

    你可以将生成的CSS放在单独的样式表中,或者将他们包含在<style>标签的页面中。如果这样做,你可能希望防止客户端编辑器再次包含CSS,对于svelte-cli,使用--no-css标志。在构建工具中(如rollup-plugin-svelte),传递css:false选项。

    上面的components数组,包含了每一个嵌套组件的样式的对象,允许你去除重复多余的样式,不过在大多数时候,你无需这么做。

    todo

    此文档仍是一项正在进行的工作,就想Svelte本身一样。如果有特定的东西丢失或可以改进,那么请在GitHub上提出一个issue!

    Visit original content creator repository
    https://github.com/tgxpuisb/sveltejs-documentation-zh-CN

  • Table of contents

    Wave Wallet Logo

    Best UI/UX Award at GrizzHacks

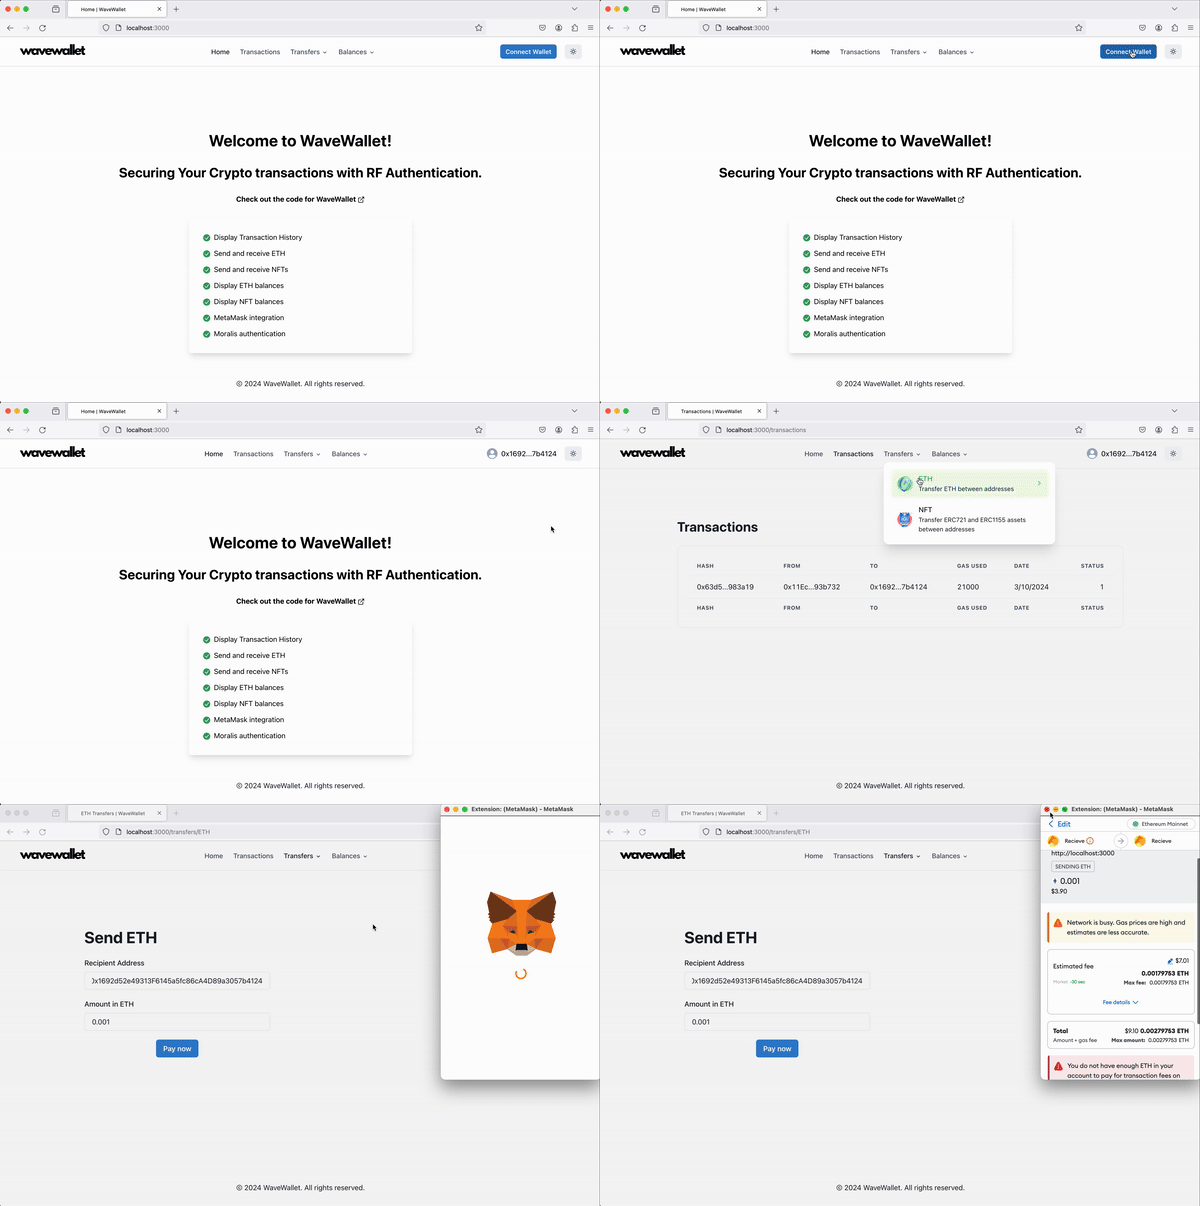
    This project demonstrates how to integrate an Arduino RF handshake process with a Next.js application to approve Ethereum transactions before sending them through Metamask. The handshake is performed between two Arduino devices communicating via RF waves, utilizing frequency hopping to increase security and prevent unauthorized interception of the communication.

    galaxy_homepage.mov

    Wave Wallet Demo

    Table of contents

    Overview

    The project consists of three main components:

    1. A Next.js frontend application that allows users to enter a recipient address and an amount of ETH to send. When the user clicks the “Send” button, the application communicates with an API route to check if the transaction is approved by the Arduino devices.

    2. A Python script that communicates with the sender Arduino device over a serial connection to initiate the RF handshake process and receive the approval status.

    3. Two Arduino devices (sender and receiver) equipped with RF modules that communicate with each other using frequency hopping to approve or reject the transaction based on certain conditions.

    How it Works

    1. The user enters the recipient address and the amount of ETH to send in the Next.js frontend application.

    2. When the user clicks the “Send” button, the startPayment function in ETHTransfers.tsx is triggered.

    3. The startPayment function makes a POST request to the /arduino-handshake API route, passing the recipient address and amount as request body.

    4. The API route (/arduino-handshake.js) receives the request and spawns a child process to run the arduino_handshake.py Python script, passing the necessary arguments (action, recipient, and amount).

    5. The arduino_handshake.py script communicates with the sender Arduino device over a serial connection, sending the transaction details (recipient and amount) to the sender Arduino.

    6. The sender Arduino device initiates the RF handshake process by sending the transaction details to the receiver Arduino device via RF waves, using frequency hopping to change the communication channel at predefined intervals.

    7. The receiver Arduino device, also employing frequency hopping, receives the transaction details and determines whether to approve or reject the transaction based on its internal logic (not provided in this example).

    8. The receiver Arduino sends the approval status back to the sender Arduino via RF waves, using frequency hopping to maintain secure communication.

    9. The sender Arduino receives the approval status and sends it back to the Python script over the serial connection.

    10. The Python script prints the approval status (True or False) to the console, which is captured by the API route.

    11. The API route sends a response back to the Next.js frontend application, indicating whether the transaction is approved or not.

    12. If the transaction is approved, the Next.js application proceeds to send the transaction through Metamask using the ethers.js library.

    13. If the transaction is not approved, an error is thrown, and the transaction is not sent. An error toast notification is displayed to the user.

    Dependencies

    • Next.js
    • React
    • Chakra UI
    • Moralis API
    • MetaMask APO
    • ethers.js
    • Python
    • pyserial
    • Arduino IDE
    • RF modules (nRF24L01)

    License

    WaveWallet is open-sourced software licensed under the MIT license.

    Visit original content creator repository https://github.com/smazurs/WaveWallet
  • Table of contents

    Wave Wallet Logo

    Best UI/UX Award at GrizzHacks

    This project demonstrates how to integrate an Arduino RF handshake process with a Next.js application to approve Ethereum transactions before sending them through Metamask. The handshake is performed between two Arduino devices communicating via RF waves, utilizing frequency hopping to increase security and prevent unauthorized interception of the communication.


    galaxy_homepage.mov


    Wave Wallet Demo

    Table of contents

    Overview

    The project consists of three main components:

    1. A Next.js frontend application that allows users to enter a recipient address and an amount of ETH to send. When the user clicks the “Send” button, the application communicates with an API route to check if the transaction is approved by the Arduino devices.

    2. A Python script that communicates with the sender Arduino device over a serial connection to initiate the RF handshake process and receive the approval status.

    3. Two Arduino devices (sender and receiver) equipped with RF modules that communicate with each other using frequency hopping to approve or reject the transaction based on certain conditions.

    How it Works

    1. The user enters the recipient address and the amount of ETH to send in the Next.js frontend application.

    2. When the user clicks the “Send” button, the startPayment function in ETHTransfers.tsx is triggered.

    3. The startPayment function makes a POST request to the /arduino-handshake API route, passing the recipient address and amount as request body.

    4. The API route (/arduino-handshake.js) receives the request and spawns a child process to run the arduino_handshake.py Python script, passing the necessary arguments (action, recipient, and amount).

    5. The arduino_handshake.py script communicates with the sender Arduino device over a serial connection, sending the transaction details (recipient and amount) to the sender Arduino.

    6. The sender Arduino device initiates the RF handshake process by sending the transaction details to the receiver Arduino device via RF waves, using frequency hopping to change the communication channel at predefined intervals.

    7. The receiver Arduino device, also employing frequency hopping, receives the transaction details and determines whether to approve or reject the transaction based on its internal logic (not provided in this example).

    8. The receiver Arduino sends the approval status back to the sender Arduino via RF waves, using frequency hopping to maintain secure communication.

    9. The sender Arduino receives the approval status and sends it back to the Python script over the serial connection.

    10. The Python script prints the approval status (True or False) to the console, which is captured by the API route.

    11. The API route sends a response back to the Next.js frontend application, indicating whether the transaction is approved or not.

    12. If the transaction is approved, the Next.js application proceeds to send the transaction through Metamask using the ethers.js library.

    13. If the transaction is not approved, an error is thrown, and the transaction is not sent. An error toast notification is displayed to the user.

    Dependencies

    • Next.js
    • React
    • Chakra UI
    • Moralis API
    • MetaMask APO
    • ethers.js
    • Python
    • pyserial
    • Arduino IDE
    • RF modules (nRF24L01)

    License

    WaveWallet is open-sourced software licensed under the MIT license.

    Visit original content creator repository
    https://github.com/smazurs/WaveWallet

  • JavaScript Multiple Areas Chart

    JavaScript Multiple Areas Chart

    JavaScript Multiple Areas Chart

    This demo application belongs to the set of examples for LightningChart JS, data visualization library for JavaScript.

    LightningChart JS is entirely GPU accelerated and performance optimized charting library for presenting massive amounts of data. It offers an easy way of creating sophisticated and interactive charts and adding them to your website or web application.

    The demo can be used as an example or a seed project. Local execution requires the following steps:

    • Make sure that relevant version of Node.js is installed

    • Open the project folder in a terminal:

        npm install              # fetches dependencies
        npm start                # builds an application and starts the development server
      
    • The application is available at http://localhost:8080 in your browser, webpack-dev-server provides hot reload functionality.

    Description

    Also known as a Area Graph or Area Chart

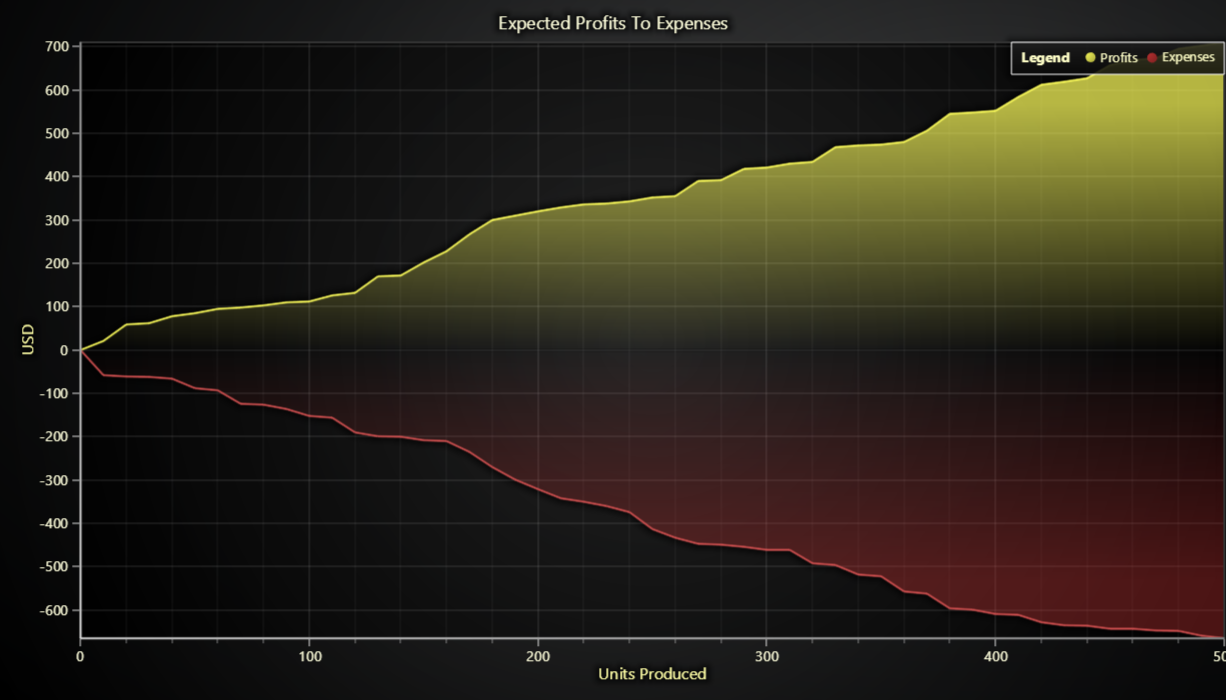
    The example shows the basic usage of a monopolar area series. The area series is based on line series with the area between the baseline and the given data filled with color. It is drawn on a Cartesian coordinate system and represents the quantitative data.

    Current example chart contains two monopolar area series. They are drawn on different sides of the specified baseline and the selected area type specifies the direction. The first area has a positive direction, the second one has a negative direction.

    The simple area chart can be created with few simple lines of code:

    // Create a new ChartXY.
    const chart = lightningChart().ChartXY()
    
    // Add an area series with positive direction using default X and Y axes.
    const areaPositive = chart.addAreaSeries({
        baseline: 0,
        type: AreaSeriesTypes.Positive,
    })
    
    // Add an area series with negative direction using default X and Y axes.
    const areaNegative = chart.addAreaSeries({
        baseline: 0,
        type: AreaSeriesTypes.Negative,
    })

    The baseline value the type of number and the type can be specified only during the creation of a series instance, where

    • The baseline is a fixed reference level of minimum or starting point used for comparisons, which allow customizing the position of the area.

    • The type of area series is an enum selector which defines the type of area series:

      • Select AreaSeriesTypes.Positive to show the data only above the baseline.
      • Select AreaSeriesTypes.Negative to show the data only below the baseline.
      • Select AreaSeriesTypes.Both to show the data from both sides of the baseline. Bipolar area series will be explained in the future example.

    The series accepts points in format { x: number, y: number }. Any number of points can be added with a single call.

    // Single point.
    series.add({ x: 50, y: 60 })
    
    // Multiple points at once.
    series.add([
        { x: 55, y: 60 },
        { x: 60, y: 62 },
        { x: 65, y: 65 },
    ])

    API Links

    Support

    If you notice an error in the example code, please open an issue on GitHub repository of the entire example.

    Official API documentation can be found on LightningChart website.

    If the docs and other materials do not solve your problem as well as implementation help is needed, ask on StackOverflow (tagged lightningchart).

    If you think you found a bug in the LightningChart JavaScript library, please contact sales@lightningchart.com.

    Direct developer email support can be purchased through a Support Plan or by contacting sales@lightningchart.com.

    © LightningChart Ltd 2009-2025. All rights reserved.

    Visit original content creator repository https://github.com/Arction/lcjs-example-0101-multipleAreas