🗣️This repository is a growing, fully open-source toolkit for training and evaluating Speech Language Models. This
includes, but is not limited to – Speech only pre-training, Preference Alignment, Speech-text interleaving, and more.
💻 We also plan to expand this repository to include more features, if you would like
to develop this open source and contribute see Contributing.
Installation
The code was tested with python>=3.11, but should also work with slightly older python versions. Install as below:
cd slamkit
pip install -e .
Be advised that some features could require additional installations, such as flash_attention, but we keep the base installation minimal.
Methods Implemented
This toolkit was used in several studies, see the specific READMEs of each for more details:
“Slamming: Training a Speech Language Model on One GPU in a Day” – Link
“Scaling Analysis of Interleaved Speech-Text Language Models”- Link
Usage
❗If you are only interested in evaluating or generating with a pre-trained SpeechLM, you can skip
straight to the Eval section.
Our package is built with four main scripts, corresponding to four main stages: extract_features.py, prepare_tokens.py, train.py, eval.py.
The core idea is to separate certain logics to share pre-computed representations as much as possible thus save time.
We explain about each part more below.
Our codebase uses Hydra to manage configurations, we suggest that you read a bit about it if you are unfamiliar with it.
Pre-training
We explain the run commands with a demonstration data sample provided located at example_data/audio that way you can assert that your output is as expected.
Extract features
This script takes audio files and outputs a file with discrete token data, using a pre-trained speech tokeniser.
The representation operate at Tokeniser level to guarantee consistency across different steps, however, it truly only
depends on the feature extractor thus can be shared between different tokenisers over the same features
(such as text-interleaving or units only over the same Hubert).
The output of this script can be directly used for the next phase, which is tokeniser specific.
An example of running it:
This will output a file that is similar to example_data/features.jsonl, usually up to the order of the files or the file_name.
We define the data_path(should be a dir), the ext (extension for audio), the tokeniser which is a config file in this case config/tokeniser/unit_hubert_25.yaml.
⚠️ Note! The tokenise script operates over entire audio files without splitting them, which can consume a lot of memory for very large audio files (30 minutes) thus we recommend to run Voice activity detection (VAD) on the files before in order to split them.
❗The audio samples are sorted by length in decreasing order to minimise padding, and fail early for out of memory. You are able to subset the dataset and taking only part of the files with data_skip=10 data_take=500
❗using tokeniser.feature_extractor.compile=true runs torch.compile on the tokeniser which can improve runtime but incur latency in initialising the model so probably best not to use when debugging.
Prepare tokens
This script takes the output of extract_features.py and prepares the tokens as a string representation for
training. This script is already dependent on the tokeniser and the tokeniser specific features, such as text.
This command can also create different tokens for different training regimes. e.g. You can use tokeniser=interleaved_hubert_25 to create a text-speech interleaved dataset.
❗ some training regimes might need additional metadata, such as aligned text.
Pre-Train
This script takes pre-tokenised data (as output from prepare_tokens.py) and trains a speech language model over the tokens.
❗Note that the train_path and val_path can be a specific file or a glob path for several files like in the example above. Use this to merge shards or datasets!
❗Note that training_args is arguments to a HuggingFace🤗 model so you can pass any argument it expects, for instance add +dataloader_num_workers=8 to use 8 workers!
⚠️ Be advised that the default scheduler is cosine, which requires a good estimate of total steps, so stopping it early (e.g with run_time=24:00) without setting the number of steps (with +training_args.max_steps=17625) could lead to poor performance.
🧪 We give an example of logging results to Weights & Biases, but you could remove this and results will be printed locally
An example of pre-training a model like in the original paper:
for the preference alignment portion we provide two scripts: preference_alignment_feature_extractor.py, preference_alignment_train.py. for now there is no equivalent to prepare tokens since we don’t support preference alignment for text-speech interleaved models. This features will come in the future.
Extract features
The script works in a similar way to the original version, but expects input of a different type. Instead of a folder with audio files in it, we expect a jsonl with the format
❗ Note that this script feature extracts the prompt,chosen, rejected using one forward pass (so if batch_size=8, the model will do a forward pass on 24 files). choose batch size accordingly.
Preference Alignment Train
the script again works in similar way to Pre-training. The only difference is that you will usually start with a pretrained model using the argument model.pretrained_model=<> where path can be either a path to a checkpoint or a model in hugging face such as slprl/slam_scaled.
For now, we only support DPO, other types may be added in the future.
Eval
This script is used to evaluate metrics of your awesomely trained SpeechLM, or generate speech continuations.
We currently support modelling metrics: sWUGGY, sBLIMP, Spoken StoryCloze and SALMon🍣.
We also support generating continuations, and generative metrics: GenPPL and Auto-BLEU.
An example of running generation given a prompt, using a pretrained vocoder:
❗Note that the model.pretrained_model should point to a folder of a specific step within the output training_args.output_dir from training or an HF🤗 model.
❗The default generation configuration matches the paper, for non-DPO models you might prefer to disable repetition penalty, e.g metric.generate_kwargs.repetition_penalty=1.0.
❗Note that you can set TEXTLESS_CHECKPOINT_ROOT to specify the download location of the vocoder. It defaults to ~/.textless/.
❗Note that we currently only support running one metric with each run of eval.py. You can use hydra multirun to run them in sucession or in parallel.
SlamKit library
You can also use slamkit as a library to build your own projects without using our scripts, e.g. if you want to use our pretrained slam_scaled you can use the following lines of code
Since this library is built upon huggingface🤗, most features of hf will work out of the box. such as pushing to the hub: model.push_to_hub('<entity>/great_model')
Contributing
We welcome contributions to this repository. Want to add support for new tokenisers?
Add support for even more efficient implementations? If you are interested in building this open source
project – open an Issue, and one of the maintainers will guide you in opening a PR!
Acknowledgements
We isolate vocoder-related code from textlesslib, in slamkit/vocoder/textless_*.
If you found this repository useful, please cite our work:
@misc{maimon2025slamming,
      title={Slamming: Training a Speech Language Model on One GPU in a Day},
      author={Gallil Maimon and Avishai Elmakies and Yossi Adi},
      year={2025},
      eprint={2502.15814},
      archivePrefix={arXiv},
      primaryClass={cs.LG},
      url={https://arxiv.org/abs/2502.15814},
}
A complete plugin for wardriving on your pwnagotchi. It saves all networks seen by bettercap, not only the ones whose handshakes has been collected. The plugin works on Evilsocket and Jayofelony images.
Support GPS coordinates retrieval from Bettercap, GPSD and Pwndroid application
Automatic and manual upload of wardriving sessions to WiGLE
Web UI with lots of information
Export single wardriving session in CSV
Label and icon on display with status information
🚀 Installation
Important
This plugin require a GPS module attached to your pwnagotchi to work, or your pwnagotchi needs to be connected via BT to your Android phone with Pwndroid application installed.
Depending on the GPS method choosen, you’ll also need the gps or gpsdeasy or pwndroid plugin enabled. For more info about GPS configuration, check the section below.
Login inside your pwnagotchi using SSH:
ssh pi@10.0.0.2
Add the plugin repository to your config.toml file and reboot your pwnagotchi:
Edit your configuration file (/etc/pwnagotchi/config.toml) and add the following:
# Enable the pluginmain.plugins.wardriver.enabled = true# Path where SQLite db will be savedmain.plugins.wardriver.path = "/root/wardriver"# Enable UI status textmain.plugins.wardriver.ui.enabled = true# Enable UI iconmain.plugins.wardriver.ui.icon = true# Set to true if black background, false if white backgroundmain.plugins.wardriver.ui.icon_reverse = false# Position of UI status textmain.plugins.wardriver.ui.position.x = 7main.plugins.wardriver.ui.position.y = 95# Enable WiGLE automatic file uploadingmain.plugins.wardriver.wigle.enabled = true# WiGLE API key (encoded)main.plugins.wardriver.wigle.api_key = "xyz..."# Enable commercial use of your reported datamain.plugins.wardriver.wigle.donate = false# OPTIONAL: networks whitelist aka don't log these networksmain.plugins.wardriver.whitelist = [
"network-1",
"network-2"
]
# NOTE: SSIDs in main.whitelist will always be ignored# GPS configurationmain.plugins.wardriver.gps.method = "bettercap"# or "gpsd" for gpsd or "pwndroid" for Pwndroid app
Restart daemon service:
sudo systemctl restart pwnagotchi
Done! Now the plugin is installed and is working.
Please note that during execution the plugin will download all the missing assets from GitHub if internet is available. For this reason, the first time you run the plugin you’ll not see any icon on your pwnagotchi’s screen.
📍 GPS Configuration
Starting from version v2.3, Wardriver supports different methods to retrieve the GPS position. Currently it supports:
Bettercap: getting the position directly from Bettercap’s agent
GPSD: getting the position from GPSD daemon
Pwndroid: getting the position from pwndroid Android companion application
Check one of the below section to understand how to configure each method for GPS position.
🥷 Bettercap
If you are using the default gps plugin that add the GPS data to Bettercap, pick and use this method. This is the default and the fallback choice, if you don’t specify something else in the config.toml.
If you are using Rai’s gpsd-easy or Fmatray’s gpsd-ng, pick and use this method. This should be used if you have installed gpsd on your pwnagotchi and if it is running as a daemon.
# ...main.plugins.wardriver.gps.method = "gpsd"# OPTIONAL: if the gpsd daemon is running on another host, specify here the IP address.# By default, localhost is usedmain.plugins.wardriver.gps.host = "127.0.0.1"# OPTIONAL: if the gpsd daemon is running on another host, specify here the port number.# By default, 2947 is usedmain.plugins.wardriver.gps.port = 2947# ...
📱 Pwndroid
Important
Be sure to have websockets pip library installed. Run sudo apt install python3-websockets on your pwnagotchi.
If you don’t have a GPS device connected to your pwnagotchi, but you want to get the position from your Android phone, then pick this method. You should have installed the Jayofelony’s Pwndroid companion application.
# ...main.plugins.wardriver.gps.method = "pwndroid"# OPTIONAL: add the IP address of your phone. This should be changed ONLY if you have changed the BT network addresses.main.plugins.wardriver.gps.host = "192.168.44.1"# OPTIONAL: add the port number where the Pwndroid websocket is listening on. This shouldn't be changed, unless the# application is updated with a different configuration. By default, 8080 is usedmain.plugins.wardriver.gps.port = 8080# ...
🗺️ Wigle configuration
In order to be able to upload your discovered networks to WiGLE, you need to register a valid API key for your account. Follow these steps to get your key:
Add the value inside main.plugins.wardriver.wigle.api_key in /etc/pwnagotchi/config.toml file
You are good to go. You can test if the key is working by opening the wardriver web page and clicking on Stats tab. If you get your WiGLE profile with your stats, the API key is working fine.
🔥 Upgrade
If you have installed the plugin following the method described in the previous section, you can upgrade the plugin version with:
Otherwise, if you have installed the plugin manually just download the new version from GitHub and replace the old file on your pwnagotchi.
👾 Usage
Once configured, the plugin works autonomously and you don’t have to do anything. Check the sections below to learn more about how it works.
🖥️ Web UI
All the operations are done through the plugin’s Web UI. Inside of it, you can see the current wardriving session statistics, global statistics (including your WiGLE profile), all networks seen by your pwnagotchi and also plot the networks on map. You can upload automatically the sessions on WiGLE when internet is available, or upload them manually through the Web UI.
You can reach the Web UI by opening http://<pwnagotchi ip>:8080/plugins/wardriver in your browser.
🚗 Wardriving
Everytime bettercap refresh the access points list (normally every 2 minutes more or less), the plugin will log the new networks seen along with the latitude, longitude and altitude. Each time the service is restarted a new session will be created. If you have enabled it, the plugin will display the total number of networks of the current session on the pwnagotchi display.
If you don’t want some networks to be logged, you can add the SSID inside wardriver.whitelist array in the config. Wardriver does not report networks whose SSID is contained within the local and global whitelist.
Note: the SSIDs inside the main.whitelist array will always be ignored.
🌐 WiGLE upload
If you have enabled it, once internet is available, the plugin will upload all previous session files on WiGLE. Please note that the current session will not be uploaded as it is considered still in progress. Don’t worry, it’ll be uploaded the next time your pwnagotchi starts with internet connection.
If you just want to upload sessions to WiGLE manually you can still do it. All you have to do, is configuring your API key and use the corresponding button in the sessions tab of the Web UI. You can also download the CSV file locally for a specific session.
❤️ Contribution
If you need help or you want to suggest new ideas, you can open an issue here or you can join my Discord server using this invite.
If you want to contribute, you can fork the project and then open a pull request.
🥇 Credits
Rai68’s gpsd-easy pwnagotchi plugin for the GPSD integration
Jayofelony’s pwndroid pwnagotchi plugin for the Pwndroid integration
Project whose the aim is to capture Social Network posts and extract the feeling from them. To this end, the program will collect data from social networks given some user choices (as a topic to search on Twitter), store, treat and model seeking to identify the feeling expressed in the post as positive or negative. Different sentiment analysis techniques will be tested to seek the best result.
run pip install -r requirements.txt to install the requirements in your environment
python -m spacy download en_core_web_sm to downoad the portuguese available core model. To see about other models, visit spacy.
visit twitter-develop and create a Twitter account if you don’t have one. You’ll need to generate access keys and add them to the file api/configs.ini
Running:
the program so far has two input variables, all of which are optional. They are: hashtag you want to search on Twitter and number of posts you want to collect. The default is: whitehouse, 200, respectively.
To Do
Create functions to pre-process the data
Create the method input variable to allow the collection, pre-processing and modeling steps to be run separately
Create sentiment analysis models and apply on a pre-processed data
The app reads the settings from template.config.yaml, then config.yaml (if it exists), then environment variables
in the form HUBIBOT_KEY=value, then command line parameters in the form HUBIBOT_KEY=value.
In both cases value needs to be valid JSON compatible with the entries in template.config.yaml, e.g. 123, 'string', [ 'a', 'list', 'of', 'string'], etc.
The absolute path to the config file can be set via the HUBIBOT_CONFIG_FILE environment variable if it cannot be collocated with template.config.yaml.
Environment variables can be especially useful docker environments, such as TrueNAS via Launch Docker Image. All environment variables consumed by the app are all caps and prefixed with HUBIBOT_.
At the minimum, you’ll need to specify the telegram and hubitat tokens, enable one user group (and put a valid user in it) and enable one device group. Assuming no config file, the minimal workable command-line incantation with debug logs enabled will look something like:
See template.config.yaml for more details on configuration options.
To install, choose one of these 3 methods (using config file in these examples):
Using pre-built Docker image
Dependency: Docker installed.
touch config.yaml
This will fail due to malformed config.yaml. That’s intentional 🙂
sudo docker run --name my_hubibot -v "`pwd`/config.yaml:/app/config.yaml" vdbg/hubibot
Edit config.yaml by following the instructions in the file
sudo docker start my_hubibot -i -e HUBIBOT_MAIN_LOGVERBOSITY=DEBUG
This will display logging on the command window allowing for rapid troubleshooting. Ctrl-C to stop the container if config.yaml is changed
To see logs: sudo docker container logs -f my_hubibot
Using Docker image built from source
Dependency: Docker installed.
git clone https://github.com/vdbg/hubibot.git
sudo docker build -t hubibot_image hubibot
cd hubibot
cp template.config.yaml config.yaml
Edit config.yaml by following the instructions in the file
Test run: sudo docker run --name my_hubibot -v "`pwd`/config.yaml:/app/config.yaml" hubibot_image
This will display logging on the command window allowing for rapid troubleshooting. Ctrl-C to stop the container if config.yaml is changed
If container needs to be restarted for testing: sudo docker start my_hubibot -i
Edit config.yaml by following the instructions in the file
pip3 install -r requirements.txt
Run the program:
Interactive mode: python3 main.py
Shorter: .\main.py (Windows) or ./main.py (any other OS).
As a background process (on non-Windows OS): python3 main.py > log.txt 2>&1 &
To exit: Ctrl-C if running in interactive mode, kill the process otherwise.
Using the bot
From your Telegram account, write /h to the bot to get the list of available commands.
Understanding user and device groups
User and device groups allow for fine-grained access control, for example giving access to different devices to parents, kids, friends and neighbors.
While three user groups (“admins”, “family”, “guests”) and three device groups (“all”,”regular”,”limited”) are provided in the template config file as examples, any number of user and device groups are supported (names are free-form, alphabetical). If only one single user is using the bot, only keeping “admins” user group & “all” device group will suffice.
Device groups represent collection of Hubitat devices that can be accessed by user groups. In the template config file “admins” user group has access to “all” device group, “family” to “regular”, and “guests” to “limited”.
User groups represent collection of Telegram users that have access to device groups. User groups can contain any number of Telegram user ids (those with no user ids are ignored) and reference any number of device groups. User groups with an access_level set to:
NONE: cannot use any commands. Useful to disable a user group.
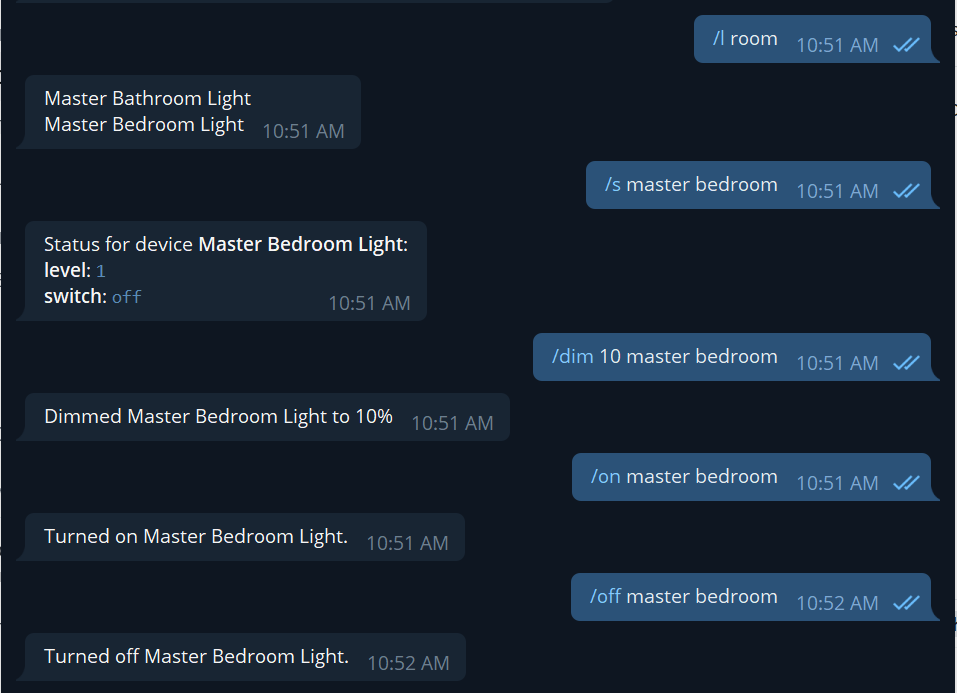
DEVICE: can use device commands e.g., /list, /regex, /on, /off, /open, /close, /dim, /status, /info.
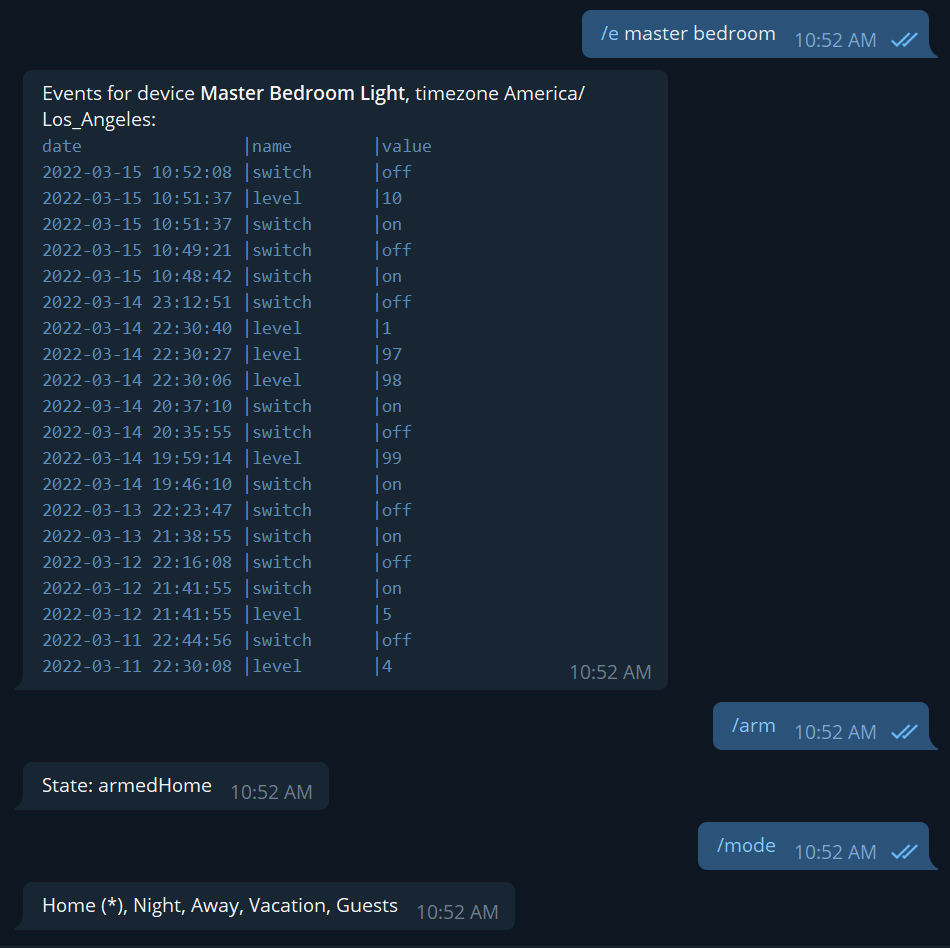
SECURITY: can use the same commands as access_level: DEVICE, and also act on locks with /lock & /unlock commands, the /arm command for Hubitat Safety Monitor, the /mode command to view and change the mode, the /events command to see a device’s history, and the /tz command to change the timezone for /events and /lastevent.
ADMIN: can use the same commands as access_level: SECURITY, and also admin commands e.g., /users, /groups, /refresh, /exit. In addition some commands have more detailed output (e.g., /list, /status).
A user can only belong to one user group, but a device can belong to multiple device groups and a device group can be referenced by multiple user groups.
Device name resolution
For all commands taking in device names (such as : /on name of device), the app will:
Split the input using the device_name_separator setting in config.yaml and remove all leading/trailing spaces.
For example, ” office light, bedroom ” becomes “office light”, “bedroom”
Look for these in the list of devices Hubitat exposes through MakerAPI that are accessible to the current user (see previous section).
If the case_insensitive setting in config.yaml is set to true, then the case doesn’t need to match.
For example “office light” will be resolved to “Office Light”
For devices not found, the bot will try and interpret the input as a regex. For example, “(Office|Bedroom) Light” will resolve to both “Office Light” and “Bedroom Light”
For devices still not found, the transforms in the device setting under aliases section in config.yaml are tried in order.
For example, the app will transform “bedroom” to “bedroom light” and look for that name
If there are entries that still could not be found, the entire name resolution process fails.
Difference between /list and /regex
/list uses the filter as a substring.
/regex uses the filter as a regex.
Troubleshooting
Set logverbosity under main to DEBUG in config.yaml to get more details. Note: Hubitat’s token is printed in plain text when logverbosity is DEBUG
Ensure the bot was restarted after making changes to config.yaml
Ensure the device running the Python script can access the Hubitat’s Maker API by trying to access <url>/apps/api/<appid>/devices?access_token=<token> url from that device (replace placeholders with values from hubitat section in config.yaml)
If a given device doesn’t show up when issuing the /list command:
Check that it is included in the list of devices exposed through Hubitat’s MakerAPI
Check that the device_groups:<name>:allowed_device_ids setting in config.yaml for the device group(s) of the current user is either empty or includes the device’s id
If the device was added to MakerAPI after starting the bot, issue the /refresh command
Check the device group(s) of the given user with the /users command
Check that the device has a label in Hubitat in addition to a name. The former is used by the bot
Getting Telegram user Ids
The config.yaml file takes user Ids instead of user handles because the later are neither immutable nor unique.
There are two methods for getting a Telegram user Id:
Ask that user to write to the @userinfobot to get their user Id
Ensure logVerbosity under main is set to WARNING or higher in config.yaml and ask that user to write to the bot. There will be a warning in the logs with that user’s Id and handle.
Authoring
Style:
From command line: pip3 install black,
In VS code: Settings,
Text Editor, Formatting, Format On Save: checked
Python, Formatting, Provider: black
Python, Formatting, Black Args, Add item: --line-length=200


 https://github.com/PresidioCode/ciscoris