Feature: Manage Basic Customer Registration

@CustomerRegistration
Scenario: Register Name and Last Name
	Given I have entered Name Jessé into the form
	And I have entered Last Name Toledo into the form
	When I press add
	Then the result should be the Full Name registered

@CustomerRegistration
Scenario: Unregistered Name and Last Name
	Given I have entered Name <Name> into the form
	And I have entered Last Name <LastName> into the form
	When I press add
	Then the result should be the Full Name unregistered

	Examples:
		| Name   | LastName |
		| <null> | Toledo   |
		| Jessé  | <null>   |
		| <null> | <null>   |
CustomerRegistrationStep.cs
[Binding]publicsealedclassCustomerRegistrationStep{privatereadonlyCustomer_customer;privatereadonlyHttpClient_client;privateHttpResponseMessage_response;publicCustomerRegistrationStep(WebApplicationFactory<Startup>webApplicationFactory){_customer=newCustomer();varfactory=webApplicationFactory.WithWebHostBuilder(builder =>{builder.ConfigureAppConfiguration((host,config)=>{config.AddTestConfig(host.HostingEnvironment);});});_client=factory.CreateClient();}[Given(@"I have entered Name (.*) into the form")]publicvoidGivenIHaveEnteredNameIntoTheForm(stringname){_customer.Name=name;}[Given(@"I have entered Last Name (.*) into the form")]publicvoidGivenIHaveEnteredLastNameIntoTheForm(stringlastName){_customer.LastName=lastName;}[When(@"I press add")]publicasyncTaskWhenIPressAdd(){varjson=Utf8Json.JsonSerializer.PrettyPrint(Utf8Json.JsonSerializer.Serialize(_customer));_response=await_client.PostAsync("/api/CustomerRegistration",newStringContent(json,Encoding.UTF8,"application/json")).ConfigureAwait(false);}[Then(@"the result should be the Full Name registered")]publicasyncTaskThenTheResultShouldBeTheFullNameRegistered(){_response.EnsureSuccessStatusCode();varbody=await_response.Content.ReadAsStringAsync().ConfigureAwait(false);varactual=JsonConvert.DeserializeObject<int>(body);actual.Should().NotBe(0);}[Then(@"the result should be the Full Name unregistered")]publicvoidThenTheResultShouldBeTheFullNameUnregistered(){_response.StatusCode.Should().Be(HttpStatusCode.BadRequest);}}
NGINX Plus is configured to perform OpenID Connect authentication. Upon a first visit to a protected resource, NGINX Plus initiates the OpenID Connect authorization code flow and redirects the client to the OpenID Connect provider (IdP). When the client returns to NGINX Plus with an authorization code, NGINX Plus exchanges that code for a set of tokens by communicating directly with the IdP.
The ID Token received from the IdP is validated. NGINX Plus then stores the ID token in the key-value store, issues a session cookie to the client using a random string, (which becomes the key to obtain the ID token from the key-value store) and redirects the client to the original URI requested prior to authentication.
Subsequent requests to protected resources are authenticated by exchanging the session cookie for the ID Token in the key-value store. JWT validation is performed on each request, as normal, so that the ID Token validity period is enforced.
If a refresh token was received from the IdP then it is also stored in the key-value store. When validation of the ID Token fails (typically upon expiry) then NGINX Plus sends the refresh token to the IdP. If the user’s session is still valid at the IdP then a new ID token is received, validated, and updated in the key-value store. The refresh process is seamless to the client.
Logout
Requests made to the /logout location invalidate both the ID token and refresh token by erasing them from the key-value store. Therefore, subsequent requests to protected resources will be treated as a first-time request and send the client to the IdP for authentication. Note that the IdP may issue cookies such that an authenticated session still exists at the IdP.
Multiple IdPs
Where NGINX Plus is configured to proxy requests for multiple websites or applications, or user groups, these may require authentication by different IdPs. Separate IdPs can be configured, with each one matching on an attribute of the HTTP request, for example, hostname or part of the URI path.
Note: When validating OpenID Connect tokens, NGINX Plus can be configured to read the signing key (JWKS) from disk, or a URL. When using multiple IdPs, each one must be configured to use the same method. It is not possible to use a mix of both disk and URLs for the map…$oidc_jwt_keyfile variable.
Installation
Start by installing NGINX Plus. In addition, the NGINX JavaScript module (njs) is required for handling the interaction between NGINX Plus and the OpenID Connect provider (IdP). Install the njs module after installing NGINX Plus by running one of the following:
$ sudo apt install nginx-plus-module-njs for Debian/Ubuntu
$ sudo yum install nginx-plus-module-njs for CentOS/RHEL
The njs module needs to be loaded by adding the following configuration directive near the top of nginx.conf.
Note: There is a branch for each NGINX Plus release. Switch to the correct branch to ensure compatibility with the features and syntax of each release. The main branch works with the most recent NGINX Plus and JavaScript module releases.
All files can be copied to /etc/nginx/conf.d
Non-standard directories
The GitHub repository contains include files for NGINX configuration, and JavaScript code for token exchange and initial token validation. These files are referenced with a relative path (relative to /etc/nginx). If NGINX Plus is running from a non-standard location then copy the files from the GitHub repository to /path/to/conf/conf.d and use the -p flag to start NGINX with a prefix path that specifies the location where the configuration files are located.
This implementation is suitable for running in a container provided that the base image includes the NGINX JavaScript module. The GitHub repository is designed to facilitate testing with a container by binding the cloned repository to a mount volume on the container.
$ cd nginx-openid-connect
$ docker run -d -p 8010:8010 -v $PWD:/etc/nginx/conf.d nginx-plus nginx -g 'daemon off; load_module modules/ngx_http_js_module.so;'
Running locally in containers
This implementation supports that you could locally test in a container. You could find the details what to set up here before running docker-compose up.
$ cd nginx-openid-connect
$ docker-compose up
Running behind another proxy or load balancer
When NGINX Plus is deployed behind another proxy, the original protocol and port number are not available. NGINX Plus needs this information to construct the URIs it passes to the IdP and for redirects. By default NGINX Plus looks for the X-Forwarded-Proto and X-Forwarded-Port request headers to construct these URIs.
Configuring your IdP
Create an OpenID Connect client to represent your NGINX Plus instance
Choose the authorization code flow
Set the redirect URI to the address of your NGINX Plus instance (including the port number), with /_codexch as the path, for example, https://my-nginx.example.com:443/_codexch
Ensure NGINX Plus is configured as a confidential client (with a client secret) or a public client (with PKCE S256 enabled)
Make a note of the client ID and client secret if set
If your IdP supports OpenID Connect Discovery (usually at the URI /.well-known/openid-configuration) then use the configure.sh script to complete configuration. In this case you can skip the next section. Otherwise:
Obtain the URL for jwks_uri or download the JWK file to your NGINX Plus instance
Obtain the URL for the authorization endpoint
Obtain the URL for the token endpoint
Obtain the URL for the user info endpoint
Obtain the URL for the end session endpoint for logout
Obtain the scopes for setting $oidc_scopes
Configuring NGINX Plus
Configuration can typically be completed automatically by using the configure.sh script.
Manual configuration involves reviewing the following files so that they match your IdP(s) configuration.
oidc_idp.conf – this contains the primary configuration for one or more IdPs in map{} blocks
Modify all of the map…$oidc_ blocks to match your IdP configuration.
Modify the URI defined in map…$oidc_logout_redirect to specify an unprotected resource to be displayed after requesting the /logout location.
Set a unique value for $oidc_hmac_key to ensure nonce values are unpredictable.
If NGINX Plus is deployed behind another proxy or load balancer, modify the map…$redirect_base and map…$proto blocks to define how to obtain the original protocol and port number.
oidc_frontend_backend.conf – this is the reverse proxy configuration
Modify the upstream group to match your frontend site or backend app.
Modify the severity level of the error_log directive to suit the deployment environment.
Comment/uncomment the x-id-token in the proxy header for the API request based on your needs. The default is to only set Bearer $access_token in the header.
oidc_nginx_http.conf – this is the NGINX configuration in http block for handling the various stages of OpenID Connect authorization code flow
No changes are usually required here
Modify $post_logout_return_uri if you want to redirect to a custom logout page rather than the default page after successful logout from the IdP.
Modify $return_token_to_client_on_login if you want to return id_token to the frontend app with a query parameter after successful login from the IdP. Otherwise the default value is empty.
oidc_nginx_server.conf – this is the NGINX configuration in each server block for handling the various stages of OpenID Connect authorization code flow
No changes are usually required here
Modify the resolver directive to match a DNS server that is capable of resolving the IdP defined in $oidc_token_endpoint
If using auth_jwt_key_request to automatically fetch the JWK file from the IdP then modify the validity period and other caching options to suit your IdP
The /login endpoint: Comment/uncomment the auth_jwt_key_file or auth_jwt_key_request directives based on whether $oidc_jwt_keyfile is a file or URI, respectively
oidc.js – this is the JavaScript code for performing the authorization code exchange and nonce hashing
No changes are required unless modifying the code exchange or validation process
Configuring the Key-Value Store
The key-value store is used to maintain persistent storage for ID tokens, access tokens, and refresh tokens. The default configuration should be reviewed so that it suits the environment. This is part of the advanced configuration in oidc_nginx_http.conf. Modify the directory of key-value store in state field per your system requirement.
Each of the keyval_zone parameters are described below.
zone – Specifies the name of the key-value store and how much memory to allocate for it. Each session will typically occupy 1-2KB, depending on the size of the tokens, so scale this value to exceed the number of unique users that may authenticate.
state (optional) – Specifies where all of the Tokens in the key-value store are saved, so that sessions will persist across restart or reboot of the NGINX host. The NGINX Plus user account, typically nginx, must have write permission to the directory where the state file is stored. Consider creating a dedicated directory for this purpose.
timeout – Expired tokens are removed from the key-value store after the timeout value. This should be set to value slightly longer than the JWT validity period. JWT validation occurs on each request, and will fail when the expiry date (exp claim) has elapsed. If JWTs are issued without an exp claim then set timeout to the desired session duration. If JWTs are issued with a range of validity periods then set timeout to exceed the longest period.
sync (optional) – If deployed in a cluster, the key-value store may be synchronized across all instances in the cluster, so that all instances are able to create and validate authenticated sessions. Each instance must be configured to participate in state sharing with the zone_sync module and by adding the sync parameter to the keyval_zone directives above.
Session Management
The NGINX Plus API is enabled in oidc_nginx_server.conf so that sessions can be monitored. The API can also be used to manage the current set of active sessions.
To query the current sessions in the key-value store:
The oidc_nginx_server.conf file defines several status_zone directives to collect metrics about OpenID Connect activity and errors. Separate metrics counters are recorded for:
OIDC start – New sessions are counted here. See step 2 in Figure 2, above. Success is recorded as a 3xx response.
OIDC code exchange – Counters are incremented here when the browser returns to NGINX Plus after authentication. See steps 6-10 in Figure 2, above. Success is recorded as a 3xx response.
OIDC logout – Requests to the /logout URI are counted here. Success is recorded as a 3xx response.
OIDC error – Counters are incremented here when errors in the code exchange process are actively detected. Typically there will be a corresponding error_log entry.
To obtain the current set of metrics:
$ curl localhost:8010/api/6/http/location_zones
In addition, the NGINX Plus Dashboard can be configured to visualize the monitoring metrics in a GUI.
Troubleshooting
Any errors generated by the OpenID Connect flow are logged to the error log, /var/log/nginx/error.log. Check the contents of this file as it may include error responses received by the IdP. The level of detail recorded can be modified by adjusting the severity level of the error_log directive.
400 error from IdP
This is typically caused by incorrect configuration related to the client ID and client secret.
Check the values of the map…$oidc_client and map…$oidc_client_secret variables against the IdP configuration.
500 error from nginx after successful authentication
Check for could not be resolved and empty JWK set while sending to client messages in the error log. This is common when NGINX Plus cannot reach the IdP’s jwks_uri endpoint.
Check the map…$oidc_jwt_keyfile variable is correct.
Check the resolver directive in openid_connect.server_conf is reachable from the NGINX Plus host.
Check for OIDC authorization code sent but token response is not JSON. messages in the error log. This is common when NGINX Plus cannot decompress the IdP’s response. Add the following configuration snippet to the /_jwks_uri and /_token locations to openid_connect.server_conf:
proxy_set_header Accept-Encoding "gzip";
Authentication is successful but browser shows too many redirects
This is typically because the JWT sent to the browser cannot be validated, resulting in ‘authorization required’ 401 response and starting the authentication process again. But the user is already authenticated so is redirected back to NGINX, hence the redirect loop.
Avoid using auth_jwt_require directives in your configuration because this can also return a 401 which is indistinguishable from missing/expired JWT.
Check the error log /var/log/nginx/error.log for JWT/JWK errors.
Ensure that the JWK file (map…$oidc_jwt_keyfile variable) is correct and that the nginx user has permission to read it.
Logged out but next request does not require authentication
This is typically caused by the IdP issuing its own session cookie(s) to the client. NGINX Plus sends the request to the IdP for authentication and the IdP immediately sends back a new authorization code because the session is still valid.
Check your IdP configuration if this behavior is not desired.
Failed SSL/TLS handshake to IdP
Indicated by error log messages including peer closed connection in SSL handshake (104: Connection reset by peer) while SSL handshaking to upstream.
This can occur when the IdP requires Server Name Indication (SNI) information as part of the TLS handshake. Additional configuration is required to satisfy this requirement.
Edit oidc_nginx_server.conf and for each of the /_jwks_uri, /_token, /_refresh and /userinfo locations, add the following configuration snippet:
This reference implementation for OpenID Connect is supported for NGINX Plus subscribers.
Changelog
R15 Initial release of OpenID Connect reference implementation
R16 Added support for opaque session tokens using key-value store
R17 Configuration now supports JSON Web Key (JWK) set to be obtained by URI
R18 Opaque session tokens now used by default. Added support for refresh tokens. Added /logout location.
R19 Minor bug fixes
R22 Separate configuration file, supports multiple IdPs. Configurable scopes and cookie flags. JavaScript is imported as an indepedent module with js_import. Container-friendly logging. Additional metrics for OIDC activity.
R23 PKCE support. Added support for deployments behind another proxy or load balancer.
R25 Added access_token to proxy to the backend. Added endpoints of /login and /userinfo. Enhanced /logout endpoint with post logout uri. Token configuration to forward and return. Configurable query and path param to the IDP endpoint. Bundled test page. Enhanced session management.
A wrapper around GeoIO for non-georeferenced jpg files. Simply give the path to a jpg file and a shapely object describing the geospatial boundary of that image.
Install
Note that GeoIO only works with python 2, therefore GeoIOJpg also has this same limitation
pip install geoiojpg
Usage
fromshapely.geometryimportboxfromgeoiojpgimportGeoImage# Path to some satellite image in jpg formatimg_file='./img.jpg'# bounding box (somewhere in Madagascar)boundary=box(49.482, -15.908, 49.570, -15.996)
# Create the GeoImage (this returns a regular geoio GeoImage)geoimg=GeoImage(img_file, boundary)
print(geoimg.raster_to_proj(50, 50))
# > (49.4826462689568, -15.9084275189568)
How it works
GeoIOJpg will build a VRT in XML format out of the supplied metadata. Basically, it will compute the geotransform based on the supplied shapely object and height/width of the image. It will assume that all jpg files are in RGB format. This will then call the GeoIO constructor with the temporary VRT file. After the GeoIO object has been created, the temporary file is deleted.
Angular routing engine that drive views by media types. It loads data itself, and by response Content-Type header
it displays configured view. It is a replacement for original Angular Router (they cannot be used at the same time).
The aim of this library is to allow building of RESTful clients using Angular, following HATEOAS principle.
fromayah_senderimportAyahSenderayahSender=AyahSender()
# Show available recitersreciters_dict=ayahSender.reciter.show_reciters()
print(reciters_dict)
# Fetch a single ayah's audioaudio_data=ayahSender.get_single_ayah(reciter_id=1, chapter_num=1, verse_num=1)
# Save the single ayah audioayahSender.save_audio(audio_data, output_dir='.')
# Merge multiple ayahs' audiomerged_audio_data=ayahSender.merge_ayahs(reciter_id=5, chapter_num=1, start_verse=1, end_verse=5)
# Save the merged audio fileayahSender.save_audio(merged_audio_data, output_dir='.')
# Getting png image of an ayahayahSender.get_image(chapter_num=2, verse_num=255, output_dir='ayah-png')
Functions
get_total_verses_in_chapter(chapter_number)
Fetches the total number of verses in a given chapter.
In the fast-paced world of consumer electronics, brand perception can make or break a company. Let’s dive into the minds of consumers and uncover the hidden patterns shaping the industry’s biggest names.
This analysis delves into the perceptions of 10 major tech brands, using advanced statistical techniques to uncover insights that could reshape marketing strategies.
I analyze consumer brand perception survey data (consumer electronics_brand_ratings_updated.csv) for popular consumer electronic device brands.
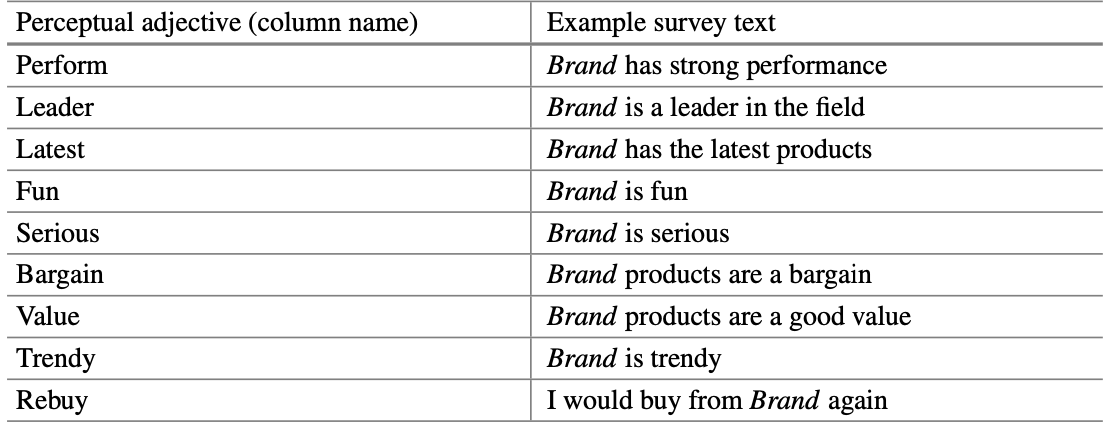
This data reflects consumer ratings of brands with regard to perceptual adjectives as expressed on survey items with the following form:
On a scale from 1 to 10—where 1 is least and 10 is most—how [ADJECTIVE] is [BRAND A]?
In this dataset, an observation is one respondent’s rating of a brand on one of the adjectives. Two such items might be:
How trendy is Sony?
How much of a category leader is Bose?
Such ratings are collected for all the combinations of adjectives and brands of interest.
The multidimensional data here comprise simulated ratings of 10 brands on 9 adjectives (“performance,” “leader,” “latest,” “fun,” and so forth), for N = 100 simulated respondents.
Rescaling and Clustering the Data
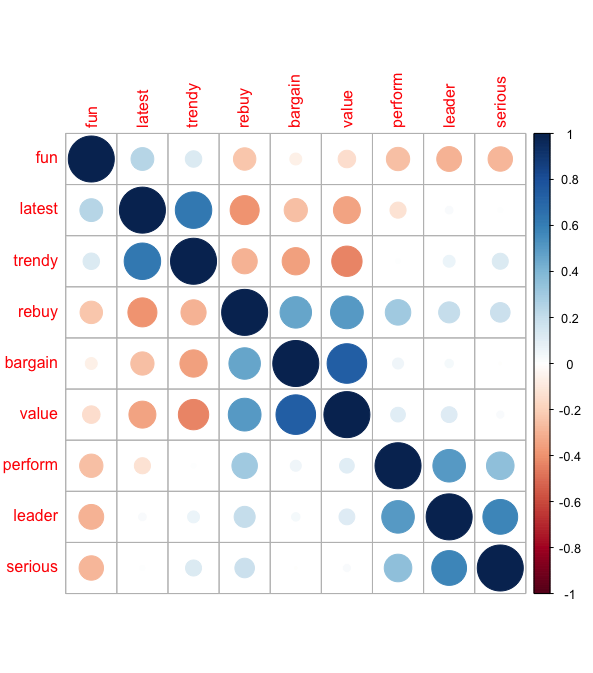
I take our initial data and make some adjustments to the first 9 columns to standardize them to a common measure (z-scoring). This is making sure all parts of the data are using the same scale. Then, I use the corrplot package and library to visualize how closely related each pair of variables (like questions in a survey about brand attributes) are to each other. The strength of the relationship between two variables is shown by how close together or far apart they are on the map. Hierarchical clustering orders the variables in the correlation plot, and sorts the variables in such a way that variables with similar patterns of correlation are grouped together in clusters in the plot, as below:
The plot suggests the following:
Certain brand attributes are closely related and form clusters. For example, attributes like “fun,” “trendy,” and “latest” might be one cluster, indicating that brands perceived as fun also tend to be seen as trendy and up-to-date.
The size and color of the circles indicate the strength and direction of the relationship between pairs of attributes. Large, dark blue circles represent strong positive correlations, meaning as one attribute increases, the other tends to increase as well. Conversely, large, dark red circles represent strong negative correlations, where an increase in one attribute corresponds to a decrease in the other.
Smaller circles or those closer to white suggest little to no correlation between those attributes, indicating that they are perceived independently of one another.
Aggregate Mean Ratings by Brand
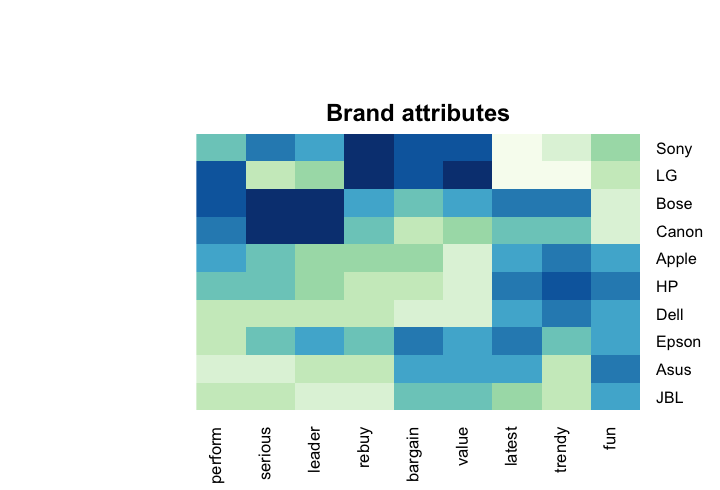
What is the average (mean) position of the brand on each adjective? To answer this, I first gather all data for each brand and calculate the average. Using our tools to paint a heatmap, which shows how similar or different brands compare on various attributes. Some brands are strongly associated with certain attributes. For example, dark blue indicates a strong positive association, and a brand with dark blue in “perform” is seen as high performing.
For each brand, these are the perceptions:
Sony – known for high performance and serious technology.
LG – also stands for reliable performance and innovation.
Bose – a leader in audio with a serious approach to sound quality.
Canon – a trusted brand for photographic equipment, valuing performance.
Apple – often seen as a leader, innovative, and trendy.
Hewlett-Packard (HP) – a long-standing brand known for value and performance in computing.
Dell – a serious and value-oriented brand in computing technology.
Epson – known for reliable performance in printing technology.
Asus – balances performance with value, also trendy in the gaming community.
JBL – provides fun and trendy audio products with good performance.
Sony and LG have high ratings for “rebuy” and “value” but score low on “latest” and “fun”. This could indicate that while customers are loyal and see value in these brands, they may not view them as the most cutting-edge or entertaining compared to others. This could suggest a strategy focused on highlighting new innovations and features in their latest products to shift consumer perception towards seeing Sony and LG as more contemporary and exciting brands.
Bose and Canon share similarities in certain attributes. They could possibly be perceived well in terms of quality or reliability but might need to work on other aspects such as being viewed as budget-friendly or innovative.
Apple, HP and Dell are typically strong brands, often perceived as leaders in innovation and quality. Grouped together, it suggests they share a strong market perception across several attributes. They should continue to leverage their strengths in marketing strategies.
Asus and JBL are paired for attributes like “fun” and “bargain”, which might imply that consumers see these brands as offering enjoyable products at a good price point. This pairing could suggest a strategy focused on marketing products that bring enjoyment to consumers at a competitive price.
Principal Component Analysis (PCA)
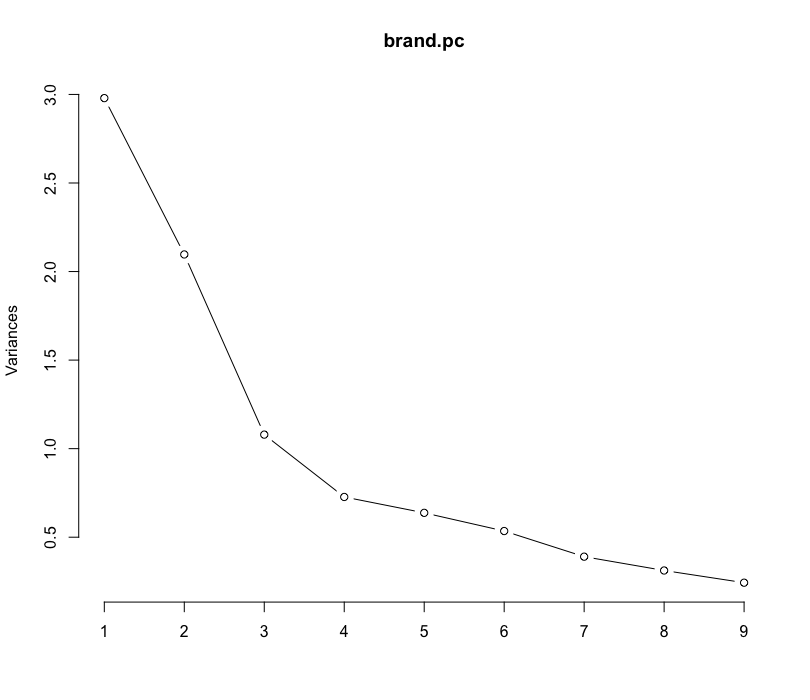
PCA helps make things simpler by finding out which parts of your data tell you the most about the whole set without having to look at every little piece. When you compare several brands across many dimensions, it can be helpful to focus on just the first two or three principal components that explain variation in the data. I find the components with the PCA function prcomp().
I can select how many components out of the 9 to focus on using a scree plot, which shows how much variation in the data is explained by each principal component. A scree plot is often interpreted as indicating where additional components are not worth the complexity; this occurs where the line has an elbow, a kink in the angle of bending where the graph stops dropping off sharply and starts to flatten out. This is a somewhat subjective determination, and in this case we consider it to be around the second or third component:
Findings
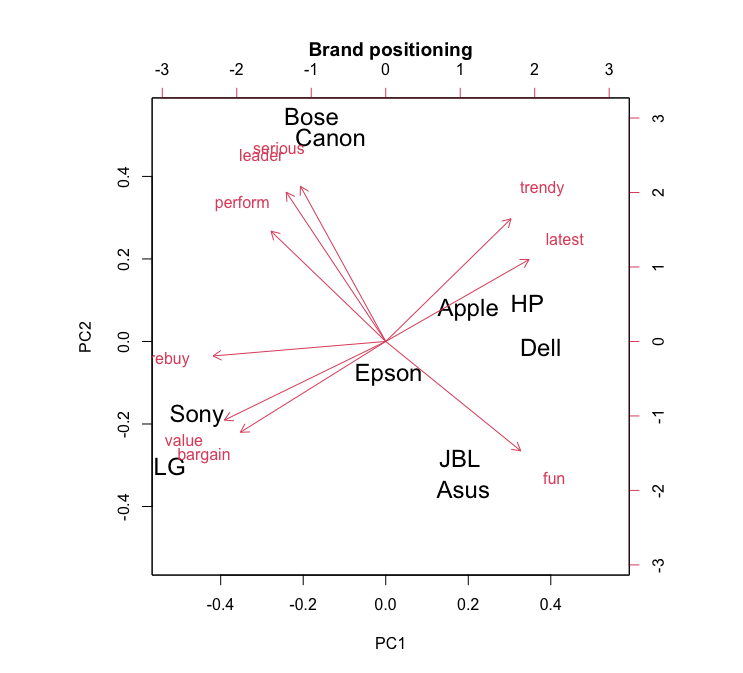
A biplot of the PCA solution for the mean ratings gives an interpretable correspondence map, showing where the brands are placed with respect to the first two principal components:
The actual names or the specific meanings of PC1 and PC2 are not directly provided in the biplot and these components are new super-attributes that are created by combining the original attributes in specific ways. They are mathematical constructs that capture certain variances and are defined by their loadings on the original variables (the brand attributes). The ‘loadings’ are the correlations or connections each original variable (like “fun,” “perform,” etc.) has with a given component. They tell us how much a change in the original variable would move the component. A high loading means that attribute strongly influences the PC, while a low loading means it has less influence.
PC1 (Horizontal Axis): This principal component captures the largest variance in the dataset. This dimension likely captures perceptions related to price, value, or affordability. Brands on the left like LG and Sony are associated with “value” and “bargain”, while premium brands like Bose, Canon, and Apple are on the right side.
PC2 (Vertical Axis): The second principal component often captures variance not accounted for by the first. This dimension seems to represent perceptions around innovation, trendiness, or performance quality. Brands higher up like Bose, Canon, and Apple are labeled as “serious/leader”, “trendy”, and “latest”, suggesting high-performance or cutting-edge attributes. Lower brands like JBL and Asus are aligned with “fun”, potentially implying a focus on excitement, customer experience, entertainment or casual use cases.
This information matters because it simplifies complex data into a few key ‘themes’. Instead of juggling dozens of individual attributes, you can concentrate on a few big-picture components. It makes analysis and decision-making more focused and manageable.
Dell and Epson are positioned near the center, suggesting a more neutral or mainstream perception.
Recommendations
Epson’s goal to be a safe brand that appeals to many consumers meant that its relatively undifferentiated position was desirable sp far. However, the new CMO wishes the brand to have a strong, differentiated space where no brand is positioned. In the correspondence map, there is a large gap between the group Sony/LG on the bottom of the chart, versus Bose/Canon on the upper left. This area might be described as the “value leader” area or similar.
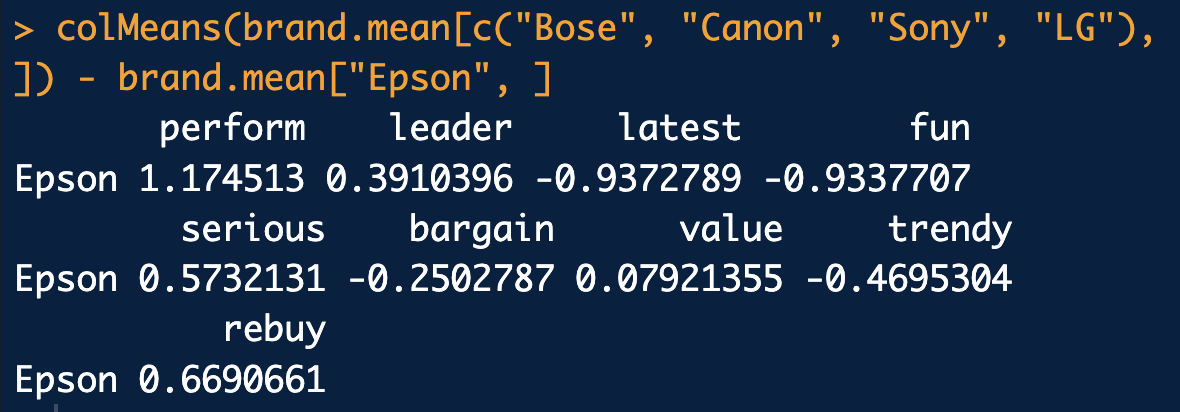
How do we find out how to position there? Let’s assume that the gap reflects approximately the average of those four brands. We can find that average using colMeans() on the brands’ rows, and then take the difference of Epson from that average:
This suggests that brand Epson could target the gap by increasing its emphasis on performance while reducing emphasis on “latest” and “fun.”
Conclusion: Charting the Course in a Dynamic Market
This analysis provides a data-driven roadmap for understanding and navigating the complex terrain of tech brand perceptions. For Epson, the path forward involves a strategic shift towards a ‘value performance leader’ position, filling a gap in the current market landscape.
As the tech industry continues to evolve, regular reassessment of brand perceptions will be crucial. This analytical approach offers a powerful tool for tracking shifts in consumer sentiment and identifying emerging opportunities.
Questo testo è una dispensa di appunti scritta da studenti; lo scopo è quello di raccogliere i contenuti del corso di Linugaggi Formali e Compilatori e organizzarli secondo un’esposizione quanto più completa, efficace ed intuitiva possibile, tanto per lo studente desideroso di ottenere un’ottima padronanza degli argomenti, quanto anche per lo studente pigro in cerca di risorse per “portare a casa” l’esame.
Gli appunti sono stati presi durante il corso di Linguaggi Formali e Compilatori tenuto dalla professoressa Paola Quaglia per il Corso di Laurea in Informatica, DISI, Università degli studi di Trento, anno accademico 2020-2021. I contenuti provengono quindi primariamente dalle lezioni della professoressa, mentre invece ordine ed esposizione sono in gran parte originali. Allo stesso modo, la maggior parte degli assets (figure, grafi, tabelle, pseudocodici) sono contenutisticamente tratti dal materiale della professoressa, ma ricreati e molto spesso manipolati dagli autori; inoltre, per ottenere il risultato appena citato, è stato molto spesso necessario abbandonare quasi del tutto l’esposizione della professoressa e usarla, appunto, come canovaccio per svilupparne una originale.
Maggiori informazioni sul progetto e e sugli autori possono essere trovate nella prefazione dell’elaborato.
Segnalazione errori
Se durante la lettura doveste incorrere in errori di qualsiasi tipo, tra gli altri errori di battitura, errori concettuali o di impaginazione, vi chiediamo di fare una segnalazione; ve ne saremo riconoscenti e provvederemo a correggere quanto prima. Se siete arrivati a questo punto assumiamo una buona familiarità con Github, per cui come canali per segnalare errori:
aprire una Github issue, se possibile referenziando all’interno del corpo anche la porzione di codice in cui è presente l’errore
se volete direttamente proporre un vostro fix, potete clonare la repo (istruzioni per la build qui) e aprire una pull request con i commit che risolvono l’errore, vi daremo un riscontro quanto prima
Se preferite non segnalare l’errore tramite Github potete comunque contattarci personalmente tramite gli indirizzi email che trovate sui nostri profili Github, oppure con la mail istituzionale nome.cognome@studenti.unitn.it, o naturalmente con mezzi più informali.
pip, per cui assicuratevi di aver installato Python
se volete compilare utilizzando il tool Arara, allora dovrete avere una JVM installata
A questo punto:
clonate la repository con git clone https://github.com/filippodaniotti/Appunti-LFC
installate il pacchetto Pygments con pip install Pygments
compilate, ad esempio:
lanciando tre volte pdflatex -shell-escape main.tex
lanciando latexmk -pdf -shell-escape main.tex
per una compilazione rapida, potete utilizzare Arara con arara main.tex (dovete necessariamente trovarvi nella directory ~/src/), sarà equivalente a lanciare una sola passata di pdflatex
È possibile compilare singolarmente ogni capitolo e ogni asset, è sufficiente lanciare la compilazione sul singolo .tex desiderato.
Se lavorate con degli IDE o con degli editor in coppia con dei tool per la scrittura LaTeX (e.g. VS Code + LaTeX Workshop o Atom + latex), assicuratevi di attivare il flag -shell-escape dalle impostazioni di compilazione del vostro tool.
How to build with Docker
Se non disponete dei prerequisiti per la build indicati sopra (o non volete installarli system-wide), potete
buildare con docker.
Se poi avete sia VS Code che Docker, potete riferirvi a questo gist per una configurazione già pronta.
clonate la repository con git clone https://github.com/filippodaniotti/Appunti-LFC
se non siete su linux, buildate l’immagine docker contenuta nel Dockerfile con docker build -t dispensa_lfc .
Nel caso siate su linux, usate questo comando per buildare docker build -t dispensa_lfc --build-arg UID=$(id -u) --build-arg GID=$(id -g) . (si assicura che il vostro userId e groupId corrispondano a quelli che il container userà)
avviate un container, ricordandovi di montare la cartella della dispensa/
Esempio: docker run -ti --rm -v $(pwd):/dispensa --name dispensa_lfc dispensa_lfc
ora avete accesso ad un ambiente con tutte le dipendenze installate e potete buildare usando i comandi della sezione how to build (ad eccezione di Arara, perché il container non ha una JVM installata)
Principali pacchetti impiegati
standalone per gestire la compilazione autonoma di capitoli e assets
tabularx per la gestione delle tabelle
forest per la generazione degli alberi
tikz con librerie automata per la generazione dei grafi
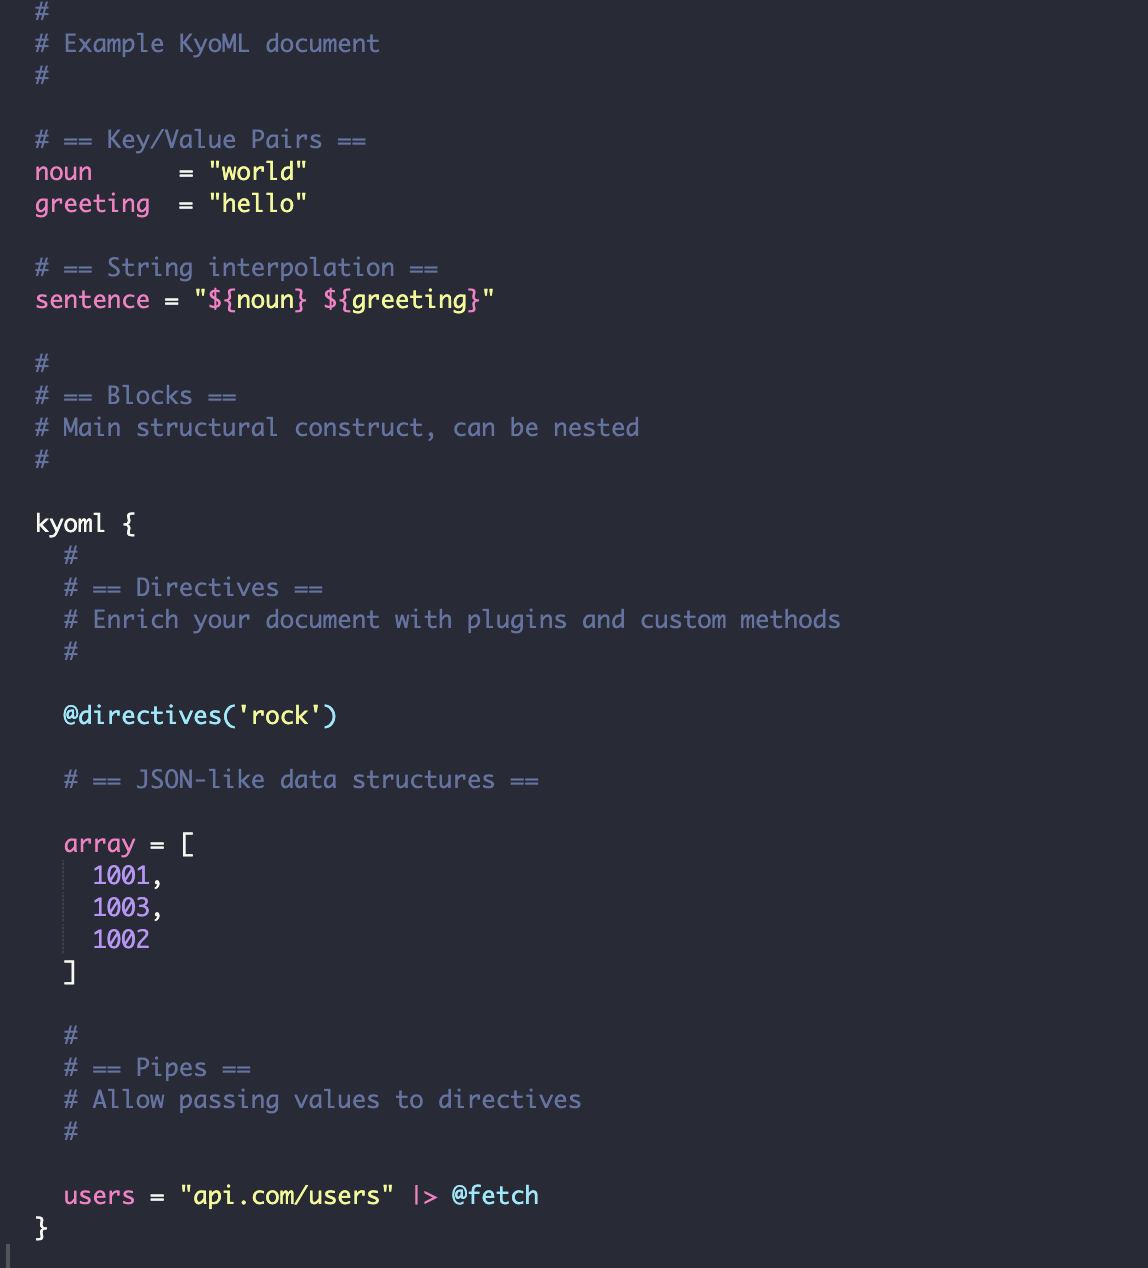
Directives can be added anywhere in the document with an @ prefix. In essence they are functions that allow you to alter your document and create enriched experiences.
constkyoml=require('kyoml');constjson=kyoml.compile(` key1 = 'value1' key2 = 'value2' block { @uppercase key3 = [1,2,3] }`,{directives: {uppercase: (node)=>{const{
root,// The root of the entire document
base,// The direct parent on which element you're operating on is
key,// The key on the base which contains the element
path,// The full path from the root (e.g document.block)
value,// The element itself
set,// A handy replace method
get // A getter allowing you to access anything in the entire document}=node;// You can now operate on your nodeset(_.mapKeys(value,key=>key.toUpperCase()));}}})