ML Infrastructure stack and playground for local (for now) machine learning development. Including workflow engine, experiment tracking, model serving (upcoming), and more.
Make sure the hosts entry for the fully qualified domain name (FQDN) is set to the storage service (e.g. minio). Pyflyte gets the minio endpoint from the flyteadmin service. In the cluster flyte is configured to use a particular storage service which is forwarded to the client(pyflyte). If the FQDN is not set to the storage service the client will not be able to connect to the storage service.
127.0.0.1 ml-minio.default.svc.cluster.local
Make sure your flyte config is defined – default in ~/.flyte/config – see flyte docs for more details.
import{createStore,addInterceptor}from'spawn-x';import{effects}from'spawn-x-effects';import{logger}from'../interceptors/logger';import{tracksEffect}from'../effects/tracks';import{renderEffect}from'../effects/render';constinitialState={tracks: ['Puddle Of Mudd - Control','American Hi-Fi - Flavor Of The Weak','SR-71 - What A Mess']}//inject effects interceptor conststore=createStore(initialState,addInterceptor(logger,effects));//add effect into effects interceptoreffects.run(tracksEffect);effects.run(renderEffect);export{store}
Effect is just a function which accept store and action and then updates state
You can also “pin” to a specific version by using nocuous@{version} instead,
for example jsr:@higher-order-testing/nocuous@1.1.0/cli.
The CLI comes with integrated help which can be accessed via the --help flag.
Using the API
If you want to incorporate the API into an application, you need to import it
into your code. For example the following will analyze the Deno std assertion
library and its dependencies resolving with a map of statistics:
The tool uses swc as a Rust library to parse code and then
run analysis over the parsed code. It is then compiled to Web Assembly and
exposed as an all-in-one API. Code is loaded via the JavaScript runtime and a
resolver can be provided to allow for custom resolution logic.
Background
The statistics collected around code toxicity are based directly on Erik
Dörnenburg’s article
How toxic is your code?.
The default metrics are based on what is suggested in the article. When applying
to TypeScript/JavaScript there are some adaptation that is required:
Metric
Table Label
Description
Default Threshold
File length
L
The number of lines in a file.
500
Class data abstraction coupling
CDAC
The number of instances of other classes that are “new”ed in a given class.
10
Anon Inner Length
AIL
Class expressions of arrow functions length in number of lines.
35
Function Length
FL
The number of statements in a function declaration, function expression, or method declaration.
30
Parameter Number
P
The number of parameters for a function or method
6
Cyclomatic Complexity
CC
The cyclomatic complexity for a function or method
10
Binary Expression Complexity
BEC
How complex a binary expression is (e.g. how many && and `
Missing Switch Default
MSD
Any switch statements that are missing the default case.
1
Copyright 2019 – 2024 Kitson P. Kelly. MIT License.
You need to configure Variables in following files to make the compose work:
file
VARIABLE1
VARIABLE2
VARIABLE3
docker-compose.yml(generated from docker-compose-full_stack.yml)
PLACE_YOUR_FQDN_HERE (3 times)
.env(env needs to be renamed to .env)
YOUR_PATH_TO_CONTAINER_STATIC_DATA
YOUR_ADMIN_USER
YOUR_ADMIN_PASSWORD
YOUR_ORGANIZATION
YOUR_BUCKET_NAME
YOUR_ADMIN_TOKEN
YOUR_MONITORED_TARGET
YOUR_MONITORED_TARGET_TIMEOUT
YOUR_MONITORED_TARGET_TIMER
YOUR_MONITORED_TARGET_LOCATION
grafana/provisioning/datasources/grafana-datasource.yml(generated from grafana/grafana-datasource-template.yml)
YOUR_ADMIN_TOKEN
YOUR_ORGANIZATION
YOUR_BUCKET_NAME
File Permissions
Because we are configuring grafana for permanent data storing and grafana actually runs with UID + GID: 472:472 it´s necessary to change permisson of die permanent storage directory we have configured.
The directory build from the following config part of grafana within the docker-compose.yml:
so please place your certificate file as ./traefik/mycert.crt and the key file as ./traefik/mycert.key.
Thats it
Grafana Dashboard Examples
Within the local path ./examples/grafana/ you can find example .json files which can be imported to grafana as dashboards to give you a first point to start with.
While Graph Neural Networks (GNNs) have achieved remarkable performance on various machine learning
tasks on graph data, they also raised questions regarding their transparency and interpretability.
Recently, there have been extensive research efforts to explain the decision-making process of GNNs.
These efforts often focus on explaining why a certain prediction is made for a particular instance,
or what discriminative features the GNNs try to detect for each class. However, to the best of our
knowledge, there is no existing study on understanding the decision boundaries of GNNs, even though
the decision-making process of GNNs is directly determined by the decision boundaries. To bridge this
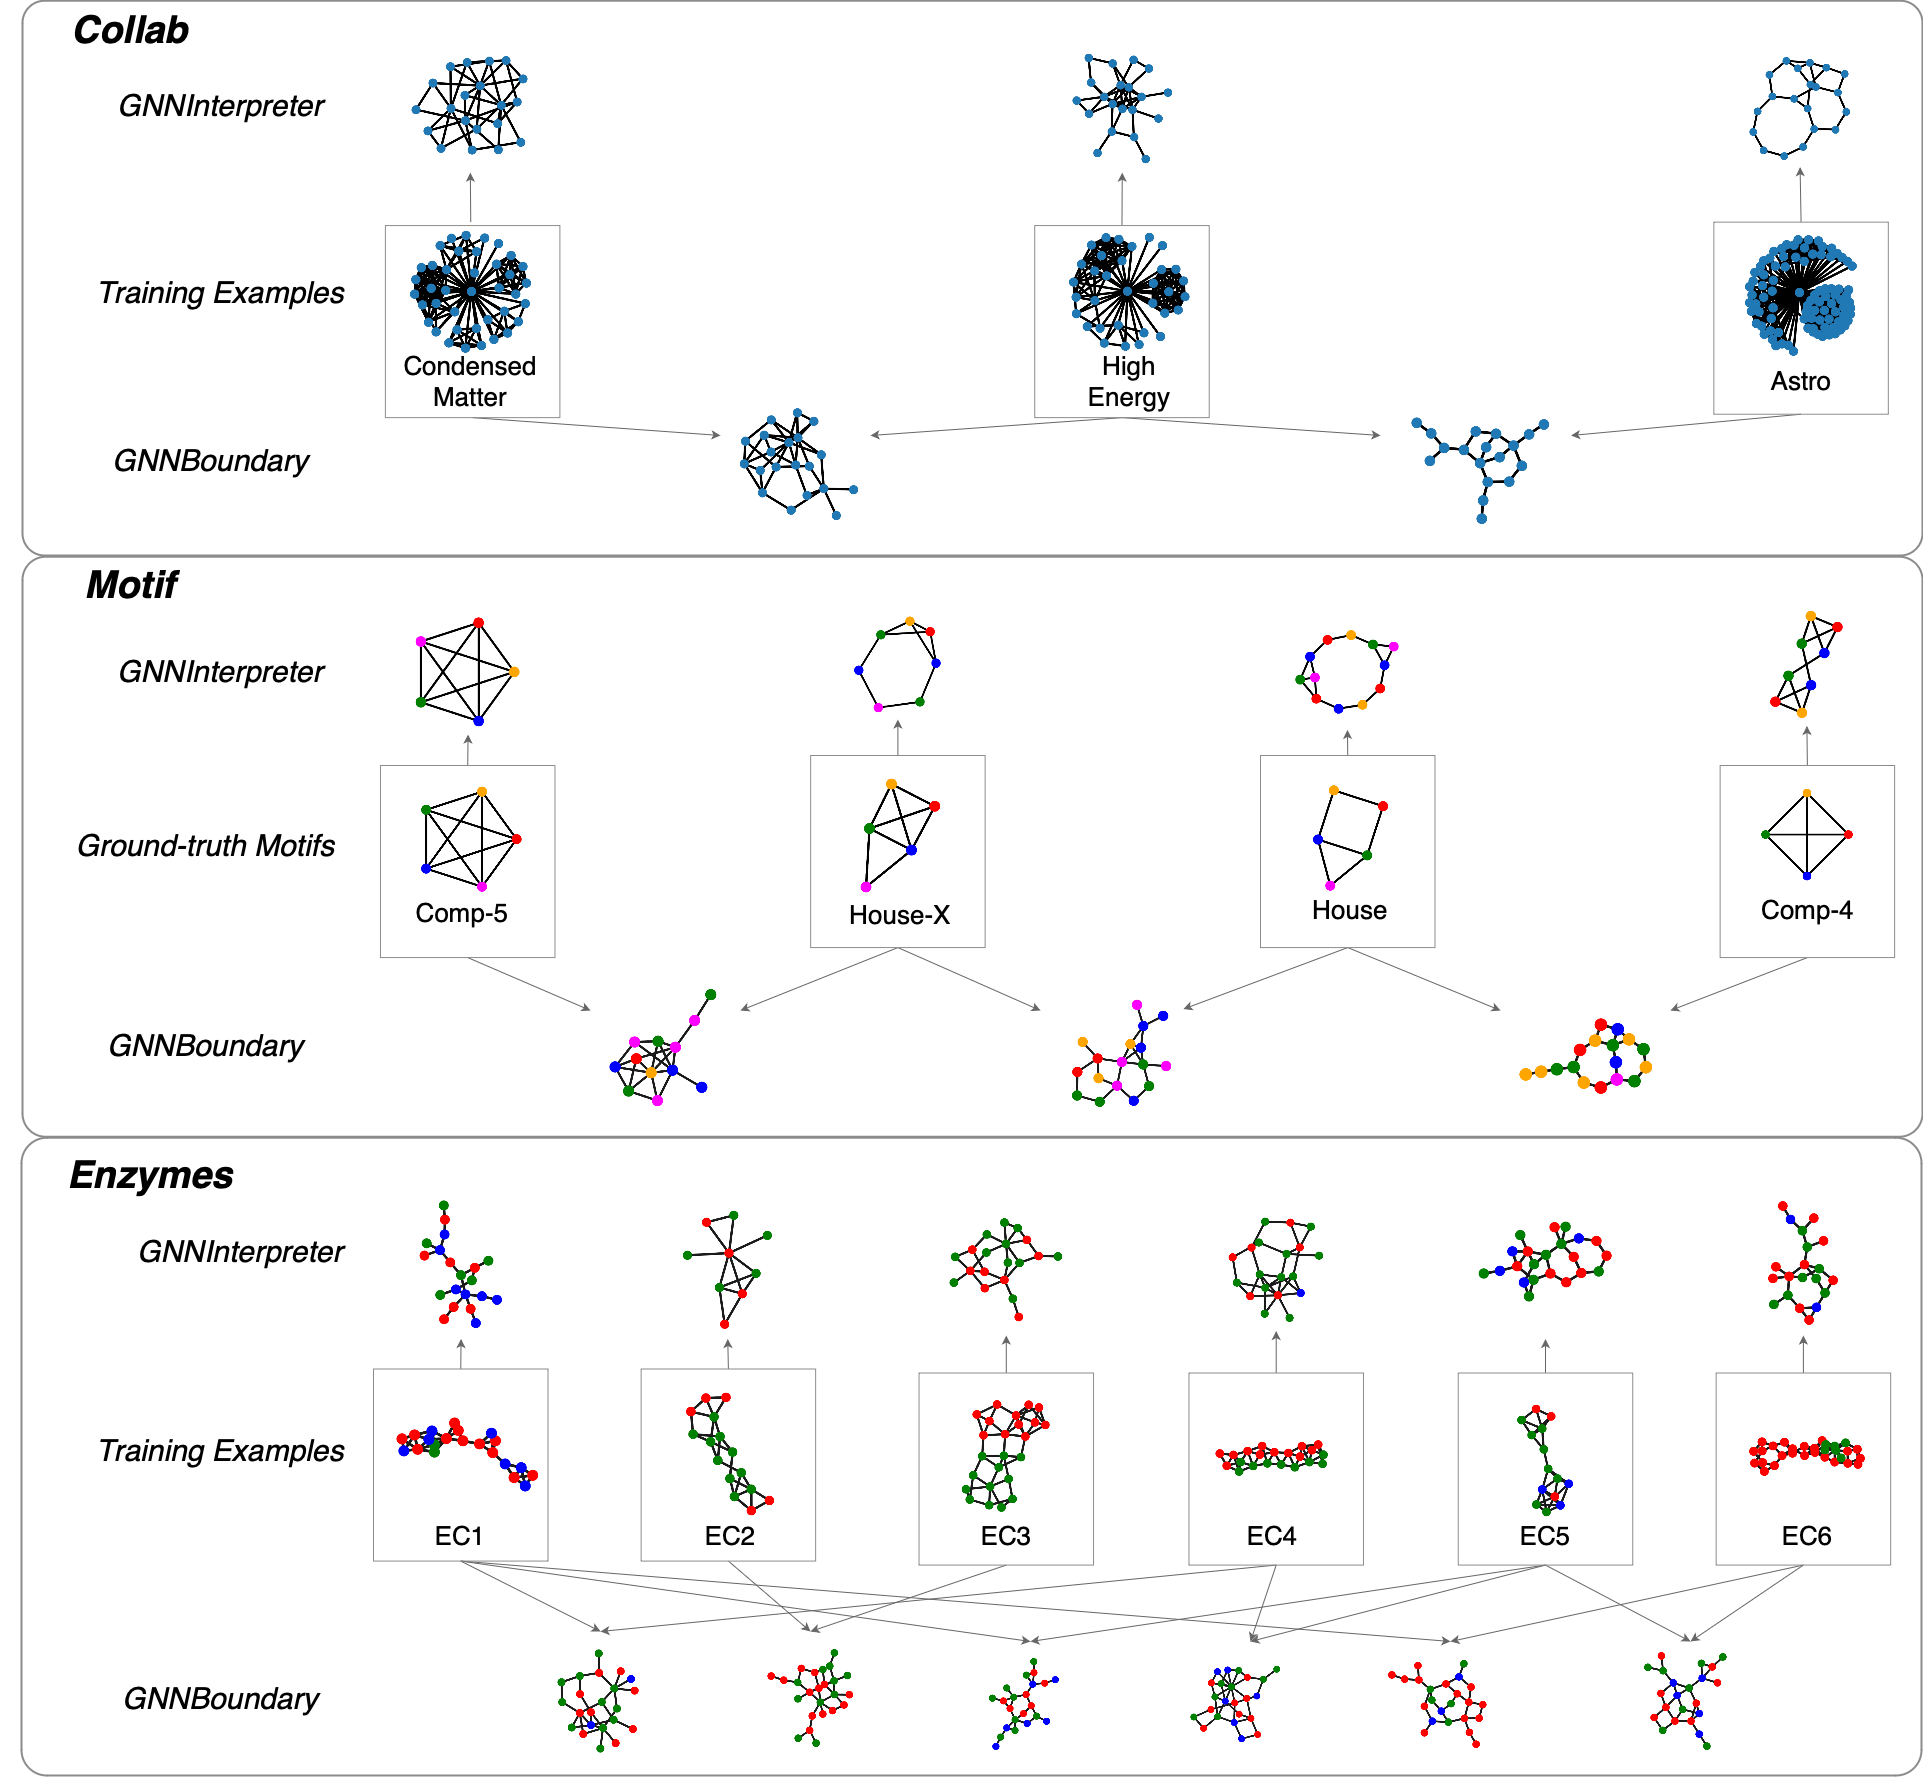
research gap, we propose a model-level explainability method called GNNBoundary, which attempts to gain
deeper insights into the decision boundaries of graph classifiers. Specifically, we first develop an
algorithm to identify the pairs of classes whose decision regions are adjacent. For an adjacent class
pair, the near-boundary graphs between them are effectively generated by optimizing a novel objective
function specifically designed for boundary graph generation. Thus, by analyzing the near-boundary
graphs, the important characteristics of decision boundaries can be uncovered. To evaluate the efficacy
of GNNBoundary, we conduct experiments on both synthetic and public real-world datasets. The results
demonstrate that, via the analysis of faithful near-boundary graphs generated by GNNBoundary, we can
thoroughly assess the robustness and generalizability of the explained GNNs.
GNNBoundary is inspired by our prior work, GNNInterpreter, which aims to explain the high-level decision-making process of GNNs. Please check this repository for more details.
Note: In case poetry fails to install the dependencies, you can manually install them using pip:
pip install -r requirements.txt
🖼️ Demo
🖊️ Citation
If you used our code or find our work useful in your research, please consider citing:
@inproceedings{wang2024gnnboundary,
title={{GNNB}oundary: Towards Explaining Graph Neural Networks through the Lens of Decision Boundaries},
author={Xiaoqi Wang and Han Wei Shen},
booktitle={The Twelfth International Conference on Learning Representations},
year={2024},
url={https://openreview.net/forum?id=WIzzXCVYiH}
}
🙏 Acknowledgement
The work was supported in part by the US Department of Energy SciDAC program DE-SC0021360,
National Science Foundation Division of Information and Intelligent Systems IIS-1955764,
and National Science Foundation Office of Advanced Cyberinfrastructure OAC-2112606.
AnyKernel3 – Flashable Zip Template for Kernel Releases with Ramdisk Modifications
by osm0sis @ xda-developers
“AnyKernel is a template for an update.zip that can apply any kernel to any ROM, regardless of ramdisk.” – Koush
AnyKernel2 pushed the format further by allowing kernel developers to modify the underlying ramdisk for kernel feature support easily using a number of included command methods along with properties and variables to customize the installation experience to their kernel. AnyKernel3 adds the power of topjohnwu’s magiskboot for wider format support by default, and to automatically detect and retain Magisk root by patching the new Image.*-dtb as Magisk would.
A script based on Galaxy Nexus (tuna) is included for reference. Everything to edit is self-contained in anykernel.sh.
do.devicecheck=1 specified requires at least device.name1 to be present. This should match ro.product.device, ro.build.product, ro.product.vendor.device or ro.vendor.product.device from the build.prop files for your device. There is support for as many device.name# properties as needed. You may remove any empty ones that aren’t being used.
do.modules=1 will push the .ko contents of the modules directory to the same location relative to root (/) and apply correct permissions. On A/B devices this can only be done to the active slot.
do.systemless=1 (with do.modules=1) will instead push the full contents of the modules directory to create a simple “ak3-helper” Magisk module, allowing developers to effectively replace system files, including .ko files. If the current kernel is changed then the kernel helper module automatically removes itself to prevent conflicts.
do.cleanup=0 will keep the zip from removing its working directory in /tmp/anykernel (by default) – this can be useful if trying to debug in adb shell whether the patches worked correctly.
do.cleanuponabort=0 will keep the zip from removing its working directory in /tmp/anykernel (by default) in case of installation abort.
supported.versions= will match against ro.build.version.release from the current ROM’s build.prop. It can be set to a list or range. As a list of one or more entries, e.g. 7.1.2 or 8.1.0, 9 it will look for exact matches, as a range, e.g. 7.1.2 - 9 it will check to make sure the current version falls within those limits. Whitespace optional, and supplied version values should be in the same number format they are in the build.prop value for that Android version.
supported.patchlevels= will match against ro.build.version.security_patch from the current ROM’s build.prop. It can be set as a closed or open-ended range of dates in the format YYYY-MM, whitespace optional, e.g. 2019-04 - 2019-06, 2019-04 - or - 2019-06 where the last two examples show setting a minimum and maximum, respectively.
block=auto instead of a direct block filepath enables detection of the device boot partition for use with broad, device non-specific zips. Also accepts specifically boot, recovery or vendor_boot.
is_slot_device=1 enables detection of the suffix for the active boot partition on slot-based devices and will add this to the end of the supplied block= path. Also accepts auto for use with broad, device non-specific zips.
ramdisk_compression=auto allows automatically repacking the ramdisk with the format detected during unpack. Changing auto to gz, lzo, lzma, xz, bz2, lz4, or lz4-l (for lz4 legacy) instead forces the repack as that format, and using cpio or none will (attempt to) force the repack as uncompressed.
patch_vbmeta_flag=auto allows automatically using the default AVBv2 vbmeta flag on repack, and use the Magisk configuration Canary 23016+. Set to 0 forces keeping whatever is in the original AVBv2 flags, and set to 1 forces patching the flag (only necessary on few devices).
customdd="<arguments>" may be added to allow specifying additional dd parameters for devices that need to hack their kernel directly into a large partition like mmcblk0, or force use of dd for flashing.
slot_select=active|inactive may be added to allow specifying the target slot. If omitted the default remains active.
no_block_display=1 may be added to disable output of the detected final used partition+slot path for zips which choose to include their own custom output instead.
“if search string” is the string it looks for to decide whether it needs to add the tweak or not, so generally something to indicate the tweak already exists. “cmdline entry name” behaves somewhat like this as a match check for the name of the cmdline entry to be changed/added by the patch_cmdline function, followed by the full entry to replace it. “prop name” also serves as a match check in patch_prop for a property in the given prop file, but is only the prop name as the prop value is specified separately.
Similarly, “line match string” and “line replace string” are the search strings that locate where the modification needs to be made for those commands, “begin search string” and “end search string” are both required to select the first and last lines of the script block to be replaced for replace_section, and “mount match name” and “fs match type” are both required to narrow the patch_fstab command down to the correct entry.
“scope” may be specified as “global” to force all instances of the string/line targeted by replace_string, replace_line or remove_line to be replaced/removed accordingly. Omitted or set to anything else and it will perform the default first-match action.
“before|after” requires you simply specify “before” or “after” for the placement of the inserted line, in relation to “line match string”.
“block|mount|fstype|options|flags” requires you specify which part (listed in order) of the fstab entry you want to check and alter.
dump_boot and write_boot are the default method of unpacking/repacking, but for more granular control, or omitting ramdisk changes entirely (“OG AK” mode), these can be separated into split_boot; unpack_ramdisk and repack_ramdisk; flash_boot respectively. flash_generic can be used to flash an image to the corresponding partition. It is automatically included for dtbo and vendor_dlkm in write_boot but can be called separately if using “OG AK” mode or creating a simple partition flashing only zip.
Multi-partition zips can be created by removing the ramdisk and patch folders from the zip and including instead “-files” folders named for the partition (without slot suffix), e.g. boot-files + recovery-files, or kernel-files + ramdisk-files (on some Treble devices). These then contain Image.gz, and ramdisk, patch, etc. subfolders for each partition. To setup for the next partition, simply set block= (without slot suffix) and ramdisk_compression= for the new target partition and use the reset_ak command.
Similarly, multi-slot zips can be created with the normal zip layout for the active (current) slot, then resetting for the inactive slot by setting block= (without slot suffix) again, slot_select=inactive and ramdisk_compression= for the target slot and using the reset_ak keep command, which will retain the patch and any added ramdisk files for the next slot.
backup_file may be used for testing to ensure ramdisk changes are made correctly, transparency for the end-user, or in a ramdisk-only “mod” zip. In the latter case restore_file could also be used to create a “restore” zip to undo the changes, but should be used with caution since the underlying patched files could be changed with ROM/kernel updates.
You may also use ui_print “<text>” to write messages back to the recovery during the modification process, abort “<text>” to abort with optional message, and file_getprop “<file>” “<property>” and contains “<string>” “<substring>” to simplify string testing logic you might want in your script.
// Binary Inclusion
The AK3 repo includes current ARM builds of magiskboot, magiskpolicy and busybox by default to keep the basic package small. Builds for other architectures and optional binaries (see below) are available from the latest Magisk zip, or my latest AIK-mobile and FlashIt packages, respectively, here:
Optional supported binaries which may be placed in /tools to enable built-in expanded functionality are as follows:
mkbootfs – for broken recoveries, or, booted flash support for a script/app via bind mount to /tmp (deprecated/use with caution)
flash_erase, nanddump, nandwrite – MTD block device support for devices where the dd command is not sufficient
dumpimage, mkimage – DENX U-Boot uImage format support
mboot – Intel OSIP Android image format support
unpackelf, mkbootimg – Sony ELF kernel.elf format support, repacking as AOSP standard boot.img for unlocked bootloaders
elftool (with unpackelf) – Sony ELF kernel.elf format support, repacking as ELF for older Sony devices
mkmtkhdr (with unpackelf) – MTK device boot image section headers support for Sony devices
futility + chromeos test keys directory – Google ChromeOS signature support
boot_signer-dexed.jar + avb keys directory – Google Android Verified Boot 1.0 (AVBv1) signature support
rkcrc – Rockchip KRNL ramdisk image support
Optionally moving ARM builds to tools/arm and putting x86 builds in tools/x86 will enable architecture detection for use with broad, device non-specific zips.
// Instructions
Place final kernel build product, e.g. Image.gz-dtb or zImage to name a couple, in the zip root (any separate dt, dtb or recovery_dtbo, dtbo and/or vendor_dlkm should also go here for devices that require custom ones, each will fallback to the original if not included)
Place any required ramdisk files in /ramdisk (/vendor_ramdisk for simple multi-partition vendor_boot support) and module files in /modules (with the full path like /modules/system/lib/modules)
Place any required patch files (generally partial files which go with AK3 file editing commands) in /patch (/vendor_patch for simple multi-partition vendor_boot support)
Modify the anykernel.sh to add your kernel’s name, boot partition location, permissions for any added ramdisk files, and use methods for any required ramdisk modifications (optionally, also place banner and/or version files in the root to have these displayed during flash)
zip -r9 UPDATE-AnyKernel3.zip * -x .git README.md *placeholder
The LICENSE file must remain in the final zip to comply with licenses for binary redistribution and the license of the AK3 scripts.
If supporting a recovery that forces zip signature verification (like Cyanogen Recovery) then you will need to also sign your zip using the method I describe here:
Not required, but any tweaks you can’t hardcode into the source (best practice) should be added with an additional init.tweaks.rc or bootscript.sh to minimize the necessary ramdisk changes. On newer devices Magisk allows these within /overlay.d – see examples.
It is also extremely important to note that for the broadest AK3 compatibility it is always better to modify a ramdisk file rather than replace it.
If running into trouble when flashing an AK3 zip, the suffix -debugging may be added to the zip’s filename to enable creation of a debug .tgz of /tmp for later examination while booted or on desktop.
// Staying Up-To-Date
Now that you’ve got a ready zip for your device, you might be wondering how to keep it up-to-date with the latest AnyKernel commits. AnyKernel2 and AnyKernel3 have been painstakingly developed to allow you to just drop in the latest update-binary and tools directory and have everything “just work” for beginners not overly git or script savvy, but the best practice way is as follows:
Set it up like your zip (i.e. remove any folders you don’t use like ramdisk or patch, delete README.md, and add your anykernel.sh and optionally your Image.*-dtb if you want it up there) then commit all those changes
git push --set-upstream origin <devicename>
git checkout master then repeat steps 4-6 for any other devices you support
Then you should be able to git pull upstream master from your master branch and either merge or cherry-pick the new AK3 commits into your device branches as needed.
MapComp facilitates visual comparisons among linkage maps of closely-related
species in order to assess their quality and to simplify the exploration of
their chromosomal differences. The novelty of the approach lies in the use of a
reference genome in order to maximize the number of comparable marker pairs
among pairs of maps, even when completely different library preparation
protocols have been used to generate the markers. As such, MapComp requires a
reference genome, at least a contig-level genome assembly, for a species that
is phylogenetically close to the target species.
Using MapComp
The main steps in using MapComp are:
Get a reference genome and put here: 02_data/genome/genome.fasta
Index the reference genome (bwa index 02_data/genome/genome.fasta)
Get marker data from two or more taxa
Prepare .csv marker file (see 02_data/tutorial_markers.csv for exact format)
Prepare markers fasta file automatically from .csv file
Run mapcomp, which will:
Map marker sequences on reference genome scaffolds
Filter out non-unique and bad quality alignments
Keep only the best marker pairs
Create figures
Dependencies
In order to use MapComp, you will need the following:
Linux or MacOS
Python 2.7
numpy (Python library)
bwa
samtools (1.x release)
The R statistical language
If you are using a Debian derived Linux distribution, for example Ubuntu or
Linux Mint, you can install all the required tools with the following command:
sudo apt-get install bwa samtools r-base-core
Tutorial
A tutorial data set of markers for two species and a reference genome are
included in MapComp. Both the genome and marker data used for the tutorial were
created in silico. As a result, the figures will look really perfect.
However, the goal of the tutorial to run a full MapComp analysis once to learn
how to use it with your real data. Additionally, the tutorial .csv data file
serves as an example of the exact format required for the marker .csv file,
which contains the marker information for the analyzed species.
Once you have produced the figures from the tutorial data, then using MapComp
on your data will be as easy as preparing the .csv file, automatically creating
the markers fasta file, getting and indexing the reference genome and running
./mapcomp.
Tutorial run
# Rename and index genome
cp 02_data/genome/tutorial_genome.fasta 02_data/genome/genome.fasta
bwa index 02_data/genome/genome.fasta

# Prepare fasta file
./01_scripts/00_prepare_input_fasta_file_from_csv.sh 02_data/tutorial_markers.csv

# Run mapcomp
./mapcomp
You can now look at the figures in the 04_figures folder and at the linkage
group correspondance among the species in the 05_results folder.
Data preparation
In order to compare linkage maps, you will need to collect the following
information about each marker:
Species name (eg: hsapiens)
Linkage Group number (eg: 1, 2, 3…)
Position in centi Morgans, or cM (eg: 0, 5.32, 22.8)
Marker Identifier (eg: marker0001)
Marker Nucleotide Sequence (60 base pairs of more)
Once you have all this information about the markers, you will need to create a
.csv file containing these informations. The .csv file will feature one extra
column containing zeroes and be in the following format:
This will produce a file named 02_data/marker.fasta.
Preparing the reference genome
Once you have a reference genome in fasta format, copy it here:
02_data/genome/genome.fasta and index it with bwa:
bwa index 02_data/genome/genome.fasta
Running MapComp
Once your data has been prepared and your reference genome is indexed, running
mapcomp is as easy launching the following command:
./mapcomp
Exploring Results
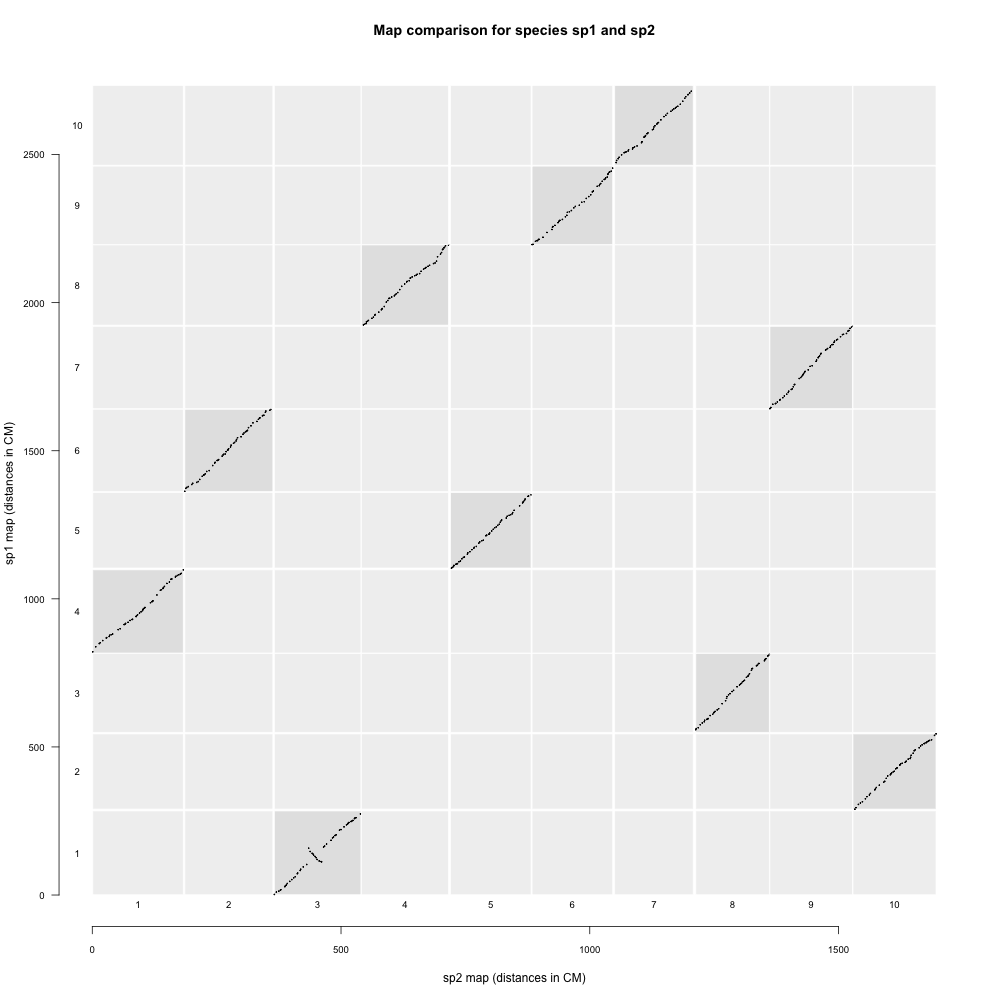
After MapComp finishes, visual plots comparing the different linkage maps will be
found in 04_figures and a summary of the results in 05_results. For more detailed
results, one can inspect the 03_mapped/wanted_loci.info file. This file
contains the details of the marker pairs found for each species pair, and can be
useful to obtain exact mapping locations of markers on the reference genome.
Example output image from the tutorial markers and genome:
Citing
If you use MapComp in your research, please cite:
Sutherland BJG, Gosselin T, Normandeau E, Lamothe M, Isabel N, Bernatchez L.
Salmonid Chromosome Evolution as Revealed by a Novel Method for Comparing
RADseq Linkage Maps. Genome Biol Evol (2016) 8 (12): 3600-3617.
DOI: https://doi.org/10.1093/gbe/evw262
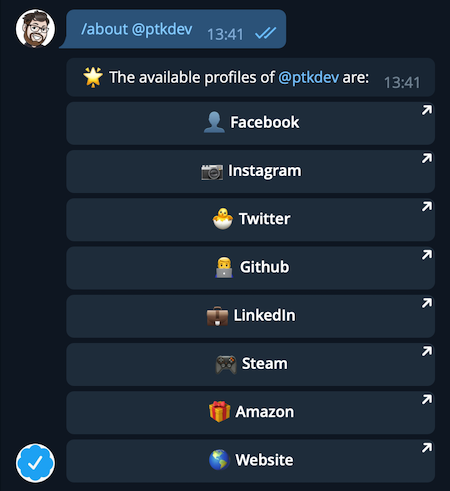
About Me Info Bot: Share your social profiles and links on Telegram
🎁 Support: Donate
This project is free, open source and I try to provide excellent free support. Why donate? I work on this project several hours in my spare time and try to keep it up to date and working. THANK YOU!
Write to @botfather on telegram and create new bot (save token and set bot username)
Run with correct values: npm run init:token --username name_bot --token 1234:asdfghjkl
Run npm install
Run npm run dev
Write /start on telegram bot.
🚀 Deploy
Deploy bot to your server and:
Run with correct values: npm run init:token --token asdfghjkl
Run init npm install
Generate release npm run release
Start bot npm run start-pm2
📚 Documentation
Run npm run docs
👑 Backers and Sponsors
Thanks to all our backers! 🙏 Donate 3$ or more on paypal, ko-fi, github or patreon and send me email with your avatar and url.
👨💻 Contributing
I ❤️ contributions! I will happily accept your pull request! (IMPORTANT: Only to nightly branch!) Translations, grammatical corrections (GrammarNazi you are welcome! Yes my English is bad, sorry), etc… Do not be afraid, if the code is not perfect we will work together 👯 and remember to insert your name in .all-contributorsrc and package.json file.
Thanks goes to these wonderful people (emoji key):
💰 In the future, if the donations allow it, I would like to share some of the success with those who helped me the most. For me open source is share of code, share development knowledges and share donations!
🦄 Other Projects
💫 License
Code and Contributions have MIT License
Images and logos have CC BY-NC 4.0 License
Documentations and Translations have CC BY 4.0 License
$ sum_cli https://python.langchain.com/docs/tutorials/llm_chain/
Here is a concise summary of the article within 10 sentences:

LangChain is a library that enables building applications using language models. This tutorial demonstrates how to build a simple LLM application with LangChain, which translates text from English into another language. The application consists of a single LLM call and prompt templates. Prompt templates take raw user input and return data ready to pass into a language model. A chat template is created with two variables: language and text. The template is used to format the input for the language model. The application invokes the chat model on the formatted prompt, generating a response in the target language. LangSmith provides logging and tracing capabilities, allowing developers to inspect the application's flow. This tutorial covers the basics of using language models, creating prompt templates, and getting observability with LangSmith. For further learning, detailed Conceptual Guides and other resources are available.
You may have some experience of travelling to and from the airport. Have you ever used Uber or any other cab service for this travel? Did you at any time face the problem of cancellation by the driver or non-availability of cars?
Well, if these are the problems faced by customers, these very issues also impact the business of Uber. If drivers cancel the request of riders or if cars are unavailable, Uber loses out on its revenue. Let’s hear more about such problems that Uber faces during its operations.
As an analyst, you decide to address the problem Uber is facing – driver cancellation and non-availability of cars leading to loss of potential revenue.
Business Objective
The aim of analysis is to identify the root cause of the problem (i.e. cancellation and non-availability of cars) and recommend ways to improve the situation. As a result of your analysis, you should be able to present to the client the root cause(s) and possible hypotheses of the problem(s) and recommend ways to improve them.
Data Understanding
There are six attributes associated with each request made by a customer:
Request id: A unique identifier of the request
Request timestamp: The date and time at which the customer made the trip request
Drop timestamp: The drop-off date and time, in case the trip was completed
Pickup point: The point from which the request was made
Driver id: The unique identification number of the driver
Status: The final status of the trip, that can be either completed, cancelled by the driver or no cars available