Causes text to decay by converting a text file to an image, then OCRing the image back to a text file. Only text files are saved.
Setup for OSX:
brew install tesseract
brew install imagemagick
To use, just run
./the_decay_of_that_colossal_wreck.sh
Options:
-i: Specify the number of iteration; the default is 10.
-f: Take a text file as input
-t: Take a string as input
If no input text is specified, the poem Ozymandias by Percy Shelley is used.
Example commands:
# Convert the text of Ozymandias 100 times
./the_decay_of_that_colossal_wreck -i 100

# Use a file as input
./the_decay_of_that_colossal_wreck -f path/to/filename.txt

# A string as input, iterating 5 times
./the_decay_of_that_colossal_wreck -t "Mouse Reeve" -i 5
Example output:
The original poem:
Ozymandias, by Percy Shelley

I met a traveller from an antique land
Who said: Two vast and trunkless legs of stone
Stand in the desert... near them, on the sand,
Half sunk, a shattered visage lies, whose frown,
And wrinkled lip, and sneer of cold command,
Tell that its sculptor well those passions read
Which yet survive, stamped on these lifeless things,
The hand that mocked them and the heart that fed:

And on the pedestal these words appear:
'My name is Ozymandias, king of kings:
Look on my works, ye Mighty, and despair!'
Nothing beside remains. Round the decay
Of that colossal wreck, boundless and bare
The lone and level sands stretch far away.
The poem after 5 iterations:
Dummies, by Percy Shgllcy
1 Mn mm 1 from an arrqu land

wm m1 Two m and mmkless leg; afsfon
Smnd \n M desen near Menu, on Me Send
Halfmnk, 1| shattered V‘Sage xles, whose frown
m wr‘nkled up, m sneer amid command

Tell mm M sculpror wel \ Mo; pass] an; read
wn‘a yer gm '1 a, mmped on mgs‘ Hales; m‘ng;
Th hand Mm mocked Men and M m Mm fed

And 1| m pedefial mgs‘ words appear
‘My mm ‘5 mymnd‘fls, lung mam

Look 1| my works, ye M‘m, aha dnga‘
Nom‘ng Des‘d rema‘n; Round m dguy

of mm (o xossal wrezk, boundless and bare
Th Ion mlml Sandsm'am faraway
If you download Fungewars via git clone --recursive, Git will download GLFW for you. Otherwise, you’ll need to manually put GLFW’s source in a directory inside the fungewars directory named glfw .
CMake should be able to build Fungewars from there.
I’d like Fungewars to work on any system, but I’ve only tested it on Gentoo Linux. I’m pretty sure it will work on any other Linux, and it might also work on OSX. I’m not sure if it will work on Windows under MinGW because I don’t know if MinGW supports pthreads, but that should be the only problem.
Please file bugs or pull requests if you have any problems or solutions related to getting Fungewars to work on your system.
Documentation
TODO
User Interface
TODO
Instruction List
Under Construction
char
stack
name
op
spc
( – )
nop
!
(a – !a)
not
“
( – string)
string
pushes cells until it hits another “, then goes back to normal mode
The primary goal of this site is to provide a fun and informative interactive quiz to test a user’s knowledge of country flags, giving users the opportunity to test their knowledge in three levels of difficulty.
UX
User goals
The central audience for this site is people who would like to test their knowledge of flags or people who would like to learn more.
Site user goals
Users to this site would like to test their knowledge of world flags in a quick, fun and interactive way, as well as see their results and find out which flags they don’t know whether they are a beginner or more advanced in terms of their prior flag knowledge.
This site will meet these goals because
The site will be fully interactive and click based, not requiring any typing or spelling.
The quiz is available in three difficulty levels to suit different levels of prior knowledge.
Quizzes are randomised, meaning that no one 30-second will ever be in the same order or with the same multiple choice in order to encourage users to replay and improve their skills.
Quizzes will be timed at 30 seconds maximum meaning users do not have to make any long time commitments.
A users will be able to save and track their scores and compare it to other users on the same device.
Visual feedback will be given to help users learn from their mistakes.
As a user who would like to play a flag trivia quiz, I want:
An uncomplicated user interface which allows quick and initiative interaction.
Clear and easy to understand feedback.
The option to play a quiz that is suited to my knowledge level.
Recognition of my positive achievements.
Encouragement to continue playing in order to get better.
Design Choices
The overall design of the site is based on a single page , no scrolling layout, with minimum text. Questions, answers and user-feedback are designed and presented as visually as possible with a bare-minimum of typing required(only to enter your name if a user would like to save their score).
Font
There is only one font used throughout the quiz which is Rubik. This font was chosen for its visually clarity and ability to stand out on the page especially in its heavier weights.
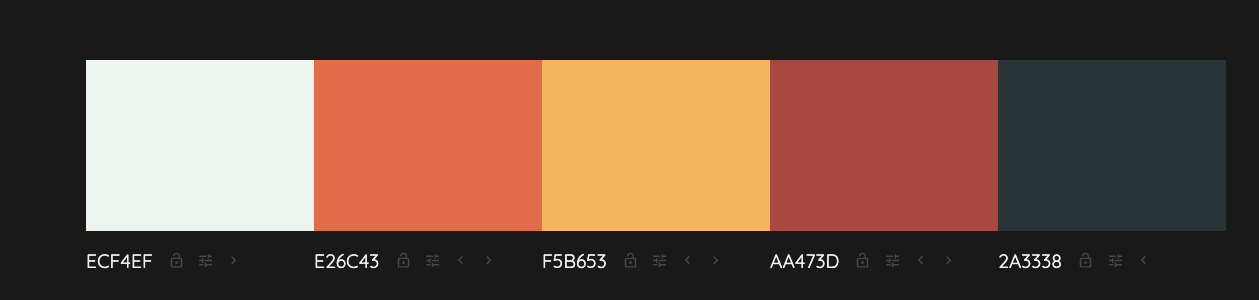
Colours
The main consideration behind the colour palate of this site is having a primary background colour that does not clash with the flag. Colour is obviously very important in distinguishing flags and a background colour that is close to the white or red end of the spectrum would cause a lot of problems due to the high prevalence of those colours in world flags. As this site is aimed at front-end interactivity the buttons which a user presses needed to be of a significant contrast to the background as a call to action. Considering these factors, the following colour palette was created using the generator in Colormind.
See this website for flag colour statistics. Statistics on flag Colours.
Red and green are used throughout the site for negative and positive feedback (for incorrect/correct and for time running out and scoring ) in order to create a quick and text-free way of passing information on to the user.
Features
Existing Features
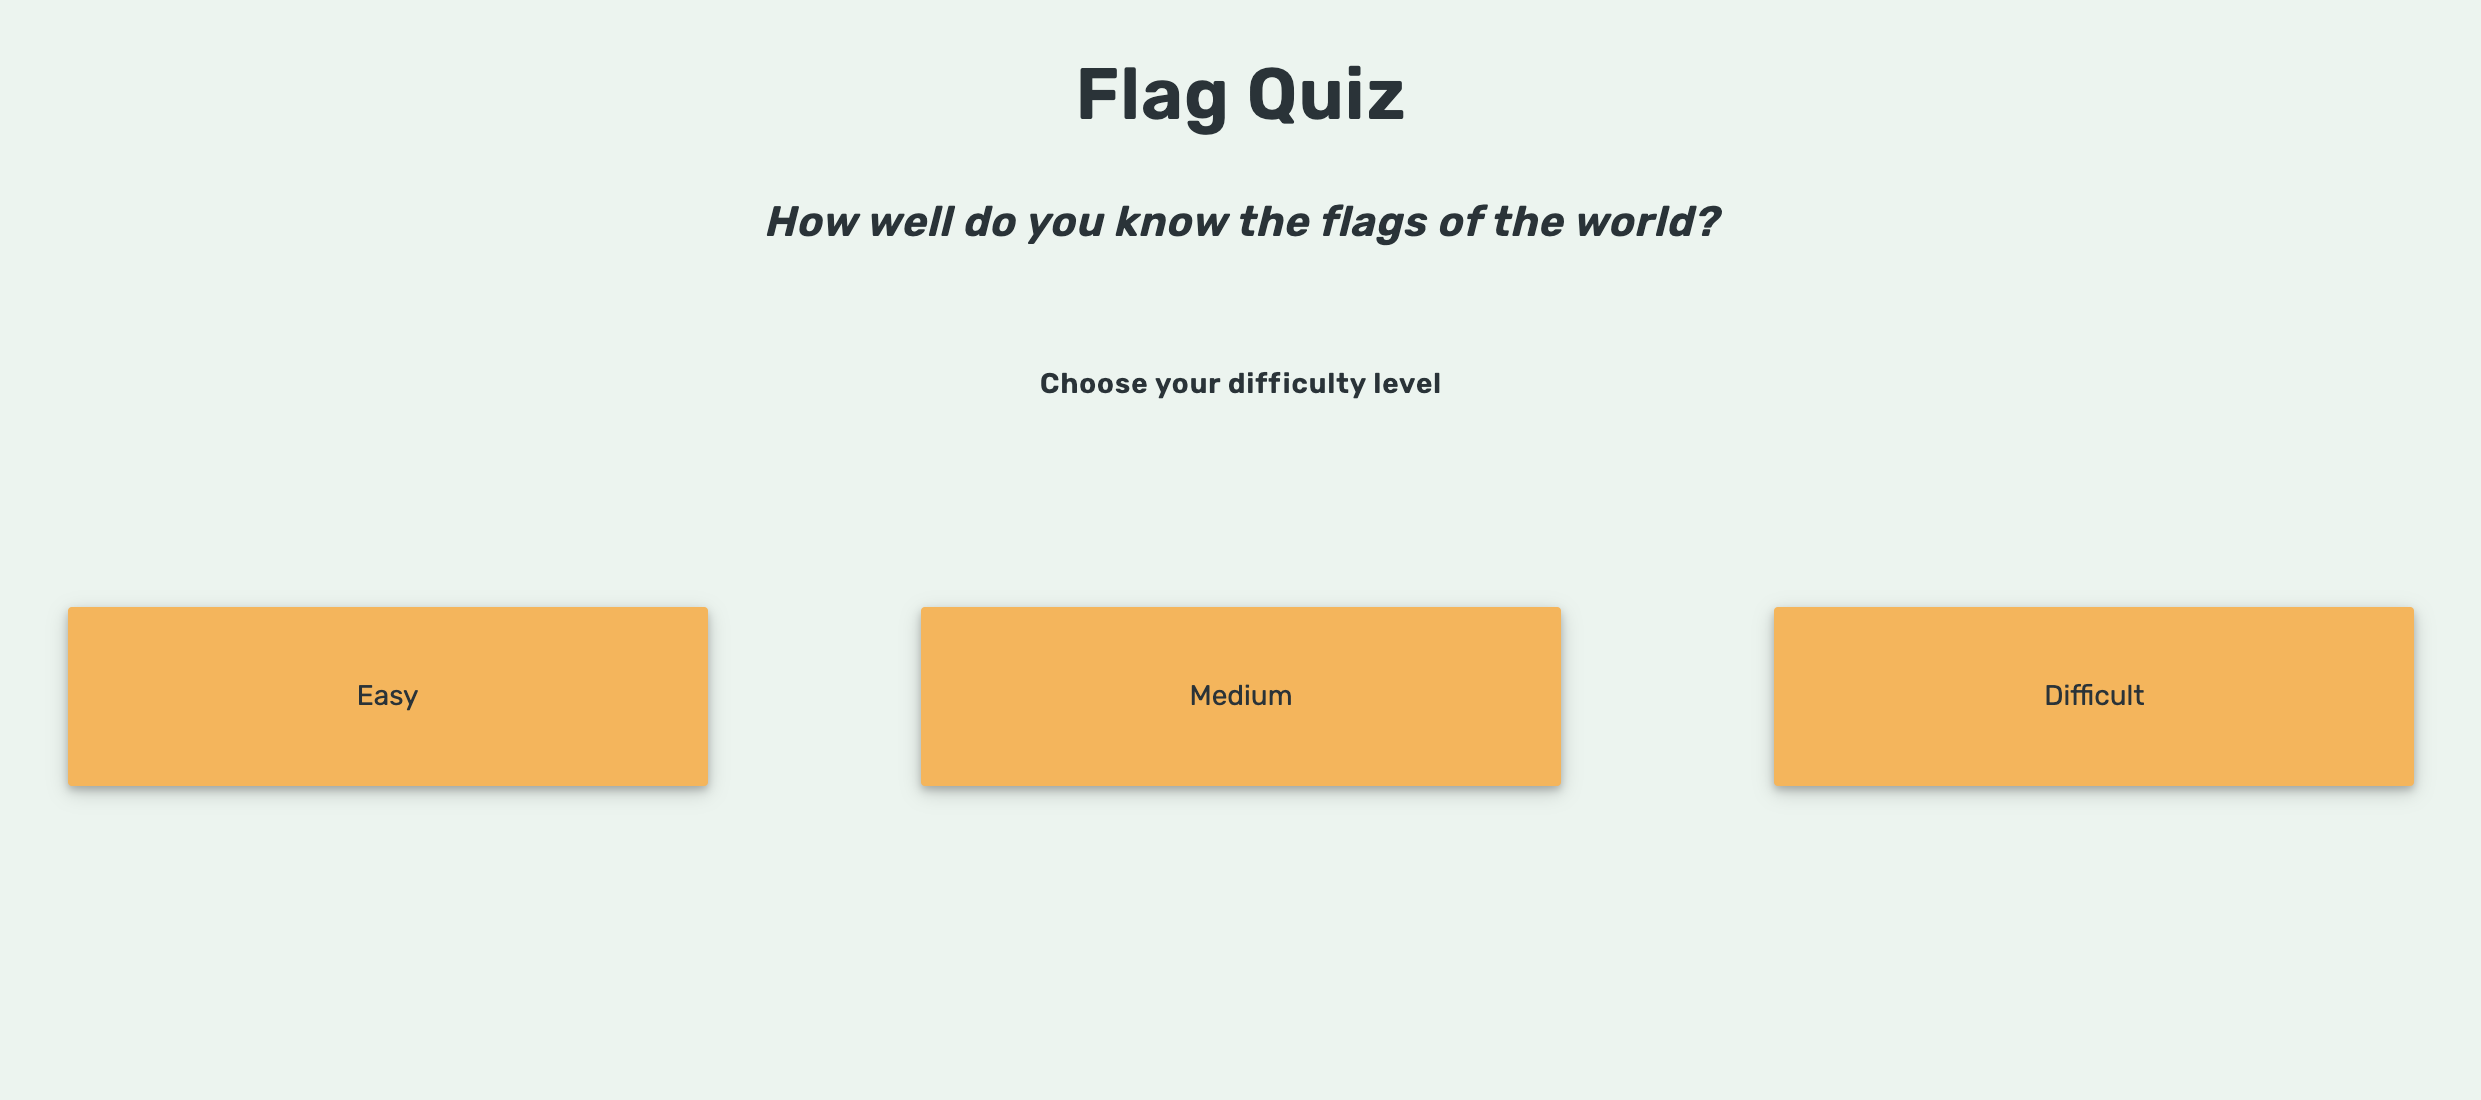
Homepage
The homepage has a main title which reads Flag Quiz, a sub-heading asking the user ‘How well do you know the flags of the world?’ and a final line of text inviting the user to choose a difficulty level.
Below the text are three large buttons with the three levels of difficulty, easy, medium and difficult.
Upon clicking on one of the buttons the quiz will start.
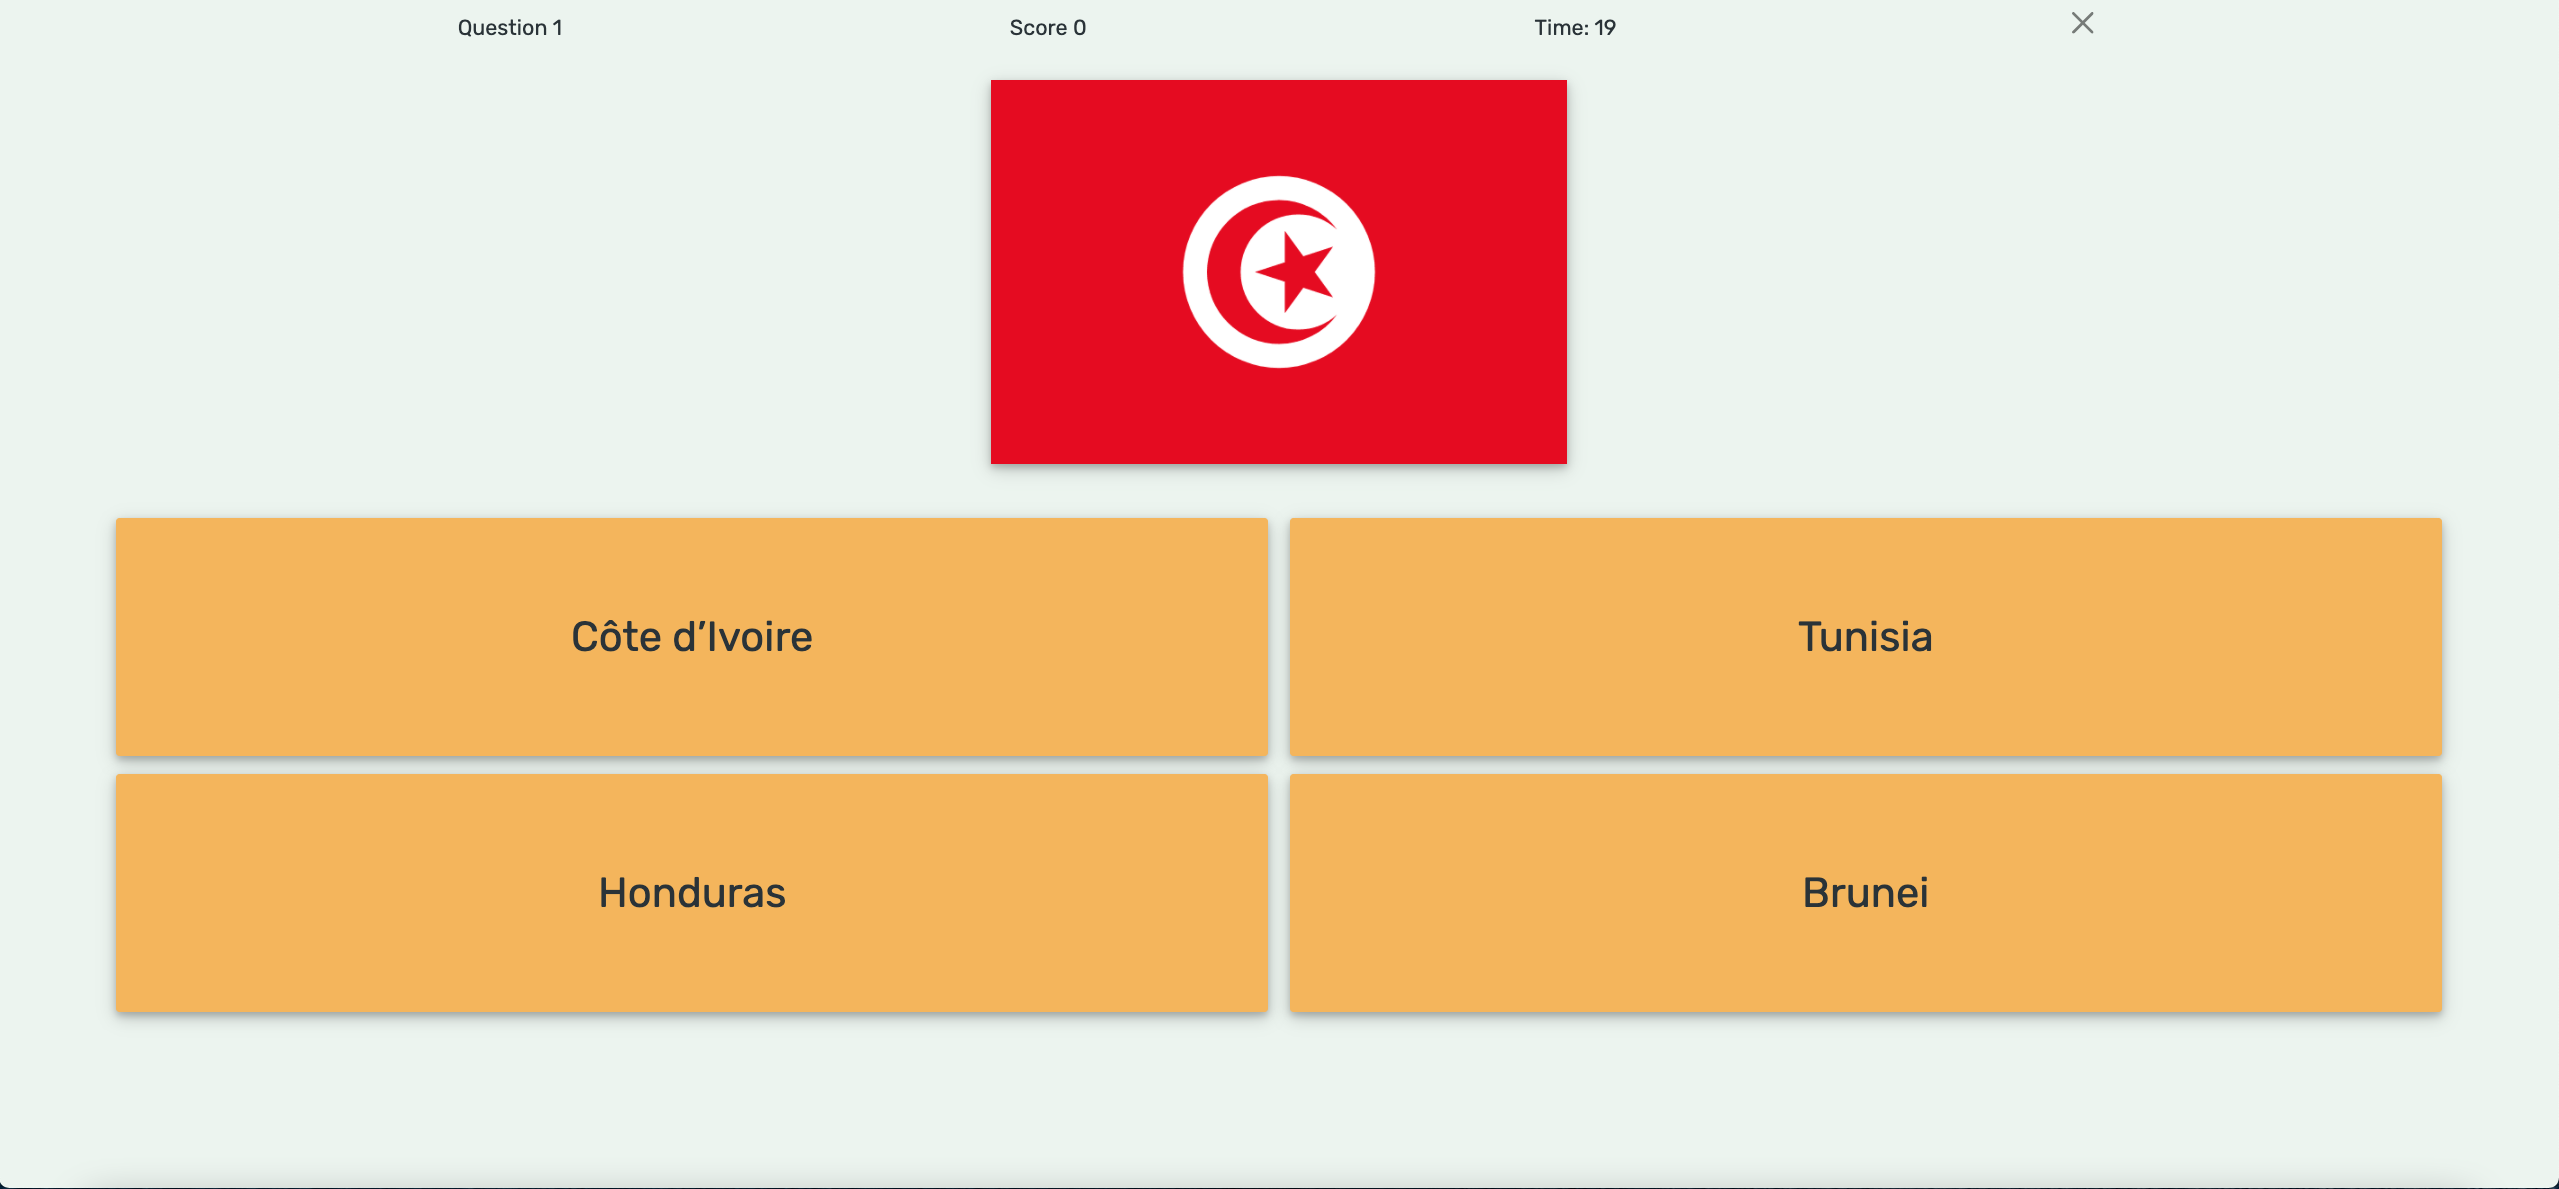
Main Quiz Page
Header
Along the top of the page the question number, score, countdown timer and a close button are evenly spread out.
If the user selects the correct answer the score information will flash green as it increases.
When the user has only 10 seconds remaining the timer will start to flash red.
Upon clicking the close button the timer will pause and a modal will appear to ask the user if they are sure they want to quit the quiz or if they want to return to the game.
Flag
A flag appears centered below the header and will change every time a user selects and answer until the time runs out.
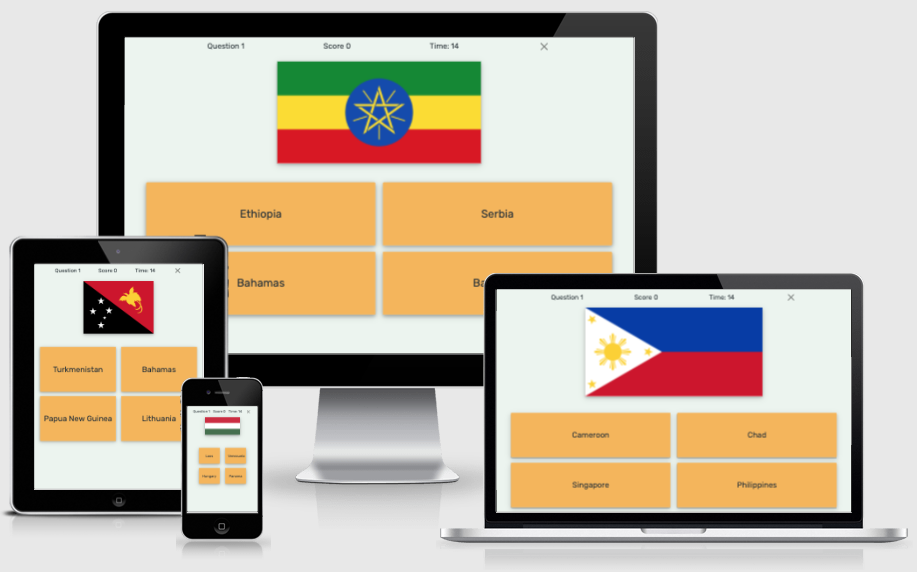
For mobile, tablet and laptop screen sizes the flags all have a fixed height and variable widths depending on the ratios of each flag. On larger screens the flags have a fixed width and variable height as the API does not allow for fixed height flags larger than 240pixels.
Answer buttons
Below the flags are four large buttons, each with the name of a different country.
If the user selects the correct answer for the displayed flag, the button’s colour will change to green and the next question will appear after 1 second.
If the user selects an incorrect answer for the displayed flag, the selected button’s background will change to red and the correct answer will be highlighted in green for 1 second until the next question appears. **
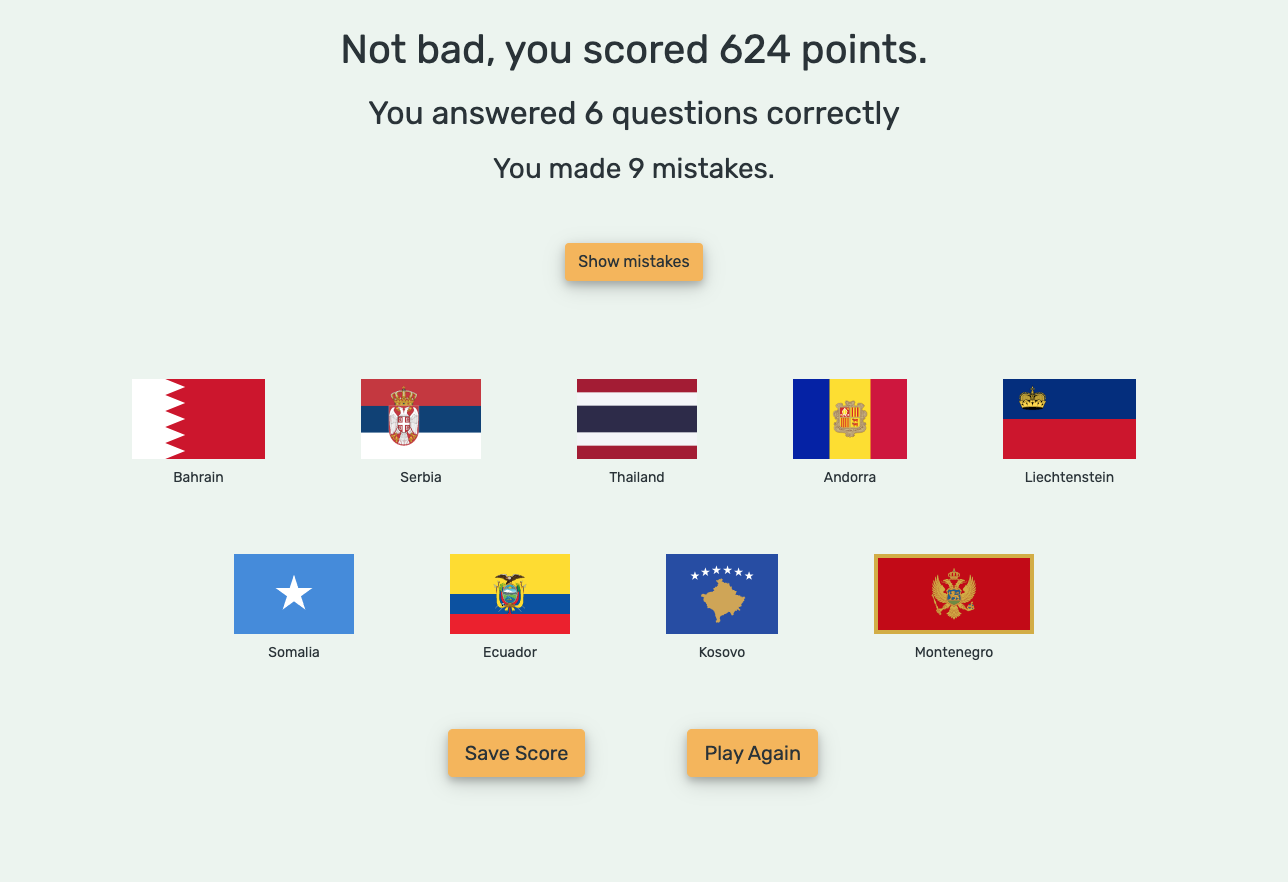
Scorepage
The default scorepage shows a message giving the user their total score and how many questions they answered in the 30 second time-limit.
If the user scored zero the message will read “Oh dear… you scored 0 points”.
If the user answers more questions wrong than right then the message will read ‘Not bad, you scored (X) points”.
If the user answers more questions right than wrong then the message will read ‘Well done, you scored (X) points”.
If the user answers all questions correct then the message will read ‘Outstanding, you scored (X) points”.
If the user made mistakes, a show mistakes button will appear below the text, which when clicked will show thumbnails of the flags they guessed incorrectly.
There are q further two buttons, one allowing the user to save their score, which when clicked will activate a modal prompting the user to enter their name.
After the user has entered their name a table will appear showing the names and scores of all site users and the save score button will be hidden to prevent the user re-saving their score.
The second button on the scorepage is a play again button which if pressed before saving the score, will ask the user if they want to save their score or if they want to go back to the homepage.
Testing information can be found in this separate file.
Deployment
This site was developed using VS Code and live server and committed and pushed to Github through the VSCODE’s source control options.
To deploy this page to GitHub Pages the following steps should be taken.
Log in to GitHub
Select the Flag-Quiz-MSProject-2 repository
Click on Settings
Select the Pages tab on the left sidebar.
In the Source settings click on the dropdown menu that is currently displaying None.
In the Select Branch settings change from None to Master.
Click on Save and the link to the deployed page will appear automatically in a green box with a tick stating “Your site is published”.
To run this site locally the following steps should be taken.
To run this site locally the following steps should be taken.
Run in Gitpod
To run this site locally the following steps should be taken.
Download Gitpod extension in chrome
Log into Gitpod
Go to the Github projects and select the Flag-Quiz-MSProject-2 repository.
There should be a green Gitpod button on the top right next to the Code button
Click the green Gitpod button
A Gitpod workspace will load allowing the user to work locally.
Run in an alternate IDE
Go to GitHub projects and select the Flag-Quiz-MSProject-2 repository.
Above the list of files click the Code button.
In the Clone with HTTPs section, copy the clone URL for the repository.
In your local IDE open the terminal.
Change the current working directory to the desired location.
Type git clone, and then paste the URL you copied in Step 3.
Press Enter. Your local clone will be created.
Credits
Code
Part of the addName function was adapted from an answer to this stackoverflow post.
The compare function was taken from an answer to this stackoverflow post.
Content
This site relies heavily on Flagpedia API in order to display the flags during and after the quiz programmatically.
The difficulty levels and resulting scoring system were adapted from these statistics from Sporcle’s Flag quiz showing how often flags were guessed correctly by players.
Acknowledgements
My CodeInstitute mentor, Antonija Simic, for her thorough and constructive feedback.
My friends and family for helping testing the site.
In phpMyAdmin, create a database named achilles_gym (Character Set should be Collation), and then import achilles_gym_final.sql located in the project’s root.
Además de Hyprland, hay varios otros entornos de escritorio populares disponibles para Arch Linux. Si estás interesado en explorar otras opciones, aquí tienes una recomendación:
Qtile
Qtile es un gestor de ventanas dinámico para X11 que se configura completamente en Python. Es ligero y altamente personalizable, lo que lo convierte en una excelente opción para aquellos que prefieren un entorno de escritorio más minimalista.
Si deseas explorar la configuración personalizada de Qtile, echa un vistazo a mis dotfiles. de Qtile en GitHub.
Debido a que la instalación puede variar, lo más recomendable es dirigirnos directamente a la guide installation y seguirla paso a paso para Arch Linux.
Definir la distribución de teclado y fuente en consola
Para configurar la distribucion de teclado en español
loadkeys es
Es posible que el tamaño de la fuente sea demasiado pequeño. Por ahora, podemos ajustar esto utilizando el siguiente comando:
setfont ter-118n
Conexion wifi
iwctl
station wlan0 scan
station wlan0 get-networks
station wlan0 connect SSID
Particionar y formatear el disco
Optaremos por utilizar cfdisk debido a su facilidad de uso
cfdisk
Particionamos el disco utilizando cfdisk de la siguiente manera:
300 MB – EFI SYSTEM
15 GB – SWAP
Resto del espacio – /
Para ver las particiones fuera de cfdisk, podemos utilizar el siguiente comando:
lsblk
Procedemos a formatear la partición SWAP
mkswap /dev/sda2
swapon /dev/sda2
Procedemos a formatear la partición ROOT
mkfs.ext4 /dev/sda3
Procedemos a montar los sistemas de archivos
mount /dev/sda3 /mnt
Montamos la partición EFI
mount --mkdir /dev/sda1 /mnt/boot
Instalar paquetes esenciales
pacstrap /mnt base base-devel linux linux-firmware linux-headers mkinitcpio networkmanager sudo grub efibootmgr nano iwd git
Configuración del sistema
Generamos un archivo fstab que contiene las particiones del sistema, utilizando UUID para montarlas automáticamente al inicio
genfstab -U /mnt >> /mnt/etc/fstab
Cambiamos el entorno de trabajo al sistema instalado en /mnt, permitiendo realizar configuraciones como si estuviéramos en el sistema recién instalado
arch-chroot /mnt
Creamos un enlace simbólico a la zona horaria deseada, configurando la hora local del sistema
Reiniciamos el sistema, y si aparece el gestor de arranque de Arch, todo habrá salido correctamente.
umount -R /mnt
reboot
Ahora creamos las carpetas personales básicas (Escritorio, Descargas, Música, etc.). Para ello, instalamos la herramienta xdg-user-dirs:
sudo pacman -S xdg-user-dirs
Finalmente, lo ejecutamos para generar nuestras carpetas
xdg-user-dirs-update
Hyprland
Instalacion y config automatica
Podemos ejecutar el script “install.sh” para instalar automáticamente todos los paquetes necesarios y copiar los archivos de configuración (dotfiles). Para hacerlo, simplemente ejecuta el siguiente comando:
./install.sh
Una vez completada la ejecución, será necesario reiniciar el sistema para aplicar todos los cambios. Después de esto, la instalación estará finalizada
Atajos de telcado
A continuación se presentan los atajos de teclado configurados en mis dotfiles para facilitar el uso y la navegación. La tecla mod corresponde a la tecla de Windows:
Sistema
Acción
Atajo
mod + ENTER
Abre una terminal (Kitty)
mod + E
Abre el explorador de archivos (Nemo)
mod + M
Abre el lanzador de aplicaciones (Rofi)
mod + B
Abre el navegador web (Brave)
mod + C
Abre el editor de código (VS Code)
mod + S
Realiza una captura de pantalla
mod + L
Bloquea el escritorio (Swaylock)
mod + W
Cierra la ventana activa
mod + F
Convierte una ventana a flotante
mod + Space
Pone la ventana en pantalla completa
Focus
Acción
Atajo
mod + H
Mueve el foco a la izquierda
mod + L
Mueve el foco a la derecha
mod + K
Mueve el foco a la arriba
mod + J
Mueve el foco a la abajo
Move
Acción
Atajo
mod + ALT + H
Mueve la ventana a la izquierda
mod + ALT + L
Mueve la ventana a la derecha
mod + ALT + K
Mueve la ventana a la arriba
mod + ALT + J
Mueve la ventana a la abajo
Resize
Acción
Atajo
mod + SHIFT + LEFT
Redimensiona la ventana activa hacia la izquierda
mod + SHIFT + RIGHT
Redimensiona la ventana activa hacia la derecha
mod + SHIFT + UP
Redimensiona la ventana activa hacia arriba
mod + SHIFT + DOWN
Redimensiona la ventana activa hacia abajo
Creditos
Agradecimientos a @f3l3p1n0 por los dotfiles iniciales. Mi trabajo se basa en sus contribuciones.
Este proceso optimiza los servidores de espejo (mirrors) utilizados por pacman para mejorar la velocidad y eficiencia de las descargas de paquetes. A continuación, los pasos para actualizar tu lista de servidores:
Para habilitar el uso de la función de compartir pantalla en tu entorno, simplemente instala los siguientes paquetes. La configuración necesaria ya está incluida en los dotfiles para que funcione correctamente:
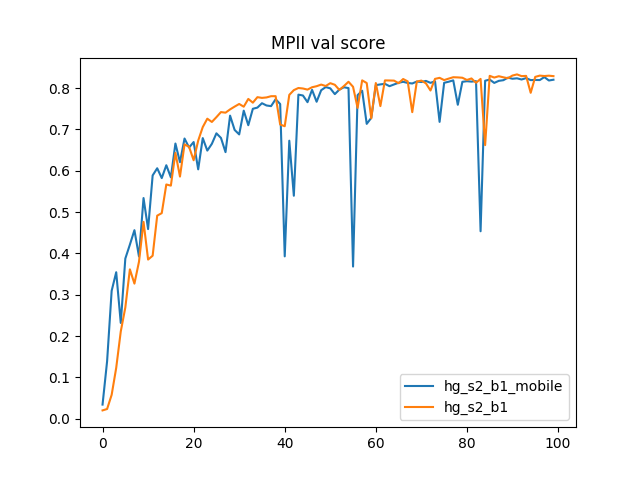
This is a Keras implementation for stacked hourglass network for single human pose estimation. The stacked hourglass network was proposed by [Stacked Hourglass Networks for Human Pose Estimation] (https://arxiv.org/abs/1603.06937). The official implementation built on top of torch is released under pose-hg-train, and pytorch version wrote by berapaw in repo pytorch-pose. Most of code for image processing and evaluation come from above repos.
Folder Structure
data : data folder, mpii
images : pictures for demo
src : source code src/data_gen : data generator, augmentation and processnig code src/eval: evaluation code, eval callback src/net : net definition, hourglass network implementation src/tools: tool to draw accuracy curve and convert keras model to tf graph. top: top level entry to train/eval/demo network
trained_models : folder to restore trained models.
Arguments: gpuID gpu id, epochs number of epoch to train, batch_size batch size of samples to train, num_stack number of hourglass stack, model_path path to store trained model snapshot
Note:
When mobile set as True, SeparableConv2D() is used instead of standard convolution, which is much smaller and faster.
A powerful tool to organize your files and folders based on pre-defined rules, saving you time and effort in maintaining a clean and efficient digital workspace.
Key Features
Flexible Rule Creation
Define rules to automatically move files based on extension (e.g., PDFs to a “Documents” folder, images to a “Pictures” folder).
SQLite Database Integration
Store rules persistently for easy access and management.
User-Friendly Interface
Interact with AutomaDesk through a visually appealing Tkinter GUI.
Renaming Functionality
Rename files using customizable patterns for enhanced organization.
Search Capability
Locate specific files within your designated source directory.
Tech Stack
Python (Core functionality)
Tkinter (GUI development)
SQLite (Database storage)
Installation
Prerequisites
Ensure you have Python 3 installed on your system. You can download it from Python Official Website.
Clone the Repository
Use Git to clone this repository to your local machine:
Execute the main script (automadesk.py or similar) from your terminal.
Source Directory
Specify the directory containing the files you want to organize.
Rule Management
Creating Rules
Enter the file extension in the “File Extension” field (e.g., “.pdf”).
Specify the destination folder in the “Destination Folder” field (e.g., “C:/Documents”).
Click the “Save Rule” button to establish the rule.
Viewing Rules
The “Current Rules” section displays the existing rules.
Deleting Rules
Enter the extension of the rule you want to remove in the “File Extension” field.
Click the “Delete Rule” button to confirm removal.
Organize Files
Once rules are defined, click the “Organize Files” button to activate file organization based on the established rules.
Renaming Files
Click the “Browse” button next to the “File” field to select a file for renaming.
Enter the desired new filename in the “New Filename” field.
Click the “Rename” button to execute the renaming process.
Search Files
Type the search term for the files you want to locate in the “Search” field.
Click the “Search” button to initiate the search. Results will be displayed in a message box.
Customization
The code provides a solid foundation. You can extend it to accommodate more complex rule-based organization, such as including subdirectories based on file content or creation date.
Consider implementing visual feedback (progress bars, confirmation messages) to enhance the user experience.
Contributing
We welcome contributions to this project! Feel free to fork the repository, make your changes, and submit a pull request. We appreciate your interest in keeping AutomaDesk a valuable tool.
License
This project is licensed under the MIT License. You are free to use, modify, and distribute it under the terms of this license.
Additional Notes
For advanced usage or troubleshooting, refer to the code comments and documentation within the project.
Consider creating a standalone executable using tools like PyInstaller to distribute AutomaDesk more easily (optional).